|
Building a Basic Computer - Part 1
|
This page has been updated. THIS is a link to the old Building a Basic Computer - Part 1 page.
|
Overview: In this tutorial, I go through the assembly process in the way that was easiest for me and most suited to the components involved. You don't have to install the components in the same order. Also, I prefer to sit down and work on a computer with the computer on a workbench that allows me to see the middle of the case at approximately eye-level. This means that, for most of the installation, the case will be standing up. If it's more comfortable for you to work from a different position (standing, bending over the computer and having the case lay down) then that's how you should do it. It's generally impossible to know what kind of quality you can expect when you buy computer parts. Even the most respected manufacturers sometimes produce turkeys. If you want to have the best chance at selecting the most reliable computer components, it's helpful to read the reviews at the various online retailers. Newegg is one site that has helpful reviews/feedback. For example, you can select an item, make a few selections to show the range of options you want (price, etc...) and then sort by the best reviews. If you purchase an item that has both a lot of reviews and mostly good reviews, you increase your chances of buying a reliable item. Of course, this isn't foolproof but it has worked well for me in the past. At one time, it was cheaper to build your own computer, compared to buying one from Dell or HP. Now, it's really difficult to build a system that's cheaper than you can get from someone like Dell. If you never plan on upgrading a computer and simply want a computer that works well, it's probably best to buy one pre-built. If you think you may want to upgrade, it's probably better to build one. For example, some of the Dell computers used BTX cases. This means that you won't easily be able to replace the motherboard if it fails. Another problem is drive mounting locations. Many of the pre-built computers have only a few places to mount drives. As an example, you can see that this case only has 2 hard drive bays. The case you'll see later on this page is a common ATX case and it has 5 hard drive bays. If you build a computer, it's much more likely to have plenty of drive bays to mount drives. If you can't decide whether to buy or build, keep reading. It may help you make up your mind. When searching for new computer components, you may be lured in by low prices based on the rebate they offer. Do NOT rely on the rebates. Many times, they find some reason not to send your rebate. Everything (EVERYTHING) must be PRECISELY as they say it must be. If you fail to follow their instructions, you will not get the rebate. In many instances, the rebate will take several months to be issued. Most rebates require that you remove the UPC barcode from the box. If you remove the barcode, it may be impossible to get a refund for the item if it doesn't work well for you. If you decide to purchase an item that has a rebate and getting the rebate is important to you, download and very carefully read the rebate form. Selecting the Items You'll Need: When choosing a computer case, you'll have to take several things into consideration. For most people, the appearance is important. For me, it doesn't matter as long as it's functional. I don't have a limitless budget for computers and I'd prefer to spend as much of the budget on higher quality electronic components than on a fancy case. For some, their computer has to look nice. That could mean an elegant case (a 'designer' case from a manufacturer like Lian Li) or they may want something with lots of LEDs and a clear side window. Cheap cases that will do the job can be purchased for $20 without the power supply and about $35 with a power supply. High-end cases can cost $300 or more. Before you select a case, please read all of this page and the second computer building page. They will help show you various problems associated with common computer cases and will help you make a better decision as to what type of case you want. The power supply for a basic computer is relatively inexpensive. For the most basic computer, you can use a $25 supply. Sometimes the cheap supplies are perfectly reliable. I have some that were only about $20 and they are still working 6+ years later. If you want a high-performance computer, you'll have to spend more. If you intend to do computer gaming with the latest greatest software and graphics cards, expect to spend $150-350 on a power supply. Again, the cost of the motherboard will depend on what you want to do with the computer. For a basic computer, expect to spend ~$60-80 on a motherboard. Motherboards for high-end gaming can cost $400 or more. The CPU will, for the most part, determine how fast your computer is. This doesn't mean that you have to buy the fastest processor to have acceptable speed but if you do a lot with your computer, you'll likely want at least a dual core computer. If you intend to do processor intensive tasks like video encoding or gaming, you'll want to buy a high-end processor. The HSF (heatsink and fan) are included with the 'retail' versions of most microprocessors. If you buy an 'OEM' processor, it probably won't come with a fan (and may have a shorter warranty). The HSF supplied with most processors is easily good enough for most computer users. Only those who intend to push their processors to the limit (especially if they overclock the processor) will need a better heatsink and fan. For most computers, as long as you have 'enough' memory, the computer will perform as well as it can. If you're short on memory, the performance will suffer. If you install significantly more memory than you need, it's likely a waste of money. When the computer is off, everything is stored on the hard drive. Unless you store thousands of songs or hundreds of videos on your drives, there's no need to buy a huge drive. There's a tendency to buy 1TB, 2TB, 3TB... drives. It's good to have plenty of storage but you have to remember that hard drives fail and if you have everything on one drive, it's all lost when the drive fails (and it will fail, sometimes in a few months, sometimes after a few years but it will fail), all of that information will be lost. I recommend using multiple smaller drives and backing up any really important data. Many people are opting to use a solid state drive (SSD) for their programs and operating system and a conventional drive (spinning platters) for storage of large files. The SSD will make a huge difference in performance. The difference (from my experience) can be a program (like Firefox) taking 15 seconds to load (from a conventional drive) or loading in less than 2 seconds (from an SSD -- actually two SSDs in a RAID0 configuration). The SSDs are more expensive (relative to the storage capacity) but it's generally worth the additional cost because the computer becomes so much more responsive. These are generally chosen for features/capability instead of performance. If you never intend to use Blu-ray discs with your computer, you don't need to spend the extra money on one. A $25 DVD burner will suffice. Some motherboards have integrated (on-board) graphics adapters and the video performance is good enough for anyone that doesn't intend to do any computer gaming. If you want to play high-end games with your computer, you'll have to buy a discrete video card. If you want to play the most complex games with high frame rates with fine textures, you'll have to spend more money than if you want to play simpler games. the cost of discrete cards for light gaming will start at ~$100. For the best graphics, the cost can be greater than $1000 (multiple expensive video cards). Most motherboards come with enough cables to get a computer up and running but you may need to buy additional cables. Airflow is important, especially for high performance computers. If you are going to build a high performance computer, you will have to buy multiple fans. Expect to pay more for higher quality fans. You may also want to use fan controllers. These allow you to slow down your fans when they're not needed. Most have controls that mount in a front/external drive bay. Some have thermistors to sense the temperature of the component that a particular fan is cooling and altering the speed of the fan as that component begins to heat up. When trying to put together a system, many people forget about the operating system. The operating system is the software that allows you to control/explore the computer. Without the operating system, the computer is nothing more than a paperweight. For most people, Windows is the OS (operating system) of choice but it's not the only choice. Various distributions of Linux (Ubuntu, Suse...) are available at little or no cost. These are OK for those willing to learn new software but it has limitations. For example, there aren't nearly as many games that can be played in Linux. It may be possible to play some through Windows emulators but that's something else that you have to learn. Windows is the most well known operating system so that's what most people use. Windows, however, isn't free. It's possible to find bootleg or pirated versions but they cause more problems that they're worth. A legitimate version of Windows will cost about $100. Having a legitimate copy of windows will allow you to get all updates which will help keep your system as safe as possible. When buying a copy of Windows (always buy from a reputable retailer to ensure that you are buying a legitimate copy), there will be several options. The most basic version will do everything that most people need to do. Higher versions add greater security and are a better choice for people who need to better secure their files. There are also choices for an OEM version or a retail version. For the OEM version, you are allowed to install it once. When you register/authenticate with Microsoft, the operating system will be linked to your motherboard. It cannot be installed on another computer, even if it's un-installed from the original computer. If the motherboard fails and an exact make/model motherboard isn't available, you may have to buy a new copy of Windows to reinstall it. There are instances where Microsoft will issue another key but don't expect it. The 'retail' version is a bit different. It can only be installed on one computer at a time but can be installed a new computer (after un-installing it from the previous computer) if you need to upgrade or replace a motherboard. Microsoft allows you to do this a limited number of times but more than enough for most all users. The OEM versions start at about $100-$130. The retail versions start at about $179. Some computer sites will sell 'combo' deals. These often give a discount over the cost of buying the components individually. There are a couple of things that you have to be aware of. The first is that they're rarely complete. Sometimes, they leave out the operating system, hard drives or other components. Carefully look over the items that are included to see what else you'll need to complete the computer. Sometimes, there is a problem with compatibility between the components. This doesn't happen often but it can happen. Sometimes one or more of the components will have a poor rating (in reviews). Check the reviews of all of the components to make sure that none of them have any serious issues. Combo deals can be a good way to buy components but you can generally put together an equal or better system for about the same price if you take the time to do a bit of research. If you have questions about the selection of computer components for your new computer, feel free to email me.
A Few Notes...
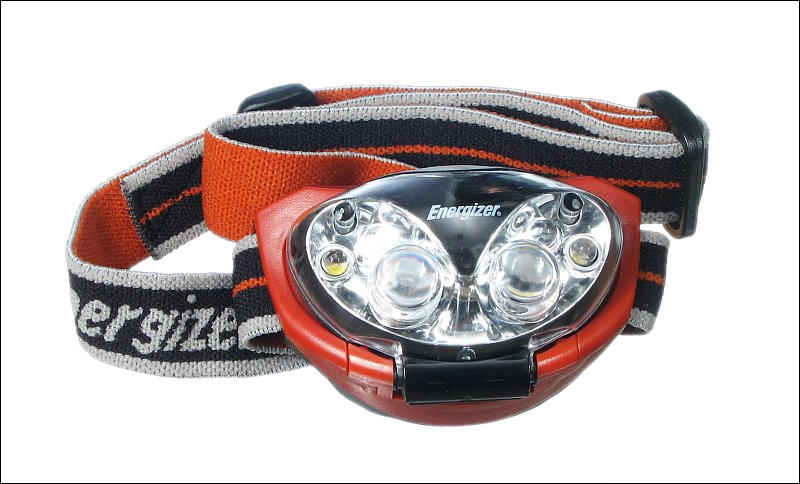
 Another option is a headlamp like those used by campers or hunters. The following is an inexpensive headlamp. They're good enough but the quality of the LEDs isn't great (inconsistent color and pattern). If you have other uses for a good headlamp, something like the Fenix HP11 is good. With the diffuser, it produces a very white, even field of light.
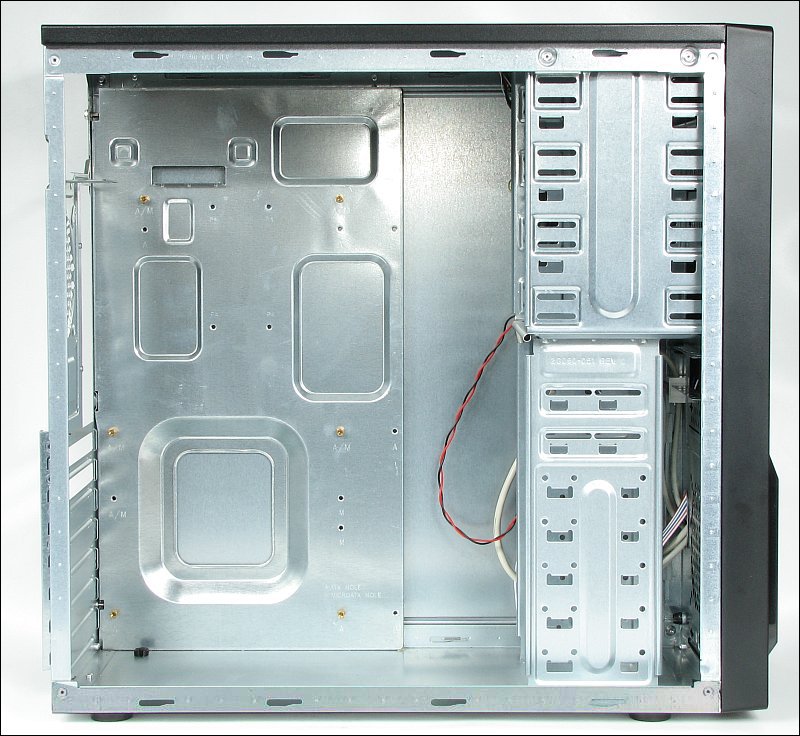
Below, you can see the empty computer case with the side cover removed. Two screws on the back edge of the cover is all that holds it in place. Remove the screws, slide the cover back about 1/2" and pull it off of the side of the case. Later the other side will have to be removed. For most cases, the other side is removed the same way but on some cases, the other side isn't designed to be removed. It's held on with rivets that would have to be drilled out to remove it. This is never necessary.
 Below is the case from an angle. You can see all of the various 'drive bays'. The top slots are designed to hold 5¼" drives (CD/DVD/Blu-ray drives) and accessories (like card readers). The lower bays are for 3½" drives. These are commonly used for hard drives. In many cases, you need to use adapter brackets to securely mount 2½" drives. 2½" drives are laptop or solid state drives.
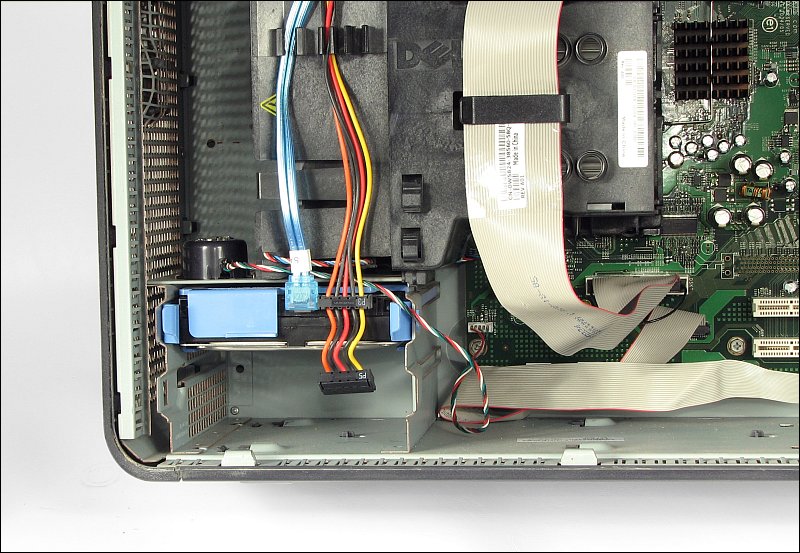
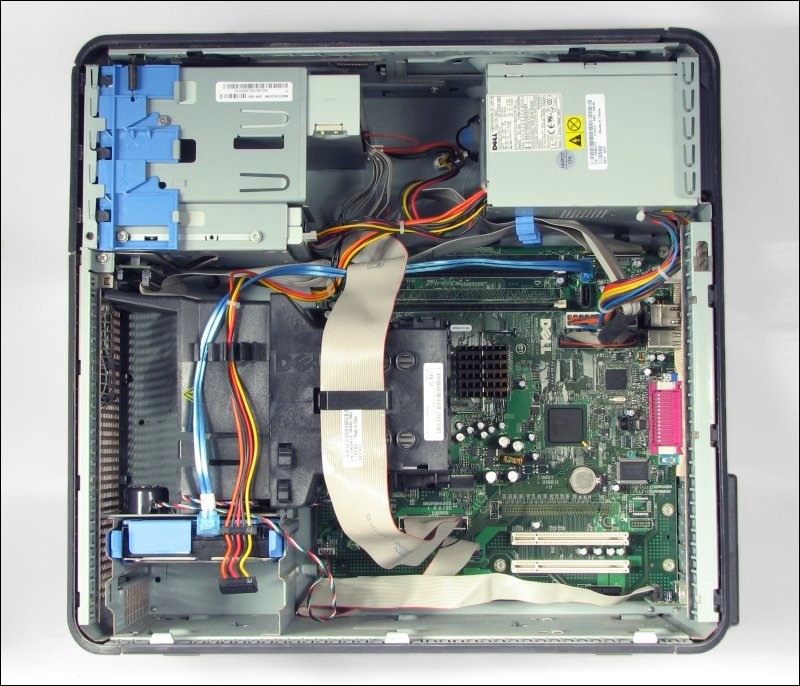
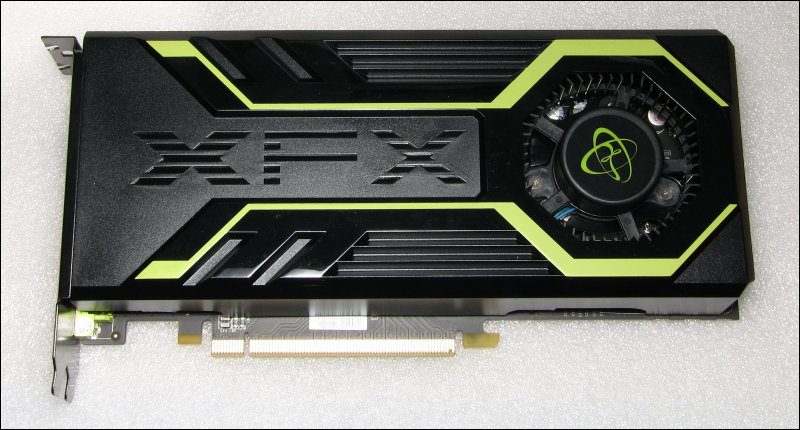
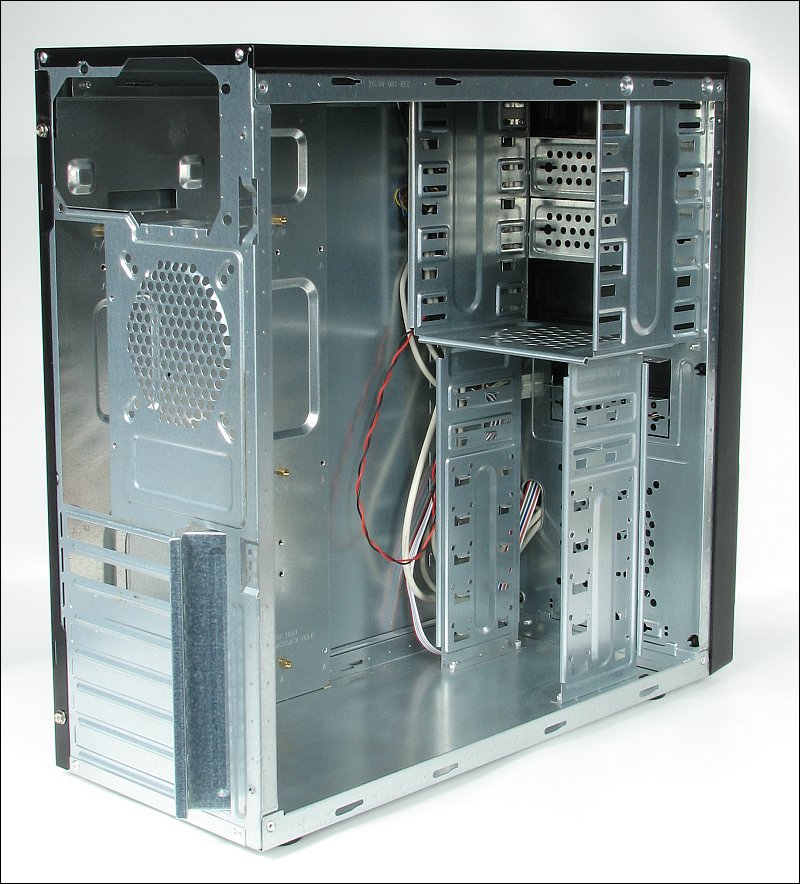 As a side note... This is an ATX case. What's important about that here is that the left side cover is removed to work on the computer. Some manufacturers like Dell use BTX cases. The main difference is that the cases are reversed. You access everything from the other side. For virtually all computers that you'll build, you will use ATX type boards in ATX cases. There aren't many BTX cases or board in the aftermarket and the cases and boards between ATX and BTX are not compatible. When ordering a computer case, you need to case that fits your motherboard. The two most common sizes (form factors) are the ATX and the micro ATX. A micro ATX board will fit into a regular ATX case but an ATX board will not fit into a micro ATX case. Even if you find a case that's made to hold an ATX board, it may be so small that the ATX board just barely fits. This often happens when you try to buy the least expensive case possible. When the board doesn't easily fit in the case, it can make it difficult to access the various drive connectors and could require that you buy additional cables (with right-angle connectors) to make the connections. This alone could make the cheap case more expensive than a case with a slightly higher initial cost. Cases that are designed for ATX boards range in depth (face of case to the rear panel of the case) from ~15" to ~20". This may not seem like a significant difference but it is. Earlier, graphics cards were covered. The graphics cards shown were relatively small, low end models. The low-end models are often no more than 6" long and very thin (no more than 1 slot wide). The newer cards are often much larger. They can be about 12" long and can require more clearance than that on the end to allow clearance for the power supply wiring/plugs. THIS one is only 9" long and was a relatively tight fit in a relatively large case. Many times, there is a problem with clearance with hard drives and you'll have to shuffle drives around to make room for the graphics card. If you're buying a case for a computer that is likely to be upgraded, buy one that's long enough to accommodate virtually any hardware.
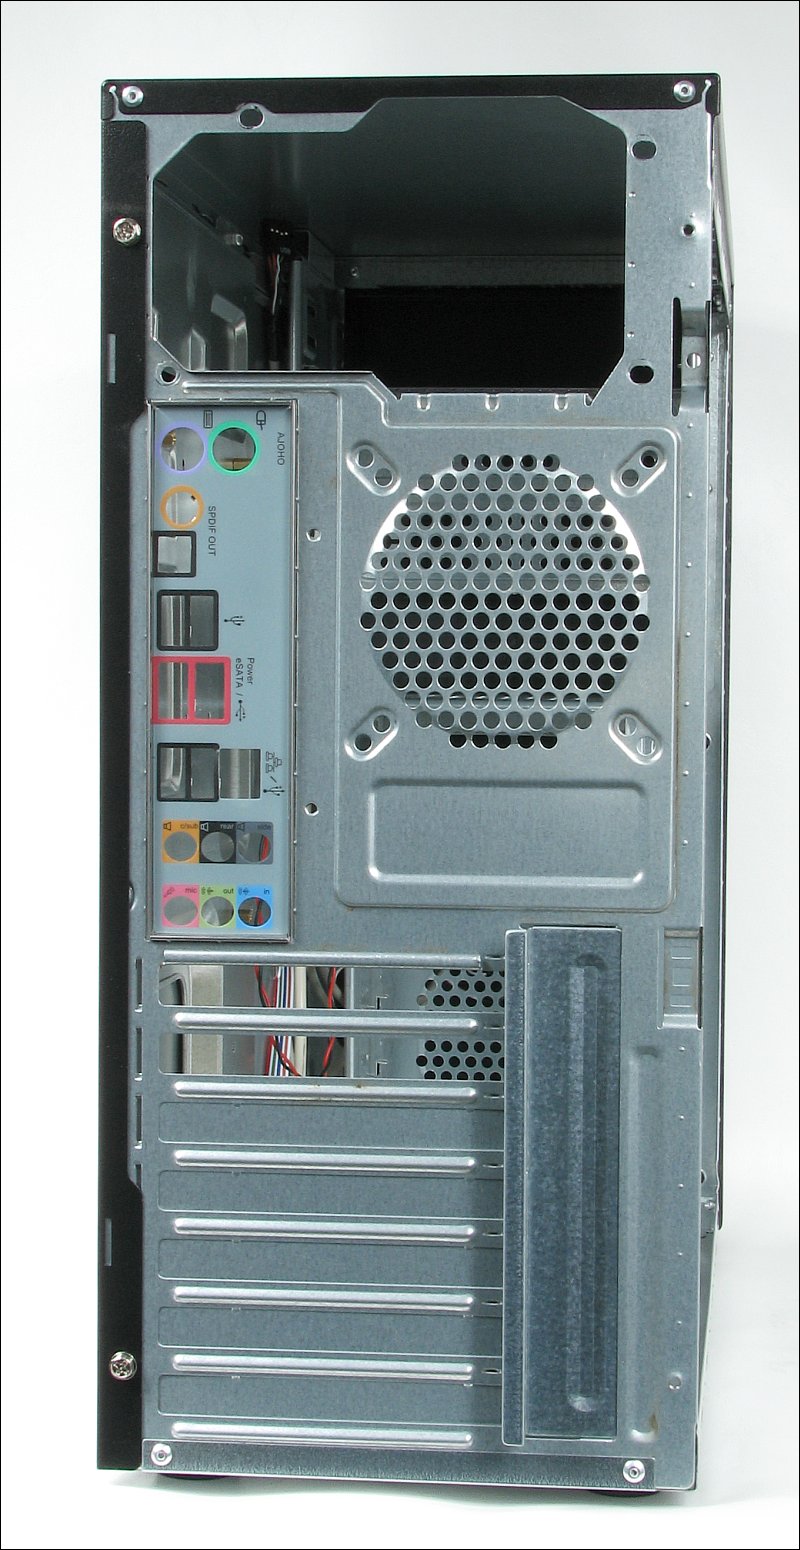
This is the rear panel of the computer case and is pretty typical for a budget case. At the top is a place for the power supply. Most computers have their power supplies at the top of the case but there are some that have the power supply at the bottom of the case. Below the power supply, you can see the I/O (input/output) panel. These are motherboard-specific so the cases are designed so that the corresponding I/O panel can be installed for the new motherboard.
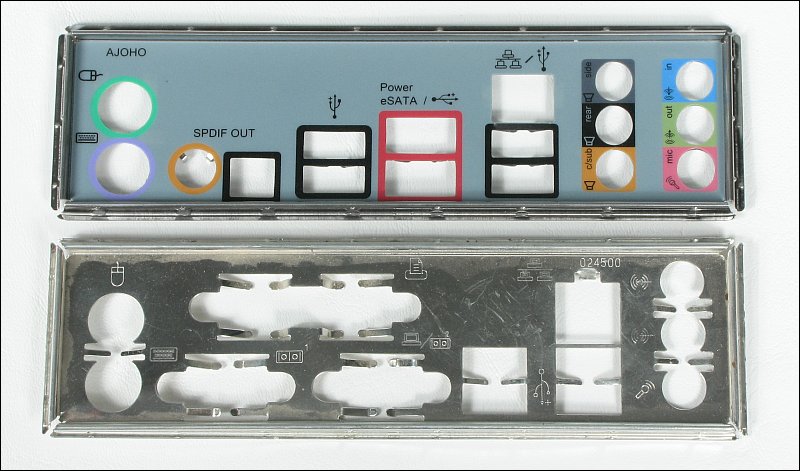
 Below, there are two I/O panels. As you can see, they're quite different and without replacing it in the case, the motherboard would not be able to be installed.
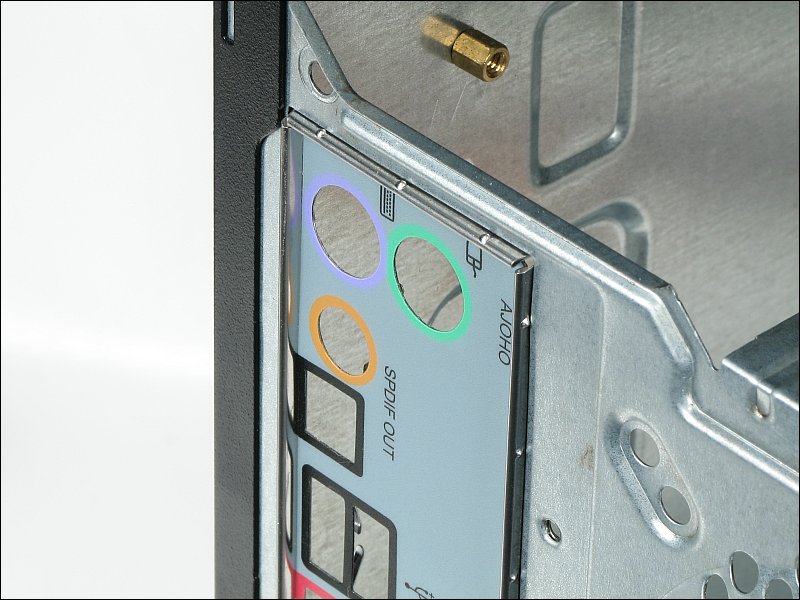
 The I/O panel is not mounted with screws. It snaps into the rear panel of the computer case from the inside of the case. Care has to be taken to get it fully snapped-in on all sides. If you don't, it will keep falling out when trying to install the motherboard or will prevent the motherboard from moving back far enough to allow the screw holes to line up with the standoffs in the case. Bear in mind that it will take a bit of effort to get the motherboard in place due to the grounding legs that contact the metal parts of the various connectors but you shouldn't have to strain to get it n place. When pushing the motherboard into place, do not apply force to any of the sockets or connector headers on the board. If you do, you could cause damage that would prevent the motherboard from working properly. Only apply force to the edge of the motherboard. Most of the I/O panels have the tiny bumps that have to be pushed beyond the cutout lip on the case. If they're not all out, it can make it VERY difficult to get the motherboard in place.
 There are various holes in the case that accept standoffs. The standoffs are sometimes stamped into the motherboard tray but the individual standoffs are more common.
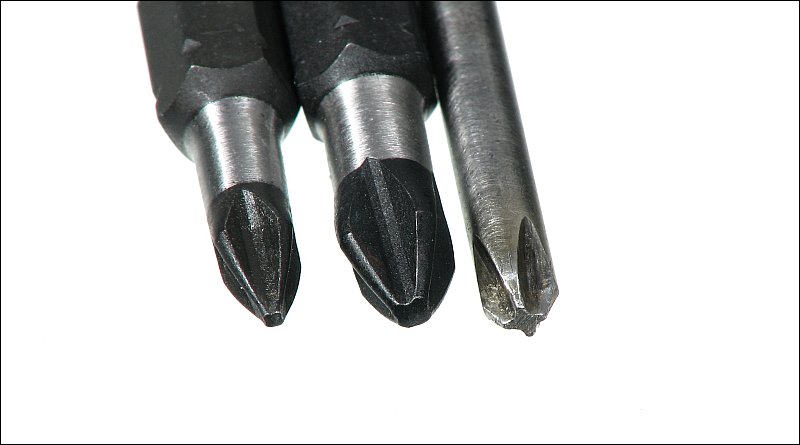
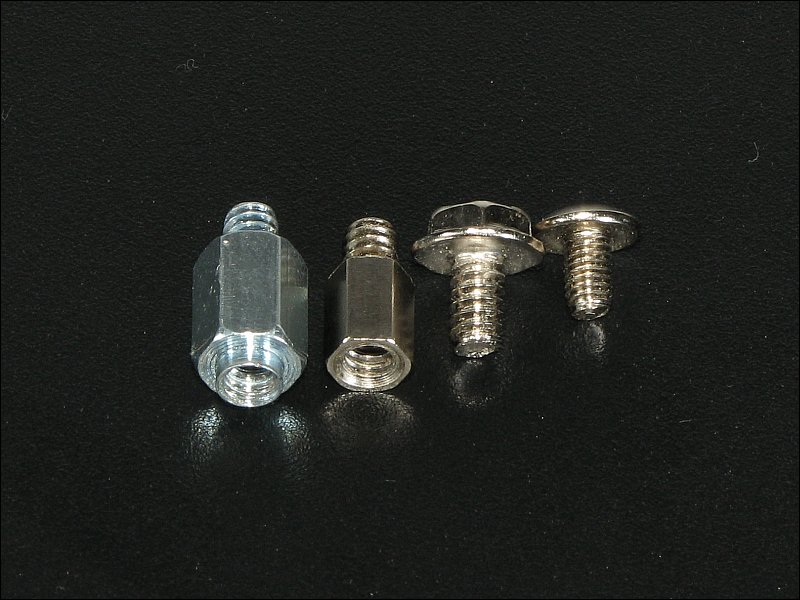
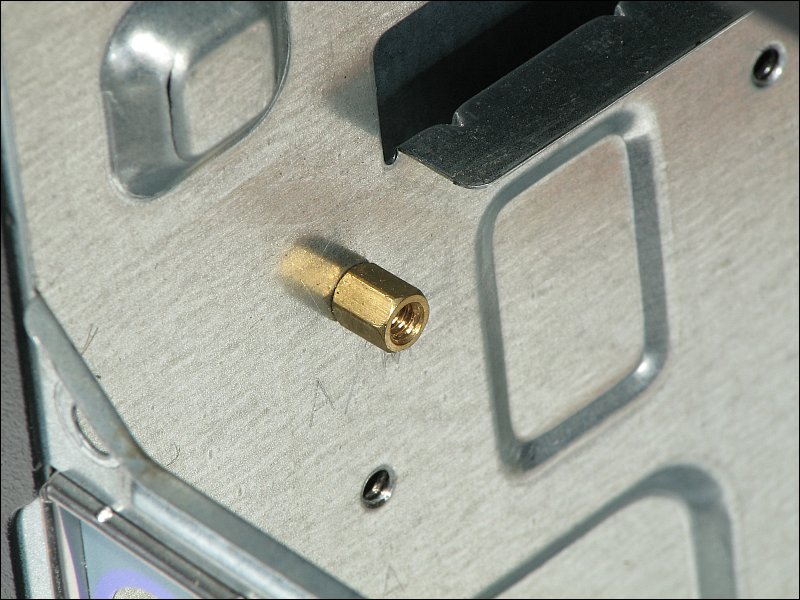 The standoffs can vary a bit and some are a bit more troublesome than others. The next image shows two types of standoffs and two types of screws. The standoff with the sleeve (that fits into the hole in the motherboard) can be better in that it centers the screw in the hole but if you're not careful and the sleeve isn't properly positioned in the hole when you tighten the screw, you can sheer off a small piece of the fiberglass on the edge of the screw hole. The ones with the flat tops are more common and you don't have to be concerned about damaging the hole. Virtually all of the standoffs take the #6-32 screws (the one on the left). This size screw is used at most of the attachment points in the computer. The one on the right is a 3mm screw with a 0.5mm thread pitch. These are typically only used for mounting the 5 ¼" and floppy drives. Standard hard drives use the #6-32 screws. It's important not to use screws that are too long. If you use the screws supplied with a computer case or motherboard, it's unlikely that any will be too long for any of the drives. If you have to obtain replacement screws, remember that, in most instances, all you need to do is get through a thin piece of sheetmetal plus a few threads.
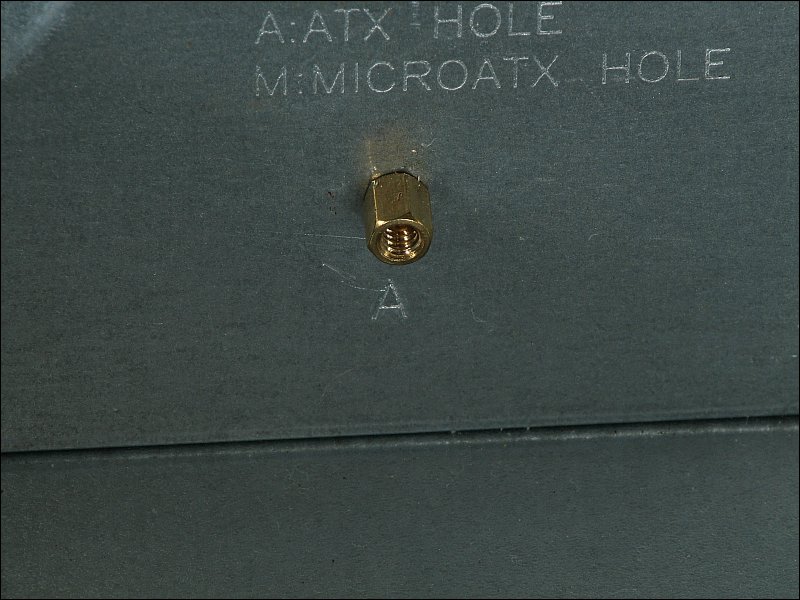
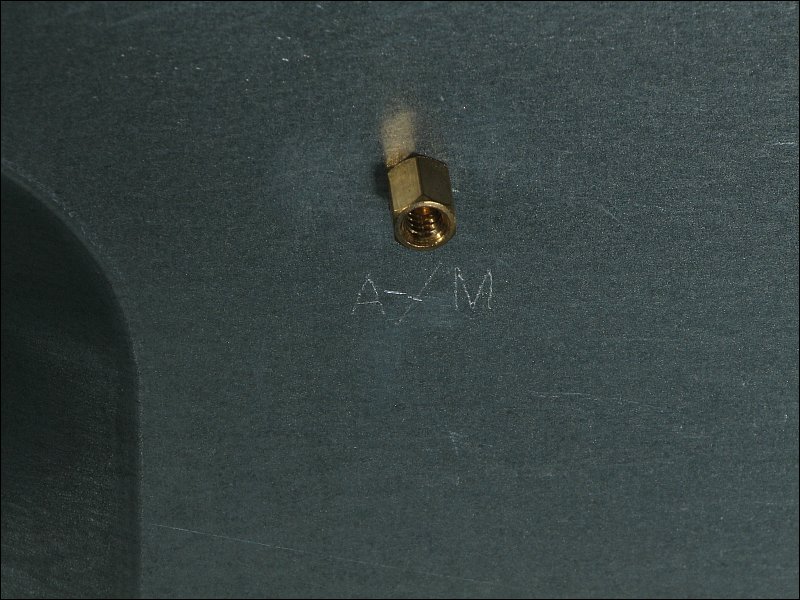
The holes in the motherboard tray are typically marked as to the type of board they're used with. In the images below, you can see that the markings are stamped into the tray. If they are not, the instructions that were included with the motherboard generally tell you which holes to use. The images below show you how this motherboard tray was marked. After finding the correct holes, you'll install the standoffs and tighten them (don't tighten too much, the sheetmetal of the motherboard tray strips easily). The smaller standoffs can be tightened with a 5mm or a 3/16" nutdriver (or a pair of pliers if that's all you have).
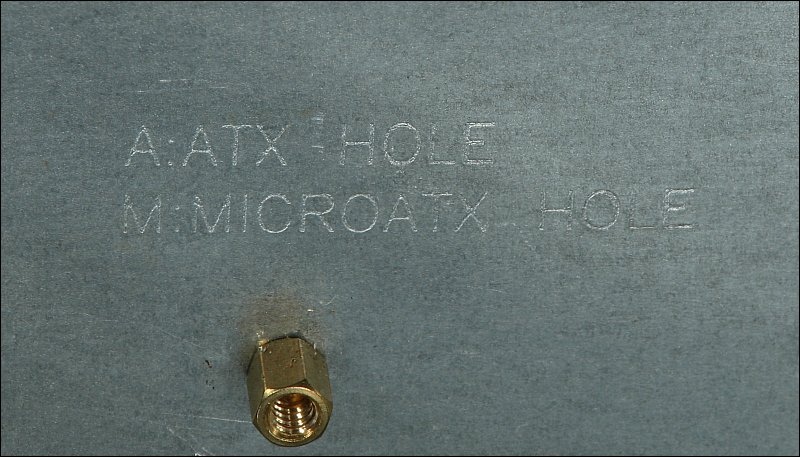 The one below is used only for ATX boards.
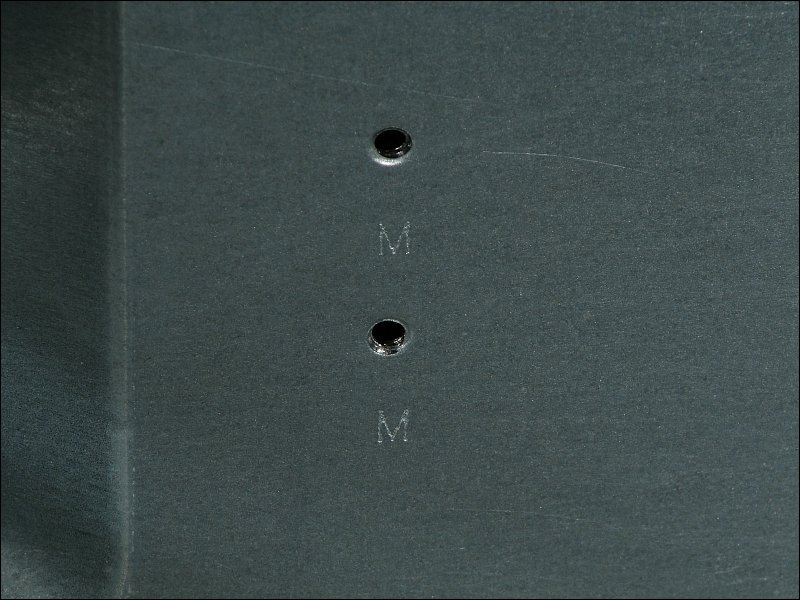
 The one below is used with both ATX and micro ATX motherboards.
 These two are only used with micro ATX boards.
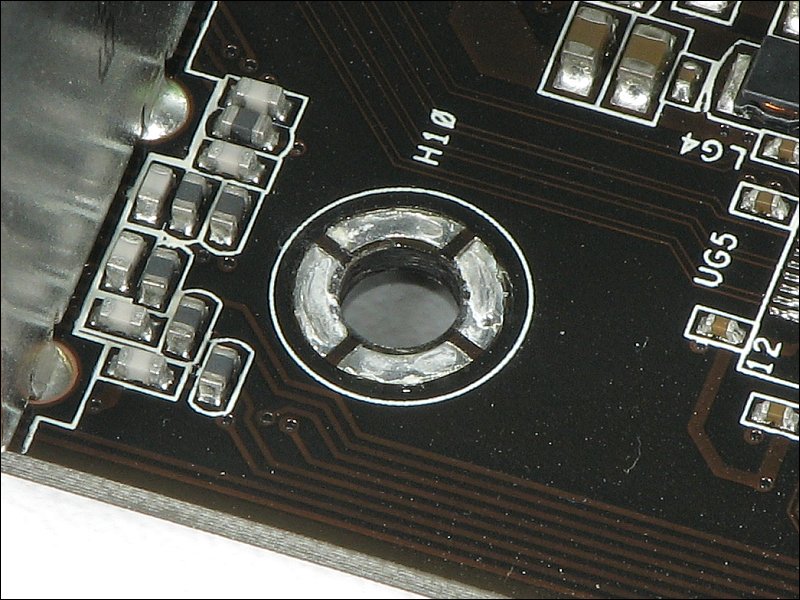
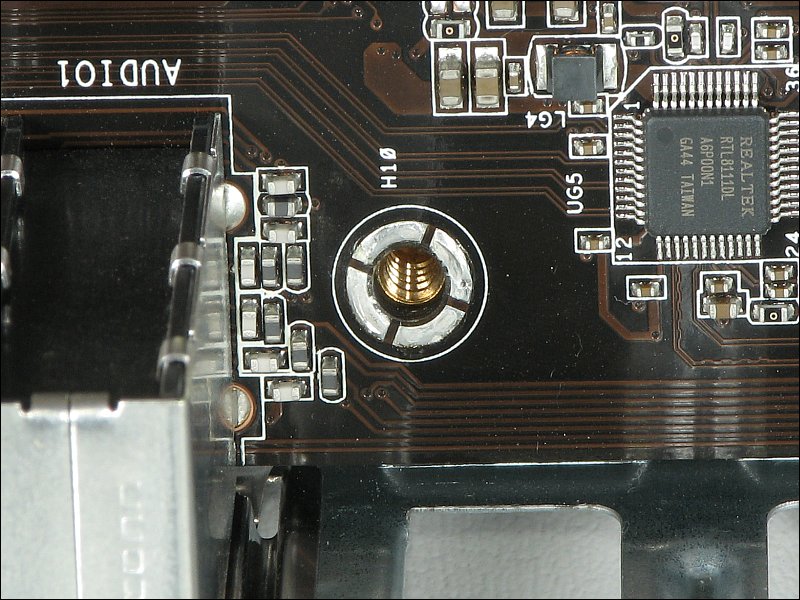
When installing the motherboard, it's important to make sure that you can see EVERY standoff (count them before placing the board in the case) through the mounting holes in the board. The mounting holes typically have a silver ring around the hole to allow the screws to ground the board to the case.
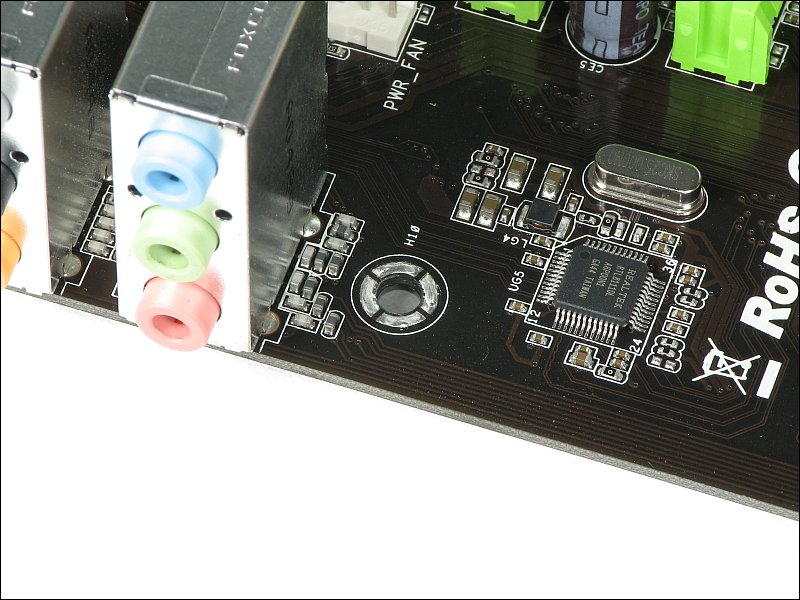 When you select the screws to mount the board, it's important that you don't use screws with heads that won't go beyond the white circle around the hole. While most supplied screws can't reach beyond the white circle but if the screw isn't centered in the hole, it's possible for the heads of some screws to go beyond the white circle. As you can see in the next image, there are often traces just outside of the circle and if the screw shorts to one of these traces, the motherboard could malfunction or fail. Before installing the board, count the number of standoffs that are installed.
 When you install the motherboard, unless you have help, it's easier if you lay the case on the back edge at a slight angle (so the rear connectors will not contact the work-surface) and install the top-left screw first. That is the most difficult to get in (but it's much easier with the case oriented as shown above.
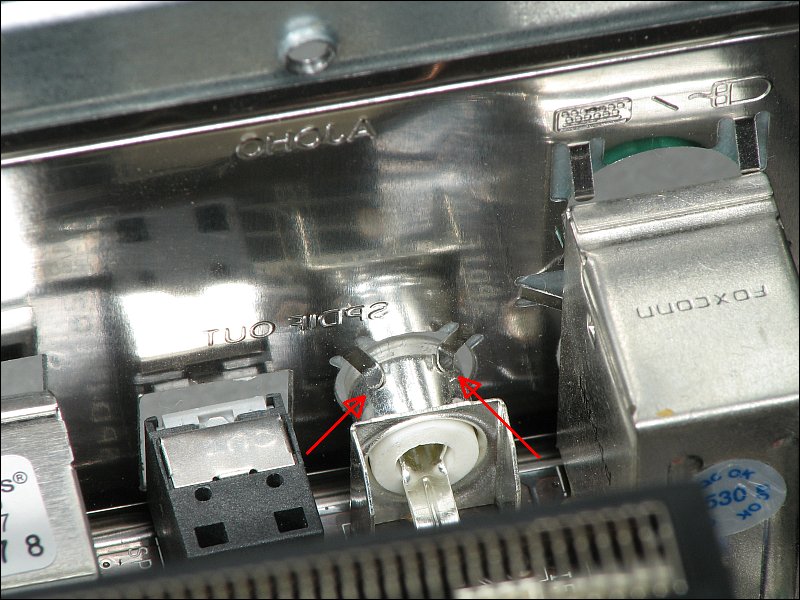
 After getting that screw in, look at the outside of the I/O panel and make sure that none of the ports are obstructed. Sometimes, one of the metal grounding conductors will get in front of a port and the port will be blocked. If that happens and you don't see it, you will have to remove the motherboard again to fix the problem. The connector below is one of the ones that can give you trouble. To get the motherboard in place, you have to push down on it and slide it under these contacts (indicated by red arrows). If you don't push down to get the connector under the contacts, they will be forced outside of the shield (in front of the connector).
 After you get the motherboard held in with one screw, look at all of the other mounting holes. Look inside the holes and count the ones with standoffs in them. If you don't have all of the standoffs that you saw before you installed the motherboard (that's why you counted them, remember that one has a screw in it), you need to pull the motherboard back out and find the one that's didn't line up with one of the holes. If you accidentally get a standoff in the wrong location and it shorts to something on the board, it could cause catastrophic failure of the motherboard, CPU and/or power supply.
 At this point, you can lay the enclosure down flat (if it's easier for you) and install the rest of the screws for the motherboard.
In most instances, it's better/easier to install the power supply after the motherboard but in some computer cases, the power supply has to be installed first. You'll have to determine if this is an issue with your computer. The power supply mounts into most cases with 4 screws. When installing it, start one of the top screws and screw it in about 90% of the way. Start the rest and then tighten them all. This is important because the screw holes don't always line up properly.
 Looking at the previous image, you'll see a red switch recessed in the back of the power supply. This is a slider switch that needs to be set to match your mains voltage.
Top/Bottom Power Supply Mounting Locations: In the computer case used in this example, the power supply is at the top of the case. In many of the gaming cases, they install the power supply at the bottom of the case. In most instances, this causes no problems. In some instances, the power supply will have to be installed upside-down. For power supplies that have a 'bottom' fan, that means that the fan will be installed facing upward. This makes it very easy to drop something into it. Many have a grill that will easily allow screws to fall in. It's a finger-guard, not a filter/screen. To prevent objects from falling into the supply, you can install a small piece of fiberglass window screen over the power supply.
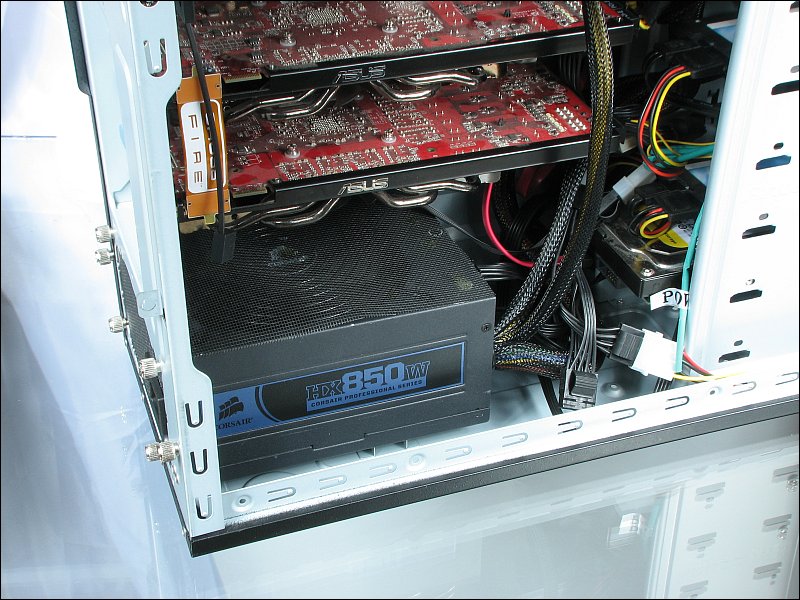
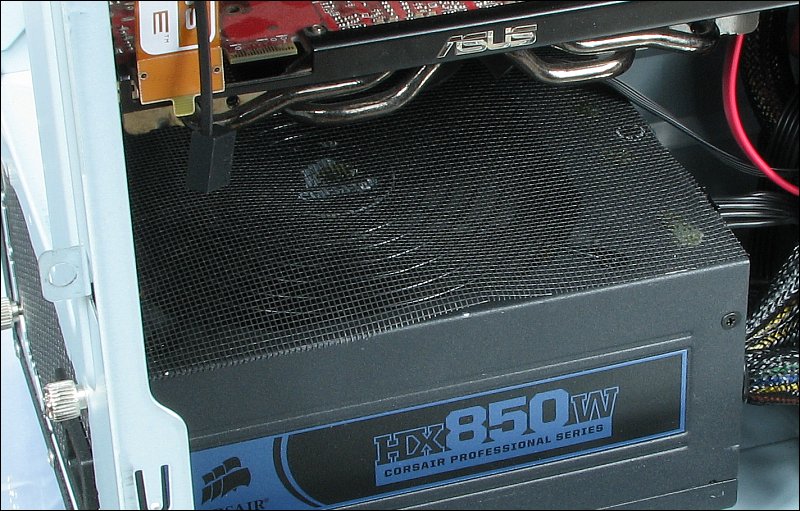 In the case above, the supply had to be mounted with the intake facing up. There are some cases with a bottom power supply that have a vent on the bottom of the case to allow the supply to be mounted with the intake facing down. For those cases, there are feet/supports that keep the bottom of the case off of the surface that the case sits on. If you have a case with a bottom intake, you have to place your computer on a hard, smooth surface. If you place it on a surface like carpet or a piece of furniture, it could make the power supply overheat and fail.
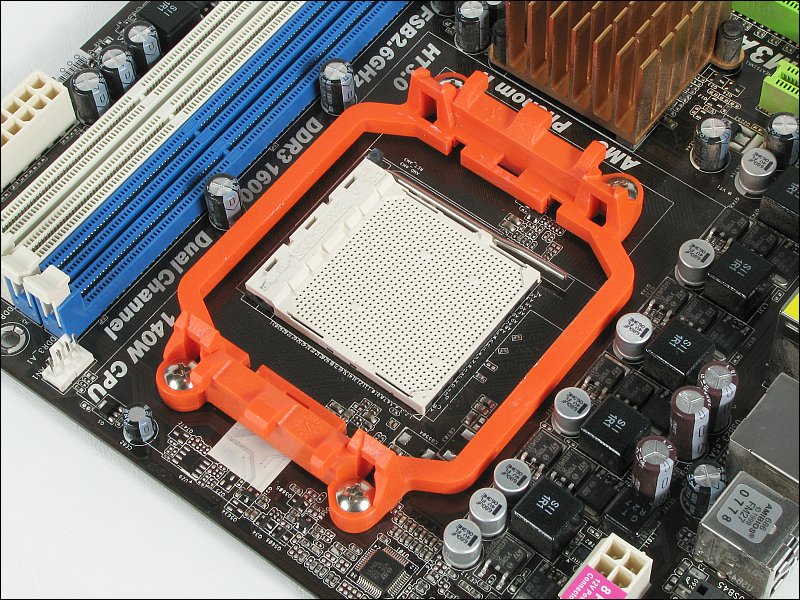
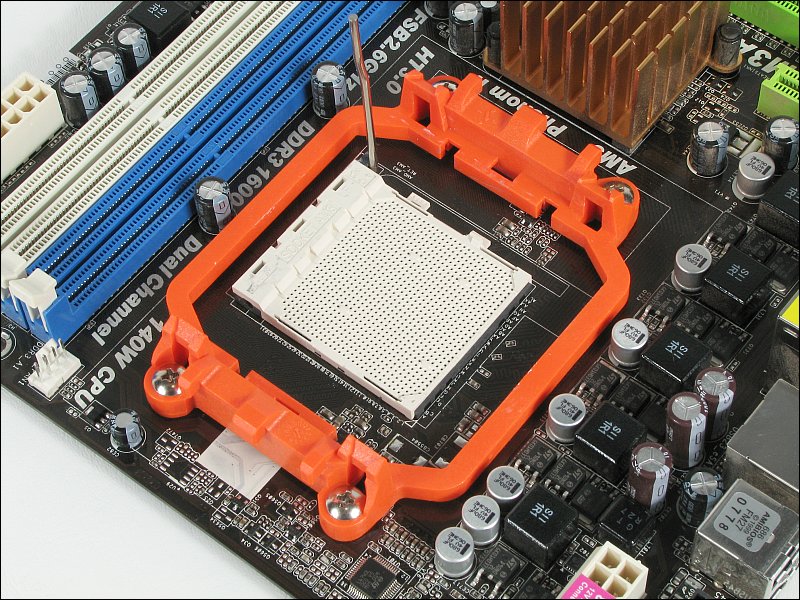
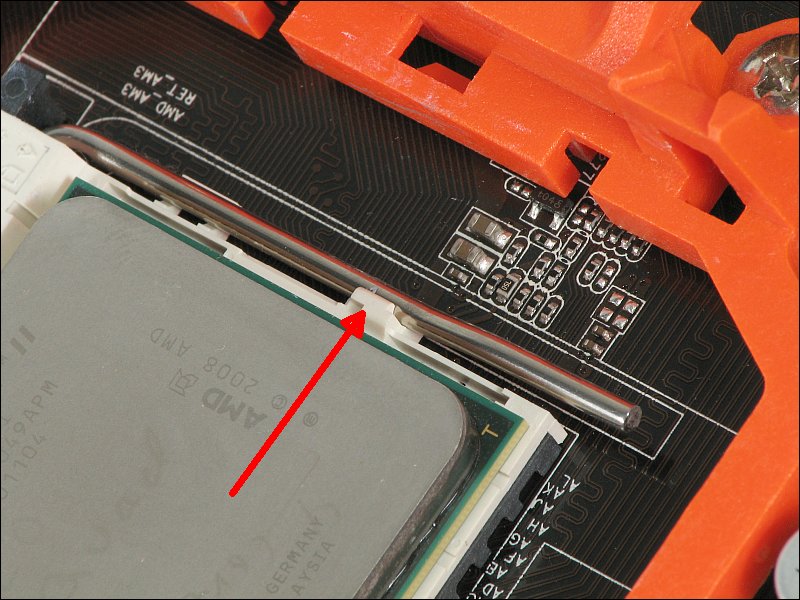
Installing the processor is simple but there are some things that you have to pay careful attention to to avoid problems. The CPU is mounted in a ZIF (Zero Insertion Force) socket. This is precisely what it sounds like. The CPU should drop into the socket with no force applied (other than the pull of gravity). The following images will show the installation of the CPU out of the case (don't remove your motherboard from the case) because it's easier to photograph properly. The following two images show the socket with the lever in the locked position then in the unlocked position. You have to place it in the unlocked position to get the CPU into and out of the socket.
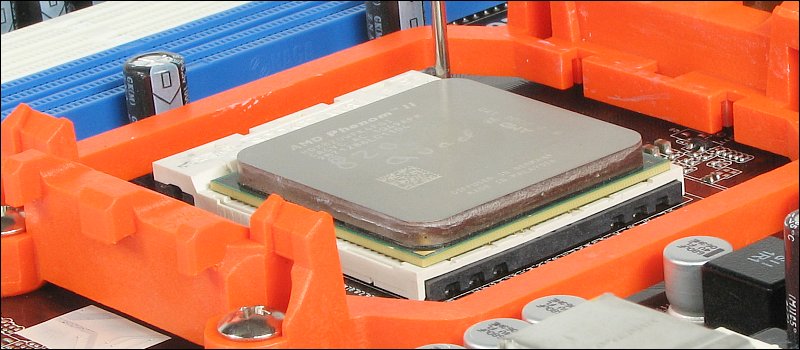
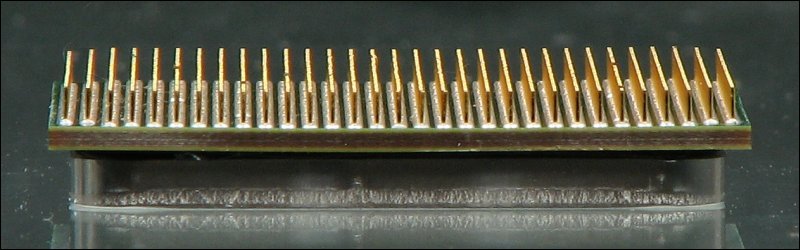
 Before taking the CPU out of its protective package, there are a few things that you should know. Unless absolutely necessary, do not touch the pins. They're easy to bend and easy to break off if they have to be straightened. This has to be done very gently. Only apply force to the one that is bent and straighten it very slowly/carefully. No CPU manufacturer will warranty a CPU with broken pins so it's important not to bend them in the first place. It's generally easiest to hold the CPU securely if you use two fingers to hold opposite corners. CPUs are sensitive to static discharge. If you don't have a static discharge strap, maintain constant contact with the computer case from the time you begin to open the CPU's protective container until the CPU is safely locked into the socket. When you install the CPU into the socket, have the computer laying on it's side. Align the gold triangle with the corner of the socket with the triangle molded into the socket. Hold it as close as you can to the socket and drop it into place. The CPU should fall into place and should lay perfectly flat against the top of the socket. Check the edge of the CPU with the edge of the socket to confirm that they're perfectly parallel along all sides. If it doesn't drop into place, do NOT force it. Pull it out of the socket and confirm that you had it properly lined up.
 If the CPU was properly aligned but did not drop into the socket, examine all of the pins. Look down each row to confirm that there are no bent pins. Turn it 90� and do this again. If there are any bent pins, VERY gently try to straighten them.
 After the CPU is down in the socket, the locking arm has to be locked into position under the notch on the side of the socket. It's been recommended that you do this with the computer laying on its side. If that's not possible due to limited working space, you MUST hold the CPU in place until the lever is securely locked. If the locking arm slips out of your fingers while you're locking it down the CPU will fall out of the socket and will almost certainly bend some of the pins. Even if the computer is laying on its side, you should apply a bit of pressure to the top of the CPU when locking it into place.
 Before you can install the heatsink onto the CPU, you must apply a heatsink compound (thermal compound). Some people like to use an expensive compound but I use the same thing I use when I repair electronic equipment (Dow Corning 340 mixed with Dow Corning 5). The expensive compounds and, many times, the stuff supplied with the heatsink (in the case of aftermarket sinks), is too thick and there isn't enough clamping force to displace the compound. Remember, the heatsink compound is there ONLY to fill microscopic gaps in the imperfect metal surfaces. You want as much metal to metal contact as possible with the compound filling what would be air gaps where the metal is imperfect. In the following two images, you can see the heatsink compound applied to the CPU and the heatsink. In the first image, you can see that I missed applying compound to one corner. That would be absolutely insignificant but it's something that I should have noticed when applying the heatsink compound.
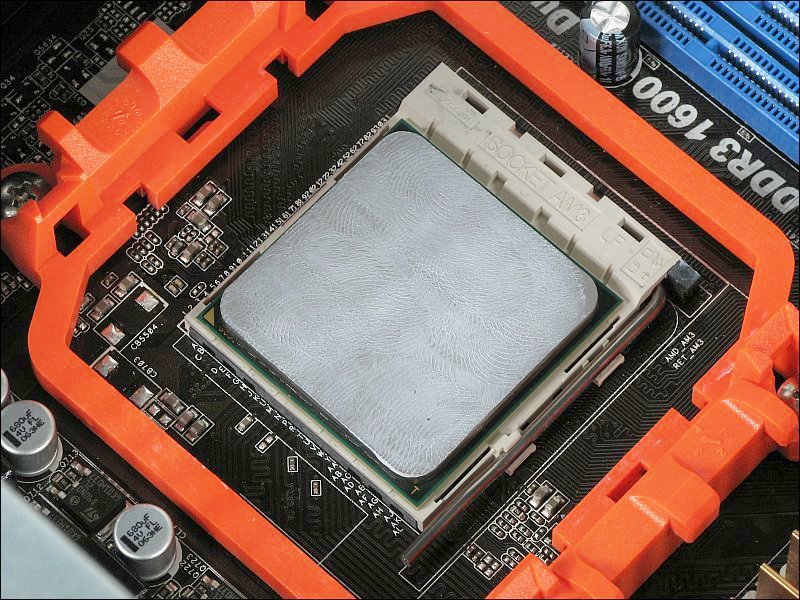 As you can see, the layer of compound is very thin on both surfaces. To further displace the compound after the heatsink was clamped down, I gently twisted the heatsink back and forth. If you have the proper amount of compound, when you twist it, you will actually be able to feel the two pieces of metal 'gently' grinding on each other. At that point, you know that you have metal to metal contact.
 Most OEM heatsinks have the heatsink/thermal compound pre-applied and covered with a shield. The OEM compound is perfectly good. There's no reason to remove it and apply something else. Try not to touch it. It rubs off very easily. The OEM compound had to be removed because the heatsink was mounted to the CPU earlier and you can't re-use heatsink compound.
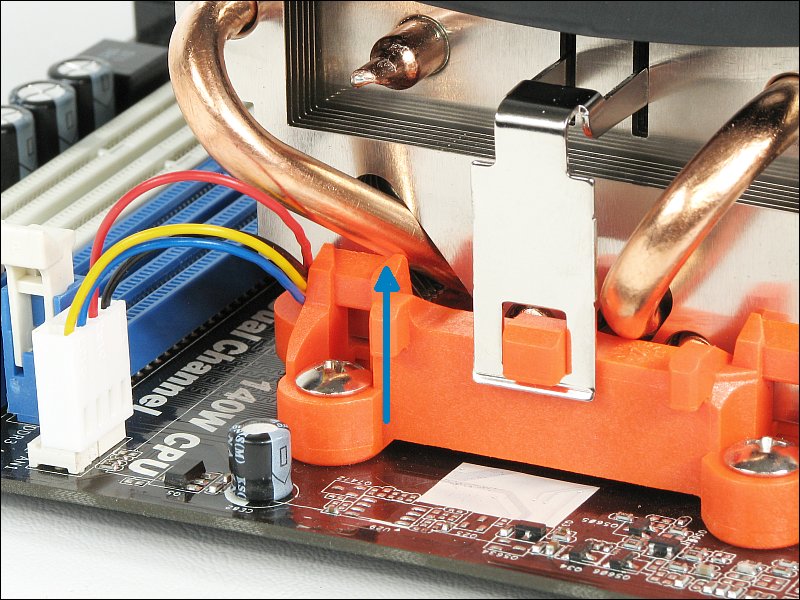
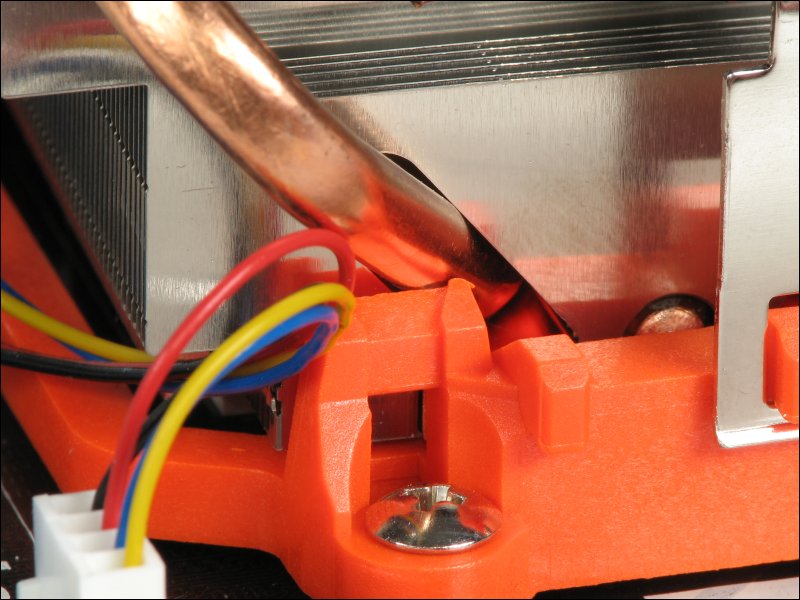
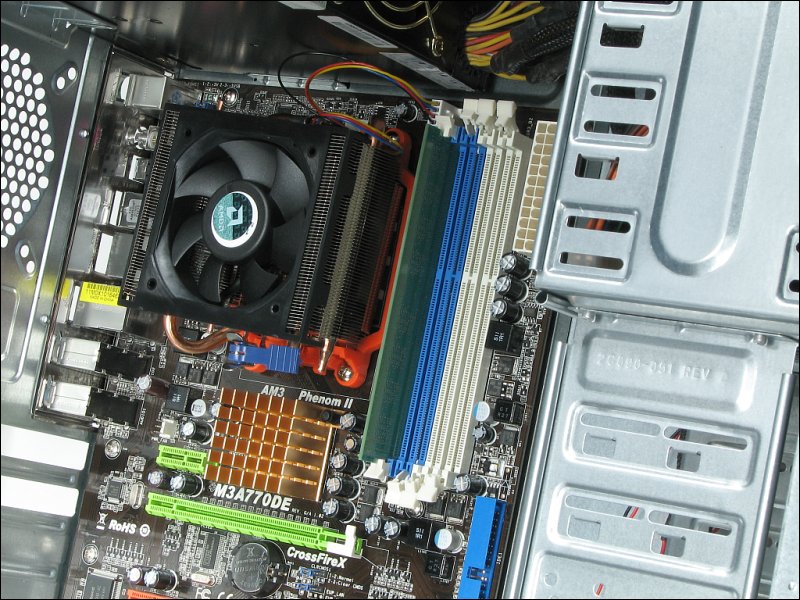
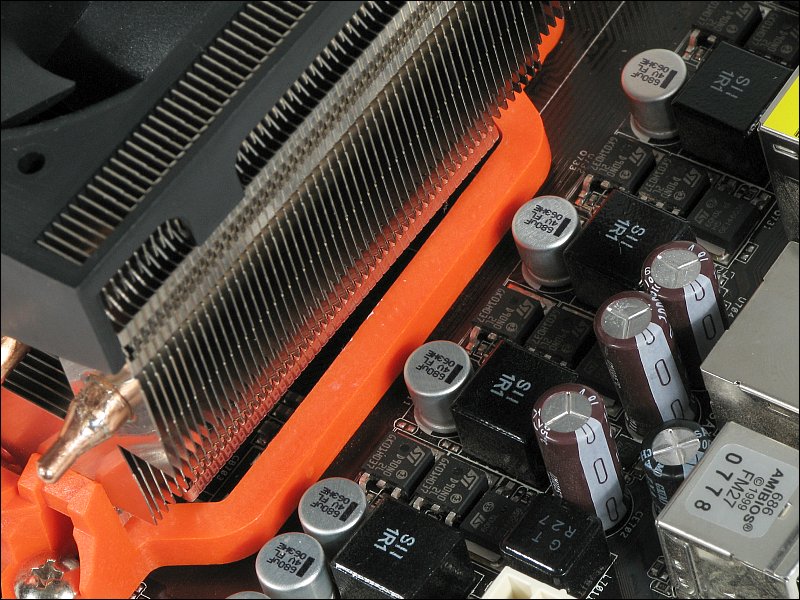
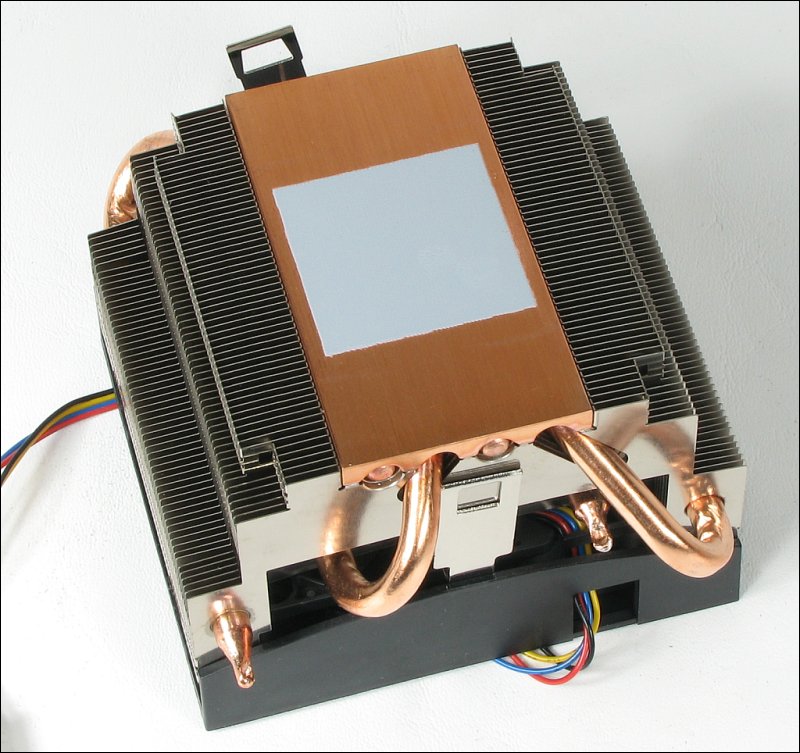 Some people prefer to install the CPU, heatsink and fan before the motherboard is installed in the case. This is a personal preference. You can decide what's right for you. In some instances, it's good to install it before and this is one such instance. Generally, there is sufficient clearance between the heatsink mounting base and the heatsink but not always. With the heatsink square to the edges of the socket, two of the heatpipes would make contact with the base and prevented the heatsink from laying flat on the CPU. To get the heatsink to lay flat, I had to twist it slightly. It was no longer square to the base but that's not as important as having it lay flat on the CPU.
 To confirm that the heatpipe was no longer touching the base, I slid a piece of paper between the heatpipe and the base on both sides of the CPU. This is one example of why it's important to be observant when doing this (or anything critical).
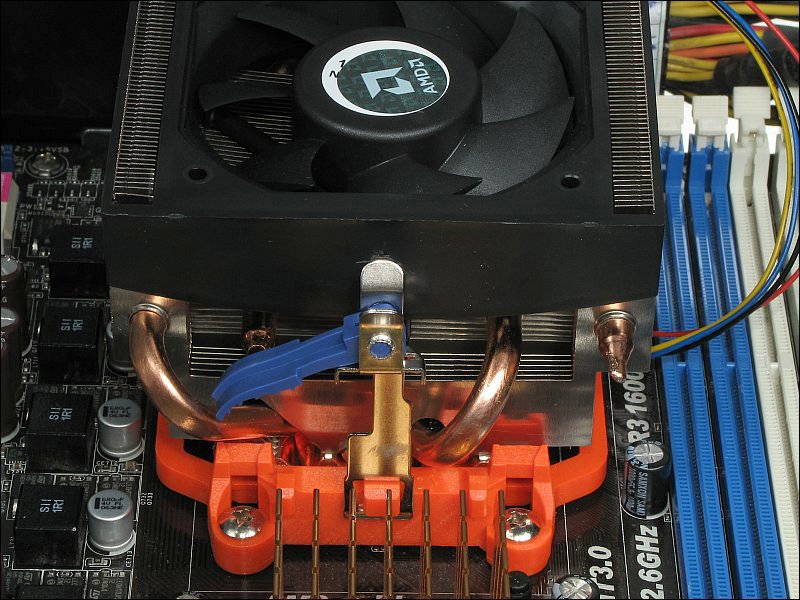
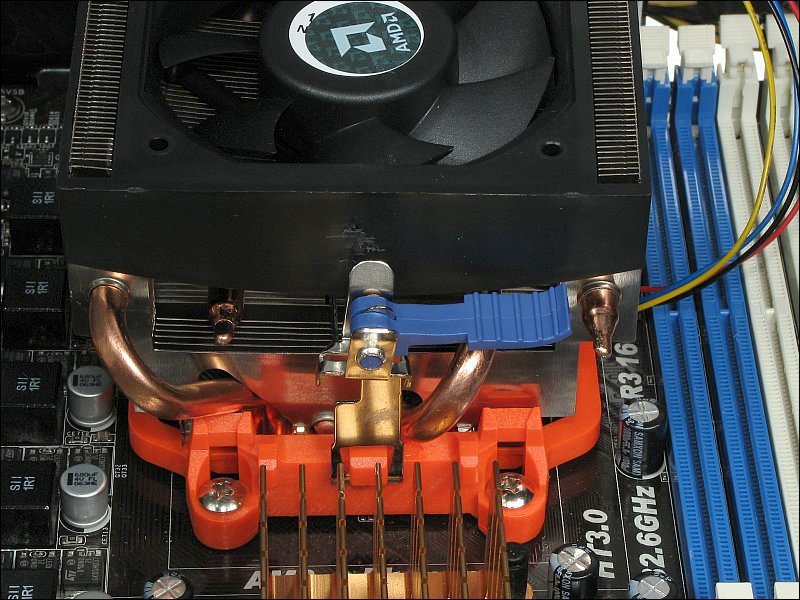
 This heatsink uses an over-center type locking mechanism. When you initially position the latches under the hooks on the clamping base, you have the mechanism in the unlocked position (first photo). After the latches are in place on both sides of the base, you flip the lock to the right. The cam on the locking mechanism applies greater force that would be possible otherwise.
 This is getting a bit ahead of things here but it's important and I don't want to forget about it later. When you initially power up the computer (if it powers up and starts to boot), go directly into the BIOS (to be covered later) and find the 'hardware monitor' screen. There is will show the temperature of the processor. If all is well (between the heatsink and the processor) the temperature of the CPU will not be more than about 40C (assuming ambient temperature is about 25C). If you see it climbing and it goes over 60C, you probably need to remove and reinstall the sink. If you haven't done so by this time, you may try slightly twisting the sink to see if the temperature will begin to drop. This page is about assembling a computer, not disassembling one but this may be helpful if you are going to replace a processor. When you remove the heatsink, there will be a layer of heatsink compound that will need to be removed from the top of the processor (you never want to re-use heatsink compound). If you're going to remove the processor to replace it, clean the heatsink compound off of it while it's in the socket. There is a tendency to want to clean a processor before it's stored and if it's done out of the socket, there's a good chance that you'll bend some of the pins. In the socket, there's no way to bend the pins. When you clean it, don't use any liquid cleaners. If they get into the processor (under the heat spreader) or into the socket, it could cause corrosion or could conduct between pins.
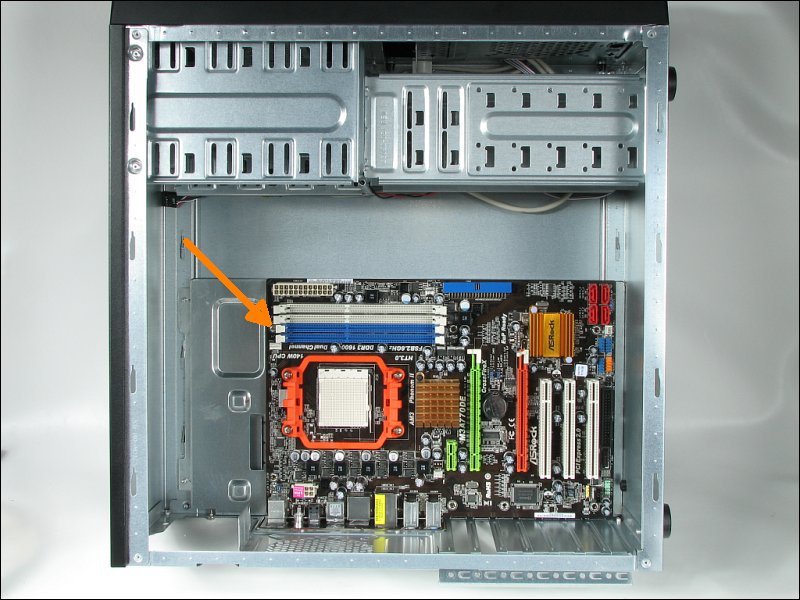
All computer memory modules have index notches along their bottom edge. All memory sockets have keys that prevent the module from being installed incorrectly or to prevent the wrong type of memory from being installed. When installing the memory, you'll have to flip the latches away from the slot in the socket to allow the memory to be installed. Align the notch with the key in the socket and push the module down firmly until the latches begin to move inward. If the module goes in easily, keep applying force until the latches lock into the notches on the ends of the memory module. If the slot is tight, you can sometimes make it a bit easier to seat the module if you push in on the latches as the module tries to pull them into place. Make sure that both latches are tight against the module. If they won't lock in, the module may not be fully seated (it must be fully seated).
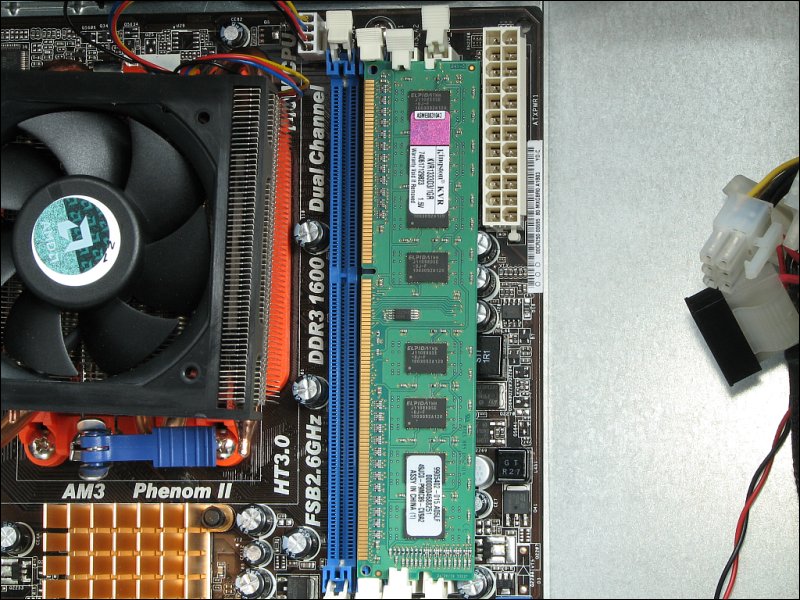
 When pushing the module into the socket, you need to support the board from the back. Some cases have a cutout in the motherboard tray to allow you to provide support from the back of the board. To get access, you'd have to remove the other side panel from the case. If there is no access and the modules go in easily, you don't need to support the board. If the slots are tight and you can't get your fingers behind the board, you may need to remove several of the screws from the motherboard so that you can lift it enough to insert the memory modules. Below, you can see that the module has been installed and the latches are in the locked position.
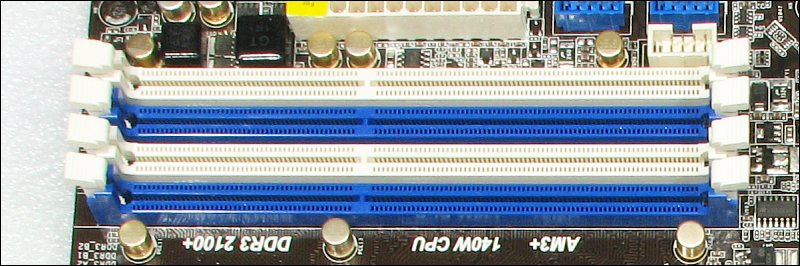
 As you can see on the motherboard, this board is designed for dual channel memory kits. If you buy a dual channel kit, you need to install the modules in the same color slots. Sometimes the like color slots are adjacent to one another and sometimes they're staggered.
|
|
| Contact Me: babin_perry@yahoo.com | |
|
Perry Babin 2005 - Present All Rights Reserved
|