Admittedly, this page is only for the geekiest of geeks. If you're not that geeky, make one quick pass through the page so that you can, at the very least, get to know some of the terms. Then, if you see something related to this, you know where to find the relevant information.
As was stated on the reactance page, some components like inductors and capacitors react differently to AC than they do to DC. They also react differently at different frequencies. Other components like resistors act the same to DC as they do to AC. When you use reactive and resistive components in the same circuit, they both influence current flow. By the time you finish with this page, you will know how to calculate impedance (Z) for simple RC, LC circuits and RLC circuits. Since impedance equations require the use of imaginary numbers (don't panic) and complex numbers (numbers with both a real component and an imaginary component), I will cover that also. When you come to the end of each section, try a few for yourself. I'll provide calculators and graphs so you can check your math.
Phase Refresher from Amplifier Bridging page
dia. A
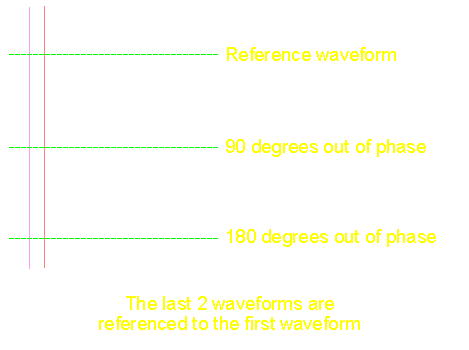
The diagram above shows 3 sine waves that are out of phase with each other, to varying degrees. As you can see, the first wave form is the reference. You must have a reference or the term "phase" has no meaning. In the above diagram, the middle wave form is 90� out of phase with respect to both of the other wave forms. The third wave form is 180� out of phase with respect to the reference wave form and 90� out of phase with respect to the middle wave form. The diagram below shows the phase angles in a different type of illustration.
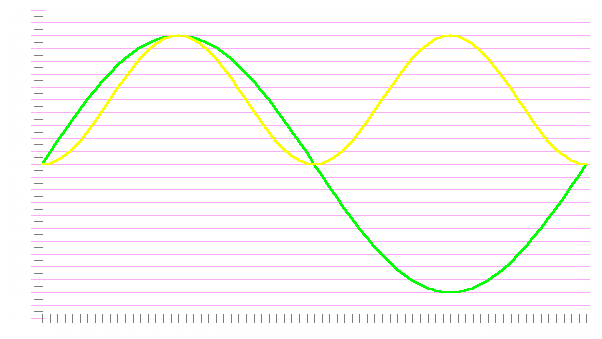
The following diagram shows how the waveform relates to the 360� of a complete circle (one complete cycle of the waveform).
dia. B
In diagram B:
The wave form's potential (voltage) is at (equal to) ground (the reference) which, in this case, is the same as "0�". The voltage increases as the wave form moves toward 90�.
At this point, the wave form has gone through 90� of the 360� cycle. This is the point of maximum voltage for the sine wave signal. After it passes this point in a counter-clockwise direction, the voltage starts to drop.
At point c, the voltage is back at reference and has gone through 180� of the 360� total cycle. If another sine wave of the same frequency would start at "A" at this point in time, it would be 180� out of phase with reference to the original wave form.
This is 270� through the cycle. You can see that the voltage is at it's lowest point. The voltage will start to increase as it moves through this point. When the wave form reaches point "A", it starts a new cycle.
This diagram shows 2 waveforms and the reference to the 360� cycle.
Current Lead/Lag:
Until now, we only discussed systems where the current and voltage were in phase with each other. If an AC waveform is applied to an ideal resistor, the current will be in phase with the voltage. This is fine for a lot of things but when you start dealing with reactive devices such as inductors, capacitors and speakers, the reactance will cause the current to lead or lag the voltage applied to a device. It may seem impossible that the current could increase or decrease ahead of or behind the voltage but I'll try to help you understand.
Mechanical Model Analogy:
To help you get a mental picture of what happens when current and voltage are out of phase think of a Slinky (the springy metal toy). If you let about 2 feet of it hang down from your hand and move your hand up and down very slowly, all of the length moves in unison. If you start to move your hand up and down a little faster, you'll notice that the bottom of the Slinky isn't quite keeping up with your hand. At this point it's only slightly 'reactive' and slightly out of phase. If you move your hand up and down even more quickly, you'll notice that the bottom of the spring isn't even coming close to keeping up with the motion of your hand. You'll even notice that the magnitude of travel at the bottom is reduced as your hand moves faster. If you move your hand fast enough, the bottom of the slinky will almost remain motionless. This would be analogous to an inductor operating at an increasingly high frequency (remember that high frequencies tend to be blocked by inductors). Don't try to remember this analogy. I just wanted you to have mental picture of similar to what I'm going to discuss here.
Note:
An ideal reactive component (inductor or capacitor) does not dissipate any power. Any energy that's put into it is given back. Many capacitors are almost ideal and waste very little energy. Inductors are much less 'ideal'. The wire that's used to make an inductor has resistance and therefore will dissipate power when current flows through it. As a side note, I should also say that a capacitor resists changes in voltage while inductors resist a change in current.
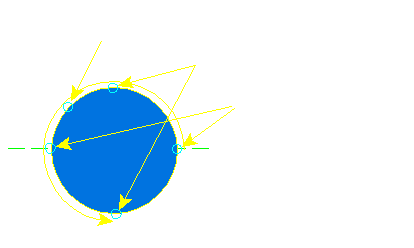
Rate of change of voltage:
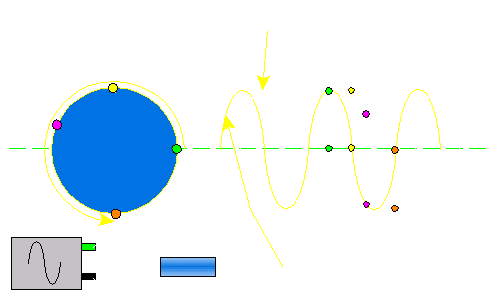
As a sine wave goes through a complete cycle, the rate that the voltage increases or decreases varies. In the following diagram you can see the blue circle. The perimeter of the circle represents voltage at all points through one complete cycle. At the points (A and D) where the perimeter of the circle crosses the horizontal line, the rate of voltage change is the greatest. Just think about a wheel on a bicycle while it's spinning. If something comes in contact with the wheel at points A or D, the object will be forced up or down with significant force. If something comes in contact with the wheel at points B or E, it will be forced to the side but not up or down. Since we're ONLY interested in the rate of change in the vertical plane, points B and E have effectively no change. At point C, the rate of change is somewhere between the rates at A and B.
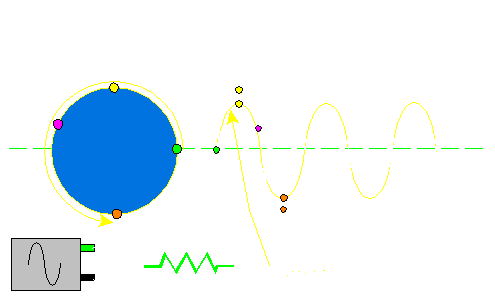
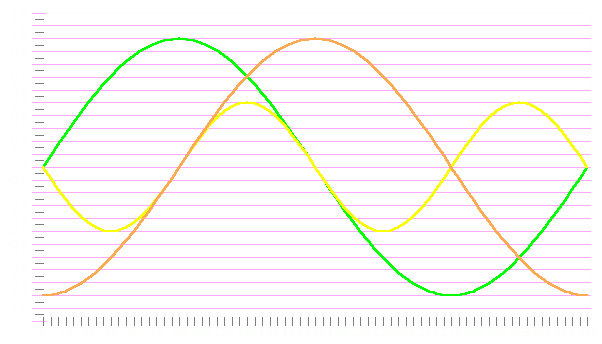
Current flow into/out of a Capacitor:
In the next diagram, The colored circles on the perimeter of the blue circle correspond to the colored circles on the two sine waves. The white sine wave represents voltage. The yellow sine wave represents current through the capacitor.
Green Points
At this point, you can see that the voltage is at 'zero volts' (because it's at the horizontal line which is 'ground'). You can also see that the current flow (on the yellow line) is at its highest point. This shows that... while the voltage applied to the capacitor's terminals is zero volts, the current is at its highest value (because it's at its greatest distant from the reference line). At this point, current is flowing out of the power supply and into the capacitor.
Yellow Points
At this point, the voltage from the supply is the greatest but since its rate of change is minimal, the current flow is also minimal. This clearly illustrates how the voltage (which is high) and current (which is low) are out of phase.
Violet Points
At this point on the perimeter of the blue circle, the rate of voltage change is between the rate of change at the green and yellow points. The rate of change in voltage is approaching its maximum and you can see how the current flow is also approaching its maximum. At this point, current is actually flowing back into the power supply.
Orange Points
At this point, the rate of change in voltage is again zero and the current flow is also zero.
Driving a pure resistance with a sine wave:
The previous diagram showed how the current was out of phase with the voltage. The following diagram shows how the current and voltage are in phase when voltage is applied to a resistor.
Note:
Please keep in mind that the current waveforms on these diagrams are not drawn to any scale. The amplitude of current in these 2 drawings is meaningless.
Phase Angles Less Than 90�:
In the previous section, we showed how a purely reactive device acts. When we have real world components and circuits, the phase shift is less than 90�. This next section will cover the math required to solve complex impedance equations. It will require a basic knowledge of geometry and algebra. Beyond that I will try to explain all of the math required.
Vectors
The Number Line:
The following diagram shows a number line. You will notice that the center of the number line is the origin (the zero point). To the left of the origin is negative values. To the right of the origin is positive numbers. You can also see 3 vectors above the number line. The blue colored vector has a magnitude of +5. The yellow vector has a value of -6. Since these vectors are exactly opposed (they are along the same axis) they can be directly added together. 5+(-6)=-1. The resultant vector (green arrow) has a magnitude of -1.
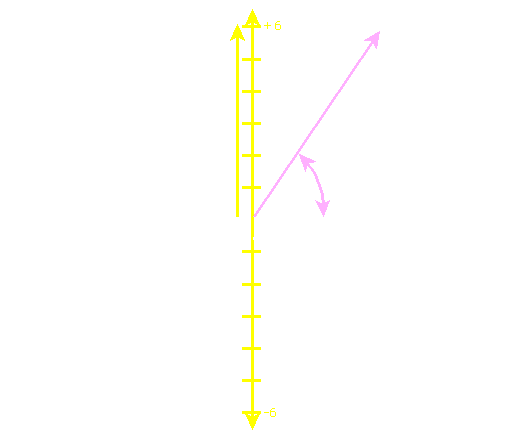
Vectors along different axes:
To explain impedance we have to use vectors along the horizontal axis (x-axis) and the vertical axis (y-axis). In the following diagram, you can see the x-axis that we had in the previous section and the vertical axis (y-axis). You should notice that the y-axis also has both positive and negative components. Above the x-axis is positive, below is negative. The yellow arrow has a value of +6 on the y-axis. The white arrow has a value of +4 along the x-axis. The resultant vector would have a magnitude of 7.2 at 56� (violet line). The next section will explain how this is calculated.
Trig functions:
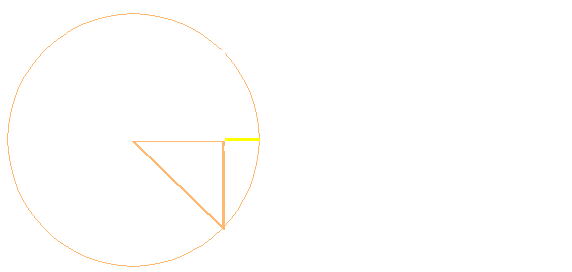
To fully understand how and why the resultant vector has a magnitude of 7.2 at 56�, I'll have to touch on some of the simple trig functions such as sine, cosine and tangent. The trig functions define the relationship between an acute angle (less than or equal to 90�) and the sides of a right triangle. In the following diagram, the angles are in upper case and the sides are in lower case. Notice that the side name matches the angle which it opposes.
Chord:
A chord is a line that intersects a circle at 2 points. Line BD (line that starts at point B and ends at point D) in the previous diagram is a chord.
Sine:
The sine of an angle is a line who's length is 1/2 of a chord of double the angle. If we use the points in the previous diagram, the sine of angle A is one half of the chord BD. Note that angle BAD is twice the angle BAC. The sine of angle BAC is BC. You can see the formula for the sine of an angle. It says that the sine of angle A is equal to the opposite side (side a) divided by the hypotenuse (side c). If side c has a length of 1.4 inches and side a has a length of 1 inch...
Sine angle A = 1/1.4
Sine angle A = .7
Angle A = ~45� (...punch .7 into your calculator then inverse and then the sin button)
If we only knew angle A (45�) and the length of the hypotenuse (1.4 inches) we could find the length of side a.
Sine A = (side a)/1.4
0.707 * 1.4 = (side a) ...The sine of a 45� angle is .707
1 = side a ...The length of side a is 1 inch
If the length of the hypotenuse was 20 inches
Sine A = (side a)/20
0.707 * 20 = (side a) (...angle A is still 45�)
14.14 = side a (side a is 14.14 inches long)
If the length of the hypotenuse was 20 inches and angle A is 60�
Sine A = (side a)/20
0.866 * 20 = (side a) (...the sine of a 60� angle is 0.866)
17.32 = side a (side a is 17.32 inches long)
You can see how opening up the angle made side 'a' longer. If you use a little common sense when doing these calculations, you can sort of tell if the answer is right.
Cosine:
In the previous discussion we wanted to find the length of the vertical line (side a). In this section we will need to find the length of the horizontal line (side b) of the triangle. To do this, we will use the cosine function. The cosine function expresses the ratio of sides b and c (the hypotenuse) to angle A. The formula is cosine A = (adjacent side)/(hypotenuse). If we know the length of the hypotenuse (20 inches) and angle A (60�) we can determine the length of the adjacent side (side b).
Cosine angle A = (side b)/(side c)
Cosine angle A * (side c) = (side b)
0.5 * 20 = (side b) ...The cosine of a 60� angle is 0.5 ...The length of side c (the hypotenuse) is 20 inches
10 = (side b) ...Side b is 10 inches long
Note:
As a side note... The cosine of angle A is equal to the sine of angle B. Since angles A and B are complementary angles (they add up to 90�), we can do a little math to see if the previous statement is true. The complement to the 60� angle is a 30� angle.
Sine angle B = (side b)/(side c)
Sine angle B * (side c) = (side b)
0.5 * 20 = (side b) ...The cosine of a 30� angle is 0.5 ...The hypotenuse is 20 inches long
10 = (side b) ...Side b is 10 inches long
As we can see, the sine of the complementary angle produces the same result.
Reactance:
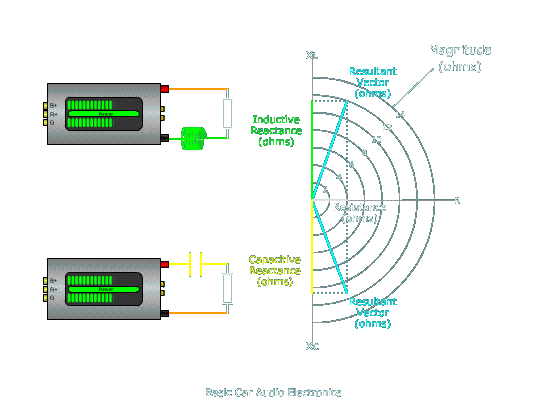
Let's get away from the trigonometry for a second. As you may recall, this page is supposed to show you how impedance changes when you have reactive components like capacitors and inductors. Reactance is the opposition to an AC waveform (a sine wave) by a reactive component. In a previous section we showed how the current was out of phase with the voltage. In another section we showed you a vector graph with x (horizontal) and y (vertical) axes. In a complex impedance equation you will have resistance which will fall along the horizontal (x) axis. The reactance will fall along the vertical (y) axis. If the reactance is inductive reactance, it will go in a positive direction on the y-axis. If the reactance is capacitive, it will go in a negative direction along the y-axis. Let's review the formulas for reactance...
Capacitive reactance:
XC = 1/(2 * Pi * f * c)
XC is capacitive reactance (Upper case X is reactance, the subscript C shows that it's capacitive reactance)
Pi = ~3.14
f is the test frequency (remember that reactance is frequency dependent)
C is capacitance in farads
If we have a 100uf and a test frequency of 150hz...
This shows that if you connect a sine wave generator with an output frequency of 150hz to the capacitor, the capacitor will limit current flow much like a 10.6 ohm resistor.
For a 12mH inductor...
Inductive reactance:
XL = 2 * Pi * f * L
XL is inductive reactance
Pi = ~3.14
f is the test frequency
L is inductance in henrys
XL = 2 * Pi * 150 * .012
XL = 11.3 ohms
If we plot those values on a graph (below) we can see how the reactive components are plotted along the y-axis. You can also see a resistance vector along the x-axis. Notice that the resistance vector is 4 ohms.
After each example, try to do a few for yourself. Here is a pop-up calculator to check your math.
Tangent:
Another trig function we will need is the tangent function. We showed the formula for tangent in a previous diagram. It is tan=opposite/adjacent.
Pythagorean Theorem:
The Pythagorean theorem says that the hypotenuse squared equals the sum of the squares of the other 2 sides. Using the sides of the previous diagram, c²=b²+a².
Impedance:
To find the impedance of the circuit with the series connected resistor and inductor, we can use the tangent function. The 'opposite' side is the reactive component (on the vertical axis) which equals 11.3 ohms. The resistive component is equal to 4 ohms.
First we'll find the angle...
The tangent of the resultant vector angle = (the reactive component)/(the resistive component)
OR
The tangent of the resultant vector angle = XL/R
The tangent of the resultant vector angle = 11.3/4
The arctangent of the resultant vector angle = 70.5� (...arctan on your calculator is the tangent -1)
Then we need to find the magnitude of the vector...
Using the pythagorean theorem...c²=a²+b²
OR
(magnitude of the vector)² = (resistance)²+(reactance)²
(magnitude of the vector)² = (4)²+(11.3)²
(magnitude of the vector)² = 143.69
(magnitude of the vector) = 11.98 ohms (... we took the square root of each side)
So... this means that the impedance (Z) = 11.98 ohms at an angle of 70.5�. If you look at the angle of the top triangle and length of its hypotenuse, you can see that the calculations match the diagram. You should also remember that this is only the impedance at 150hz with a series connected 4 ohm resistor and 14mH coil.
Polar vs Rectangular:
The two different types of notation that we used in the previous examples were polar and rectangular. The polar form uses a magnitude at a given angle. The rectangular form uses horizontal and vertical components.
Polar: 11.98 @ 70.5�
Rectangular: 4 + 11.3j
Both of the statements above are equal.
Polar to rectangular calculator to check your math.
Rectangular to polar calculator to check your math.
J?:
J (actually lower case j) is the notation used to identify the 'imaginary' component. In electronics the imaginary component is the reactive (either capacitive reactance or inductive reactance) component (which falls along the y-axis). J is used in electronics (instead of 'i') because I is used to denote current. J is defined as the square root of negative 1. Now, I know what you're thinking, there's no such thing as the square root of a negative number. This is because the square root of a number is the number that's multiplied by itself to get said number (square root of 4 is 2... 2 multiplied by itself (2 * 2) is 4). And, as you know, when you multiply a negative number by itself, the negative sign will go away. That's why j is considered an imaginary number and not a real number.
Lets try it with capacitive reactance
Test Parameters:
4 ohm resistor
40uf capacitor
1000hz frequency
Find Reactance:
Use the formulas:
XL = 2 * Pi * f * L
or
XC =1/(2 * Pi * f * C)
Remember that reactance is 90� out of phase. Inductive reactance is +90� and capacitive reactance is -90� out of phase. This means that the impedance of the 40uf cap at 1000hz capacitor alone is 3.97 ohms at -90�
To find the angle we will use the arctan (tan-1 on your calculator).
tan-1 = -3.97/4
tan-1 = 0.993
Phase angle = -44.78 Remember that capacitive reactance is below the x-axis which makes the angle negative.
The impedance of the series connected 4 ohm resistor and 40uf capacitor at 1000hz is 5.63 ohms at -44.78�.
How about some visualization:
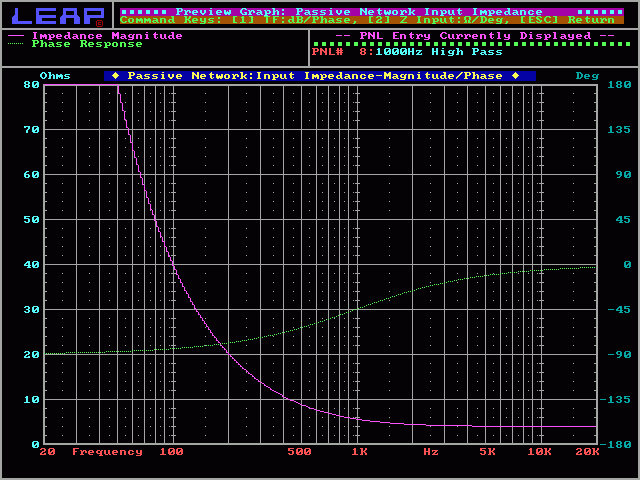
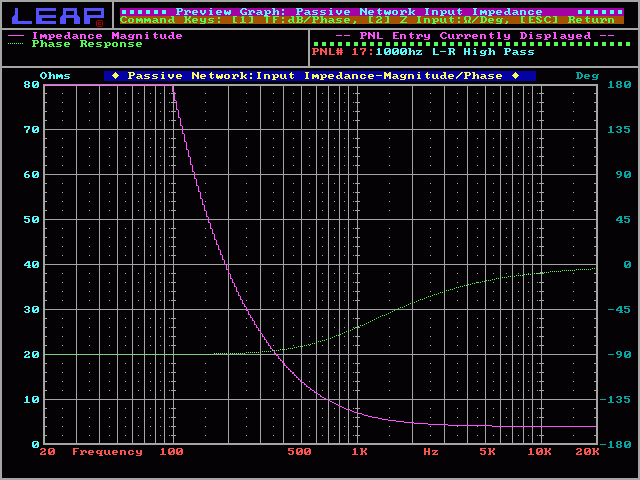
The following chart will show you a few things that you probably already know but may not have put together.
The purple line shows the impedance of the series connected resistor and capacitor across the audio spectrum.
The green line is phase angle.
At 1000hz, you can see that the impedance and phase angle are what we calculated for a 40uf capacitor in series with a 4 ohm resistor.
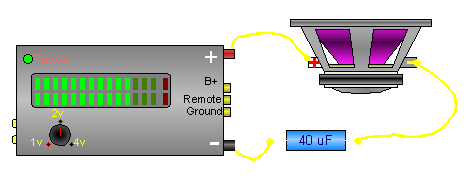
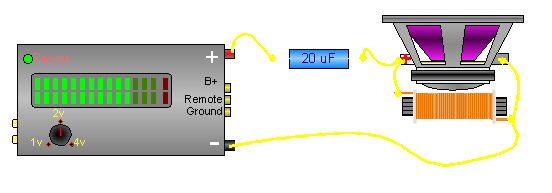
If you remember the passive crossover page, you probably remember that a 40uf cap in series with a 4 ohm speaker was a 1000hz high pass crossover. You should also remember that the crossover point for a 6dB/octave butterworth filter is the 3dB down (or half power) point. A resultant impedance (with the speaker and series connected capacitor) of 5.6 ohms (at 1000z) reduces the voltage across and the current through the speaker to .707 of their values without the capacitor. As you know, when calculating power in a known resistive load (a speaker in this example) you either square the voltage across the speaker or square the current through the speaker. When you square 0.707 you get 0.5 which translates into 1/2 power.
If you use the Ohm's law formula P=E²/R and we have a 100 watt per channel amplifier driving the 4 ohm load at full power we'd have 20 volts across the speaker and 5 amps of current through the speaker. If we use that voltage in the following calculations you can see that the power is cut in half at the crossover point (1000hz).
P = E²/R
P = (.707 * 20)²/4
P = 14.14²/4
P = 200/4
P = 50 watts
RC, RL and RLC:
Until this point we have only discussed series RC (resistor/capacitor) and series RL (resistor/inductor) circuits. Now we'll try our hand at series RLC (resistor/inductor/capacitor) circuits. The calculations are essentially the same as before but now we'll have to add 1 more out of phase component. Fortunately, two of the components (the inductor and the capacitor) are 180� out of phase. This means that we can just subtract the capacitance (which is on the negative half of the vertical/imaginary axis (y-axis)) from the inductance (which is on the positive half of the imaginary axis). Remember that reactance is the imaginary part of the impedance (on the y-axis) and the resistance is the real part of the impedance (on the x-axis).
Test parameters:
Frequency: 1000hz
Resistive load: 4 ohms
Capacitance: 40uF (microfarads)
Inductance: .65mH (millihenries)
First we'll find inductive reactance:
XL = 2 * Pi * f * L
XL = 2 * 3.14 * 1000 * .00065 (.00065 henries = .65 millihenries)
XL = 4.08 ohms
Phase Angle:
Since we are considering the inductor above to be the ideal inductor, it's phase shift will be +90�. This means the impedance is:
Rectangular form: 0 + j4.08
Polar form: 4.08 +90
Next we'll find capacitive reactance:
XC = 1/(2 * Pi * f * C)
XC = 1/(2 * 3.14 * 1000 * .000040 (.000040 farads = 40 microfarads)
XC = 3.98 ohms
Phase Angle:
Since we are considering the capacitor above to be ideal, it's phase shift will be -90�. This means the impedance is:
Rectangular form: 0 - j3.98
Polar form: 3.98 -90
All components together (using polar form):
Capacitor: 3.98 -90
Inductor: 4.08 +90
Resistor: 4 0
As you see above we have 2 components on the same axis (180�) apart and like I said before, we can add them directly. If they were not directly opposed or on different axes, we'd have to go back to the trig functions to solve for impedance.
So, now we just have 2 components to deal with as we did with an RC or RL network. Now we can find the resultant angle and magnitude of the impedance vector.
To find the angle:
tan-1 = +0.10/4 (opposite/adjacent OR reactive/resistive)
tan-1 = +0.025 = 1.43�
To find the magnitude:
C² = b² + a² (c² is the impedance vector or hypotenuse squared)
C² = 0.10² + 4²
C (magnitude of vector) = 4.0000125
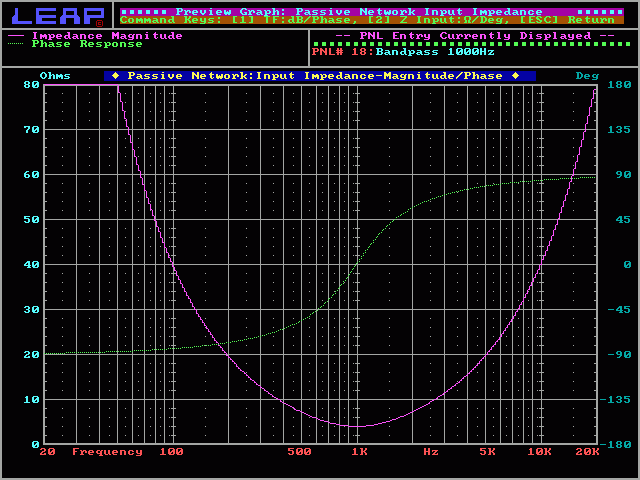
So now we have an impedance of the RLC circuit of 4.00001251.43�. This means that the circuit at 1000hz is almost purely resistive (the angle is only 1.43� so it's only minimally reactive). Since the reactive components are basically canceling each other out at this frequency, the RLC network is essentially a 1000hz band pass filter. As you can see in the following diagram, The phase curve crosses the 1000hz line at ~0 degrees as we calculated. You should notice how the impedance increases as you move away from the test frequency. This would cause the output of the 4 ohm speaker to be reduced as the frequency increases or decreases. You should also note how the phase shifts as you move away from the test frequency.
Let's try the same calculations as before at a different frequency (like 500hz).
Test parameters #2:
Frequency: 500hz
Resistive load: 4 ohms
Capacitance: 40uF (microfarads)
Inductance: .65mH (millihenries)
First we'll find inductive reactance:
XL = 2 * Pi * f * L
XL = 2 * 3.14 * 500 * .00065 (.00065 henries = .65 millihenries)
XL = 2.04 ohms
Phase Angle:
Since we are considering the inductor above to be the ideal inductor, it's phase shift will be +90�. This means the impedance is:
Rectangular form: 0 + j2.04
Polar form: 2.04 +90
Next we'll find capacitive reactance:
XC = 1/(2 * Pi * f * C)
XC = 1/(2 * 3.14 * 500 * .000040 (.000040 farads = 40 microfarads)
XC = 7.96 ohms
Phase Angle:
Since we are considering the capacitor above to be ideal, it's phase shift will be -90�. This means the impedance is:
Rectangular form: 0 - j7.96
Polar form: 7.96 -90
All components together (using polar form):
Capacitor: 7.96 -90
Inductor: 2.04 +90
Resistor: 4 0
As you see above we have 2 components on the same axis (180�) apart and like I said before, we can add them directly. If they were not directly opposed or on different axes, we'd have to go back to the trig functions to solve for impedance.
So, now we just have 2 components to deal with as we did with an RC or RL network. Now we can find the resultant angle and magnitude of the impedance vector.
To find the angle:
tan-1 = -5.96/4 (opposite/adjacent OR reactive/resistive)
tan-1 = -56.1 = -56.1�
To find the magnitude:
c² = b² + a² (c² is the impedance vector or hypotenuse squared)
c² = 5.96² + 4²
c (magnitude of vector) = 7.17
As you can see, the calculations are again very close to the graph. Try going through the calculations again at a different frequency to get some practice. If you do everything right, your answer will fall right on top of the curve.
Use this program to calculate the reactance for inductors and capacitors at various frequencies. You should notice that the reactance increases for inductors as the frequency increases. The reactance for the capacitor decreases as the frequency increases.
Adding Subtracting, Multiplying and Dividing Complex Numbers
Review:
As we said earlier, a complex number is a number that has a real component and an imaginary component. In the complex number (3 + 5j) 3 is the real component and 5j is the imaginary component (5 is a real number but when multiplied by j, 5j becomes an imaginary number). This is the rectangular form of a complex number. In this next section, I'll explain how to add, subtract, multiply and divide complex numbers. Why? Because it will become necessary to solve equations for more complex series/parallel circuits. Complex numbers can also be in polar form. The polar form of 3+5j is 5.8359�.
Adding and subtracting complex numbers:
Until this point, we only had to add and subtract numbers that were exactly 180� out of phase so we just subtracted the real part of the capacitive complex number from the real part of the inductive complex number. We were actually adding the components together but... because capacitance is on the negative y-axis, it's a negative number. When we add a negative number to positive number, we're essentially subtracting the negative number from the positive number (4j+(-6j))=-2j.
Vector review:
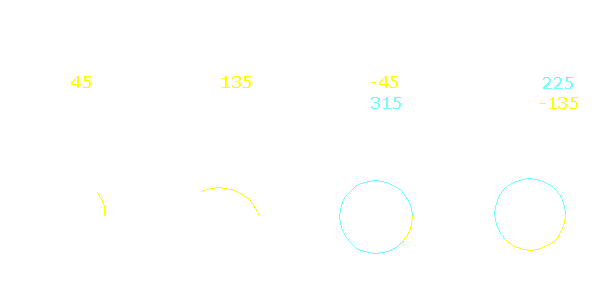
The following drawing shows a few vectors and the complex number that expresses their value. You'll notice that some of the vectors have 2 angles. Both are valid. Using the positive real axis as the origin, if you go counter-clockwise, the angle measurement is increasingly positive. If you go clockwise, the angle is increasingly negative.
Using the rectangular form for adding and subtracting complex numbers:
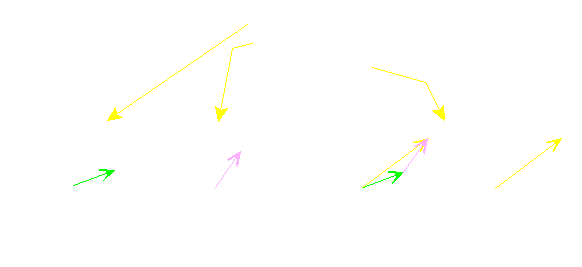
When adding complex numbers, it's easier if they are in rectangular form (instead of polar form). Below we have a few examples. You can see that it's essentially straight forward. In this diagram the vector on the first graph is added to the vector on the second graph. On the third graph you can see the first two vectors graphically added together. Notice that they end up at the end of the resultant vector.
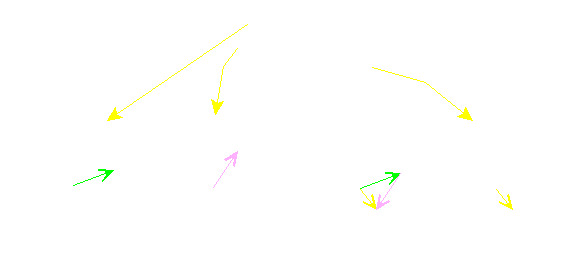
You can see that subtracting the second vector means changing the signs from positive to negative which results in a vector which looks like a mirror image of the vector (in both planes). Again, in the third graph, the vectors are put end to end and point to the same point as the resultant vector.
Multiplying and dividing complex numbers in polar form:
Multiplying and dividing numbers in polar form is easier than in rectangular form. To multiply 2 complex numbers, you multiply the magnitude and add the angles. Like this...
Division:
To divide complex numbers, divide the real part (the magnitude) and subtract the angle.
(5660)/(3590) = 1.6-30
(56-60)/(-3590) = -1.6-150
(8060)/(20-90) = 4150
Parallel resistance networks were covered on the series/parallel impedance page. If you don't remember the basics, go back and reread the section on calculating parallel resistance. It's only a couple of paragraphs long.
As you know, with series resistance, you simply add the resistive components together. With series impedance (magnitude and phase), you still add the series components but you have to deal with a phase angle. For parallel resistance we had a few options. For parallel impedance those option are still viable but you have to be a little more careful. If you have multiple components with the same impedance (like in 'method #1'), the phase angle must be identical for the calculations to be accurate. If you have 3 identical components, the phase angle will be the same and therefore 'method #1' would work. Method #2 will work but dealing with the reciprocal of complex numbers isn't my idea of fun. Method #3 is, in my opinion, the easiest.
For this example I chose the component values that would be used to make a 1000hz Linkwitz-Riley high pass filter for a 4 ohm speaker. In this example we will consider all of the components to be ideal (capacitor... purely capacitive, inductor... purely inductive, speaker... purely resistive).
Test Parameters:
4 ohm speaker
20uf capacitor
1000hz frequency
1.25mH coil (inductor)
Find reactance of all reactive components (inductor and capacitor):
Inductive reactance:
XL = 2 * Pi * f * L
XL = 2 * 3.14 * 1000 * .00125 (inductance must be in henries not millihenries)
XL = 7.854 ohms
Capacitive Reactance:
XC =1/(2 * Pi * f * C)
XC = 1/(2 * Pi * 1000 * 0.00002) (capacitance must be in Farads not microfarads)
XC = 1/0.126
XC = 7.958 ohms
So now we know...
4 ohm speaker has an impedance of 4 0�
20uf capacitor has an impedance of 7.958 -90 (ideal capacitors have a phase shift of -90�)
1.25mH coil (inductor) has an impedance of 7.854 +90 (ideal inductors have a phase shift of +90�)
What next?
Since we can't determine total impedance until we determine the impedance of the speaker and inductor in parallel, we'll use the product over sum method to calculate the parallel impedance. Remember that it's easier to multiply in polar form and add in rectangular form so we'll convert the values to rectangular values also.
Capacitor
Inductor
Resistor
Rectangular
0 - 7.958j
0 + 7.854j
4 + 0j
Polar
7.958 -90
7.854 +90
4 0
Ok, now that we have the values in both polar and rectangular, let's do the math to find the impedance of the parallel connected coil and speaker.
Total parallel impedance = ((7.854 +90) * (4 0))/((0 + 7.854j)+(4 + 0j))
Total parallel impedance = (31.416 90)/(4 + 7.854j)
OR convert the denominator to polar (since it's easier to divide in polar form)
Total parallel impedance = (31.416 90)/(8.814 63.011�)
Total parallel impedance = 3.564 26.989� or (3.176 + 1.617j)
If we add the impedance of the parallel network to the capacitor's impedance, we get...
Z = (3.176 + 1.617j) + (0 - 7.958j)
Z = 3.176 - 6.341j or 7.09 -63.395�
This tells us that the circuit will have an impedance of 7.09 ohms at a frequency of 1000hz. If you look at the following diagram (which is a plot of impedance and phase shift) you can see that the impedance curve crosses the 1000hz line at ~7 ohms and the phase curve crosses the 1000hz line at ~63�.
Power Calculations
For most power calculations, we use simple scalar magnitudes. This means that the complex values will have to be in polar form. The reason that we will simply use scalar values (simple magnitude) is beacuse the power waveform is significantly different from the voltage and current waveforms from which it's derived. The following plot shows power dissipation as voltage drives a purely resistive load. As you can see, the yellow (power) waveform has a frequency twice the voltage waveform. You can also see that the waveform is no longer sinusoidal. These differences make complex power calculations more difficult.
In the following diagram, we have voltage (orange), power (yellow) and current (green). If we use the formula P=I * E (actually it's reactance so... X=I * E), we get the power waveform. As you can see, the power waveform represents the power into and out of a capacitor. When the power waveform is above 0 on the y-axis, energy is flowing out of the power source (amplifier, wall outlet...). When the waveform is below 0 on the y-axis, the capacitor is delivering energy back into the power source. Remember that we said an ideal capacitor doesn't use any power. Any energy that it stores is later released, especially when dealing with sinusoidal waveforms.
Reactive Power (Q):
Power into a purely reactive load such as an ideal inductor. It can be calculated by using modified versions of the Ohm's law formulas. Its unit of measure is Volt-amps reactive (VAR)
Q = E²/X (voltage squared divided by reactance)
Q = I²X (current squared times reactance)
Q = I * E won't work without phase angle because current and voltage are out of phase.
True Power (P):
Power driven into a purely resistive load. As we said before, its unit of measure is the watt. This is the power dissipated in a purely resistive load or the resistive part of a circuit with both resistive (real) and reactive (imaginary) components.
P = E²/R
P = I²R
P = I * E
Apparent Power (S):
Apparent power is a combination of true power and reactive power (much like impedance is a combination of resistance and reactance). Apparent power is commonly used to indicate power consumption of home appliances such as TVs, stereo receivers and such. Its unit of measure is the volt-amp (VA).
S = E²/Z
S = I²Z
S = IE (the most commonly used formula).
Let's use the values from a previous example to make the next calculations.
Test Parameters:
4 ohm resistor (ideal speaker)
40uf capacitor
1000hz frequency
To find reactance...
Use the formula:
XC =1/(2 * Pi * f * C)
If we use the amplifier from an earlier example (100 watt amplifier into 4 ohms), we know that it produces 20 volts across a 4 ohm load. We already know that the speaker is a 4 ohm load (perfectly resistive for this example). We also know that the capacitor has a reactance of 3.97 ohms. To find the actual impedance of the circuit, we'll use pythagorean's theorem:
c² = b² + a²
c² (hypotenuse² or impedance²) = 4² + 3.97²
Z (impedance) = 5.637
Since we know the voltage and impedance, we can calculate current through the circuit.
V = I * Z or I = V/Z
I = 20/5.637
I = 3.548
Since this is a series circuit, the current flow through all of the devices is the same. If we punch these numbers into some of the formulas we listed above, we can find reactive power, true power and apparent power.
P = I² * R
P = 3.548² * 4
P = 12.588 * 4
P = 50.35 watts The speaker is receiving 50 watts of true power at 1000 hz.
Q = I² * X (VAR = amps² * reactance)
Q = 12.588 * 3.97
Q = 49.98 VAR
S = IE
S = 20 * 3.548
S = 70.96 VA
As you can see, the apparent power (S), is ~71 VA. If you'd have measured the current through the circuit and simply multiplied it times the voltage applied to the circuit (to try to calculate the power being used by the circuit), you'd would have believed that the circuit was using 71 watts of power. But... due to the reactive component of the circuit (the capacitor), which was continuously absorbing and releasing power, you would not have been able to calculate the true power that the speaker was receiving.
Here's a demo to show (graphically) how the total impedance changes as values of the series connected components change. Click on the slider button (on the white bars) to lock and unlock the sliders. When unlocked, the button will follow the mouse as long as it's over the bar.
----- Critically Important -----
Adobe has deemed that the Flash content on web pages is too risky to be used by the general internet user. For virtually all modern browsers, support for Flash was eliminated on 1-1-2021. This means that those browsers will not display any of the interactive Flash demos/calculators/graphics on this (or any other) site.
The simplest (not the best) fix, for now, is to download the Ruffle extension for your browser. It will render the Flash files where they were previously blocked. In some browsers, you will have to click on the big 'play' button to make the Flash applets/graphics visible.
An alternative to Ruffle for viewing Flash content is to use an alternative browser like the older, portable version of Chrome (chromium), an older version of Safari for Windows or one of several other browsers. More information on Flash capable browsers can be found HERE. It's not quite as simple as Ruffle but anyone even moderately familiar with the Windows Control Panel and installation of software can use Flash as it was intended.

 dia. A
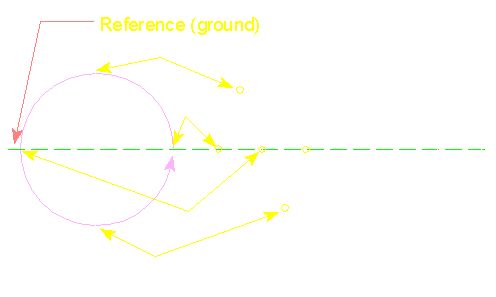 dia. B
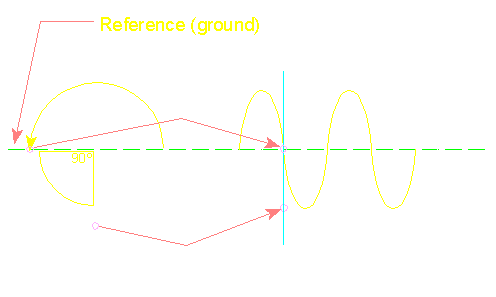


 +90
+90