|
Basic Troubleshooting
|
|
Troubleshooting computers is like solving the problems you solve in everyday life. Once you understand the basic structure, you can easily determine where the problem lies. Of course, this page is designed to guide you through the steps that are generally taken when a computer fails to operate properly. If you have only one computer and it fails to function properly, this will do you no good (it can't be read on a computer that is inoperative). If you think you may need it later, print it out but before you send it to the printer, do a 'print preview' to be sure that the background is printed white with black text. Printing the background color will use a significant amount of ink/toner.
If your computer fails to power up (you can hear/see no fans running and no lights are lit when you press the power button), check the following:
If the lights light up and the various fans spin up when you press the power button but you get no display, check the following:
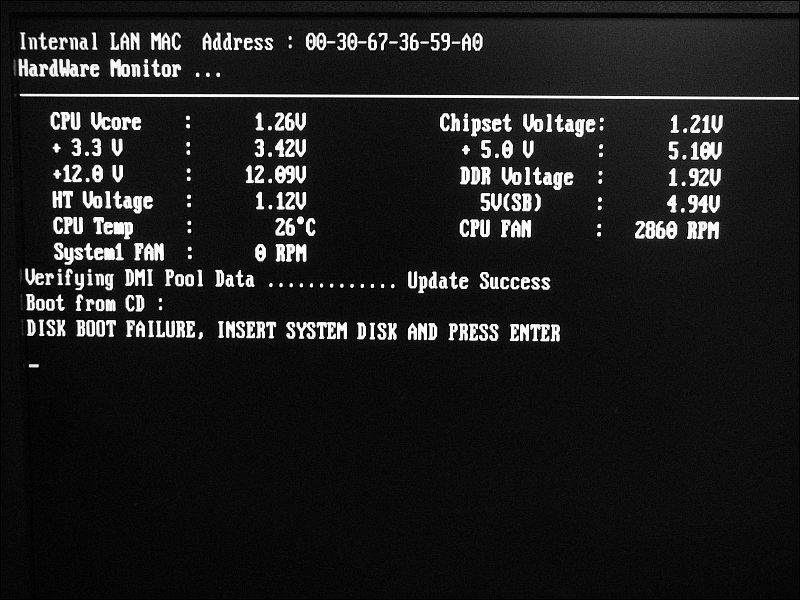 If you've recently installed new graphics card, make sure that the monitor cable is plugged into the new card. Many computers have two or more graphics ports. If it has one on the motherboard's IO panel and a second one in one of the expansion slots, the one in the expansion slot is almost always the one that's going to be used by the computer. If the secondary graphics card is anything other than a basic card, it may need an external power source (from your computer's power supply). Check the installation manual for the graphics card. More on the power requirements for graphics cards can be found on the More On Video Graphics Cards page of the site.
Loose Connections: Sometimes, memory problems cause system instability (crashes). If you want to test the memory, download a program like memtest and burn it to a CD. It's a bootable CD so if it's in the CD/DVD drive when you boot the system and the BIOS setting tell the computer to try to boot to CD first, the memtest software will run automatically. If it makes it through an entire pass, the memory is likely OK.
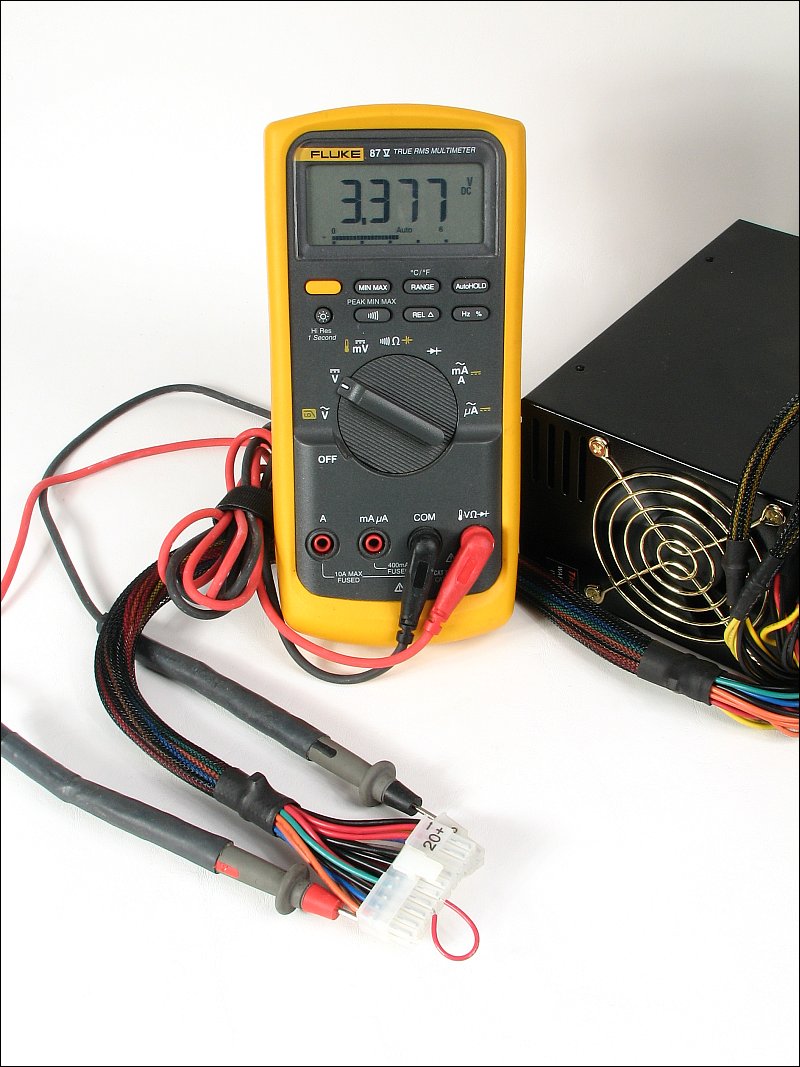
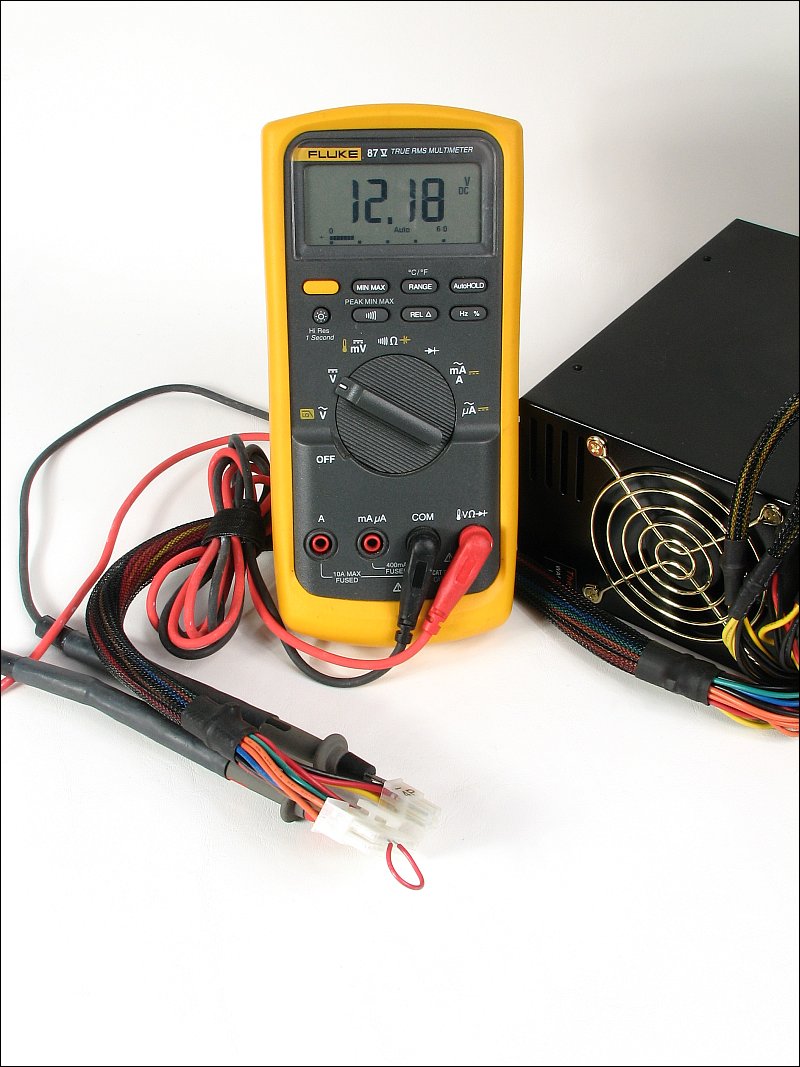
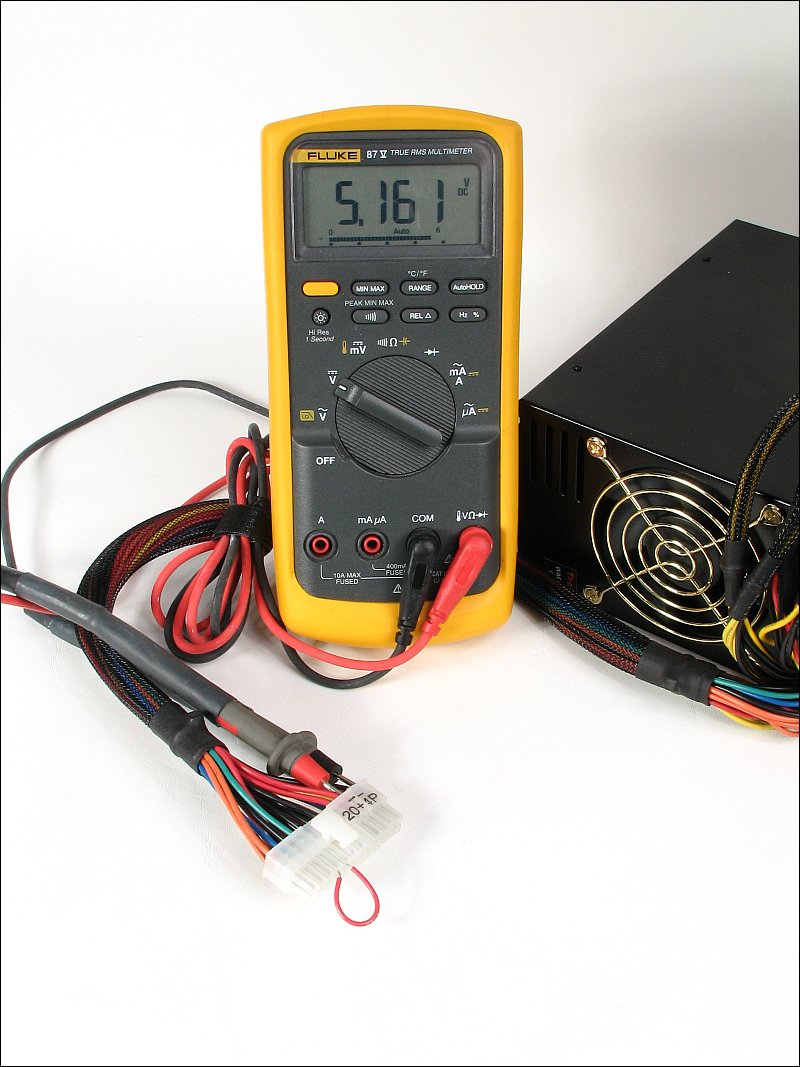
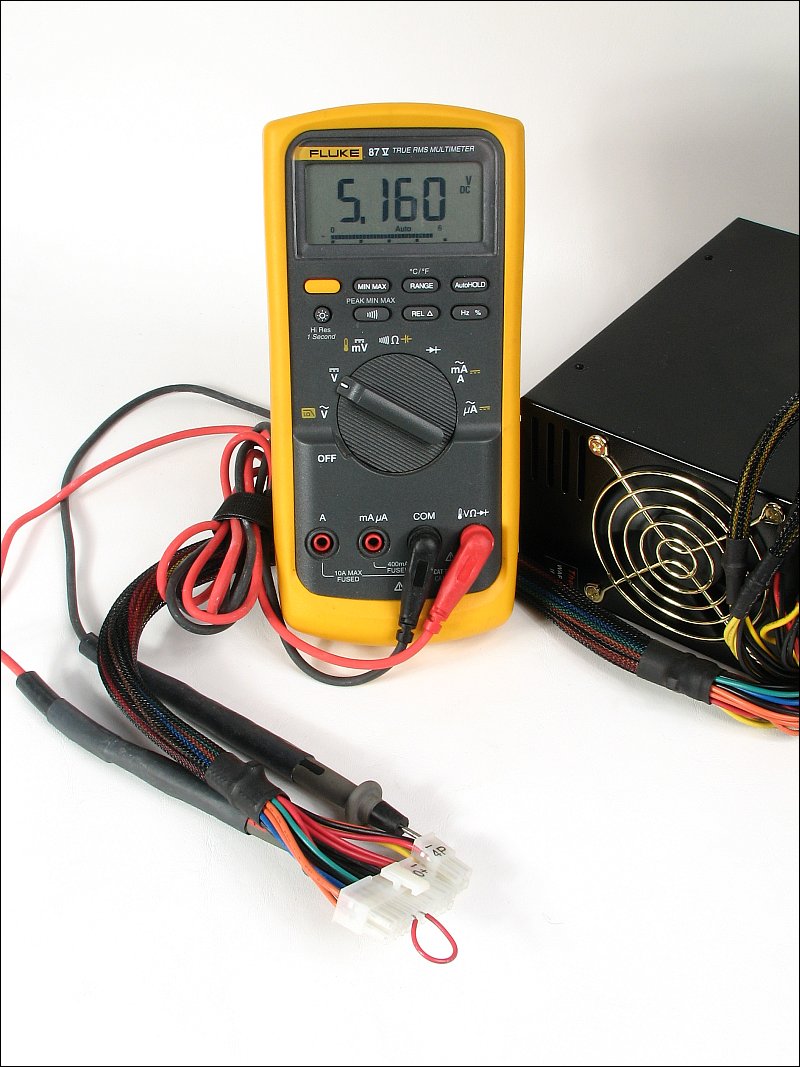
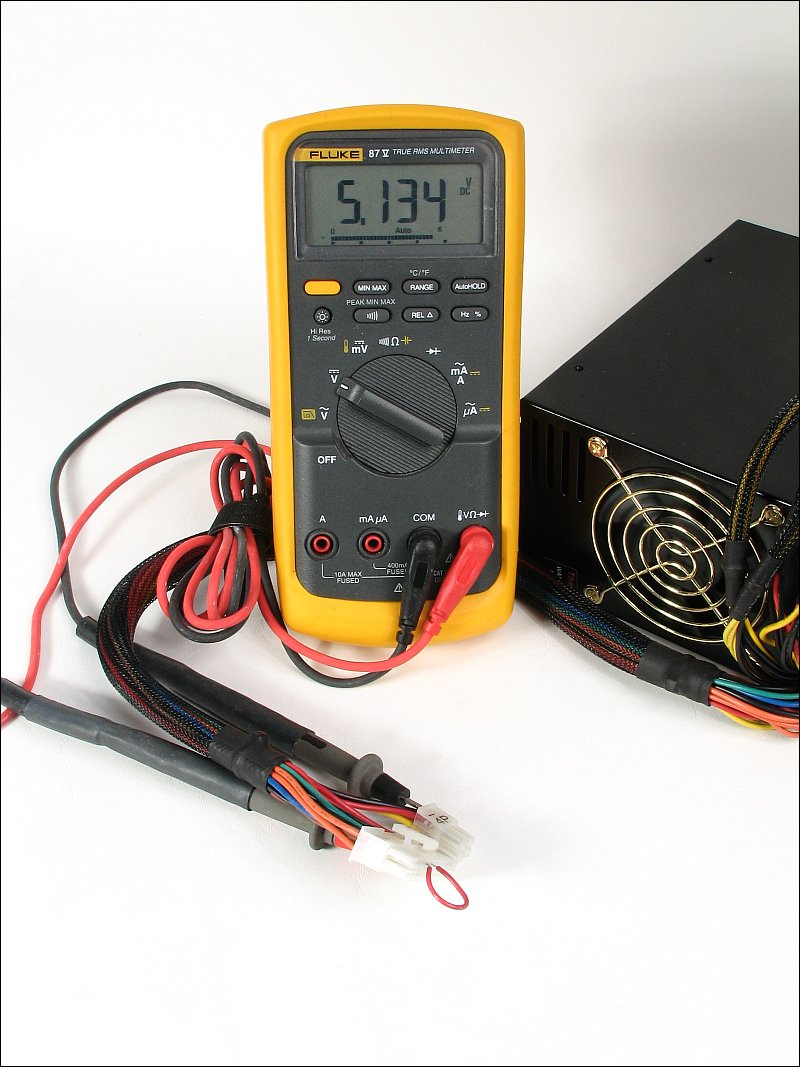
Power Supply in Protect Mode: When you press the power switch, the green wire in an ATX power supply is connected to ground (by the motherboard, not directly grounded by the switch). At that point, the power supply is switched on and all of the various voltages are generated. When the various voltages are within a specified tolerance, a signal is generated on another of the power supply pins (the power OK pin) and the processor is then switched on. All of this takes well under a second and most people never realize that it's happening. ATX power supplies can be tested by disconnecting them from the motherboard and connecting the green wire to any of the black wires. This will turn the supply on. At that point, you can test the individual voltages. If all of them are close to the rated voltage, the supply is likely OK. If the power supply tried to start but wouldn't start (or wouldn't run for more than a second) when it was plugged into the motherboard, you should suspect that something is pulling too much current. Plug the power supply back into the motherboard and disconnect all of the drives' power connectors as well as any accessories such as fans. Again, try to power up the computer. If the PS starts normally, begin reconnecting the power supply to the accessories and drives (one piece at a time and trying to start the machine after each piece is plugged in). If you find that one piece is preventing the machine from starting, you've likely found your problem.
Note: You may not realize that the actual output voltages are rarely precisely at the rated voltage. The following voltages are from a relatively inexpensive supply. The variation from the rated output that you see here is relatively common and this supply will work fine in most computers. Of course, when the power supply is loaded by the computer, the voltage WILL change somewhat. This is an UN-loaded power supply. As a side note, sometimes the output voltage of some of the outputs will actually increase when the supply is loaded. This often happens when the regulated output (generally the +5 volt output) is loaded down. The reason it happens is that the pulse width of the power supply is increased to maintain the regulated 5 volt output. When the pulse width is increased, all of the other outputs will increase (the 5v output should remain constant). Recently, some power supplies have begun employing two independent sets of regulators. This will help keep more of the output voltages within a tighter tolerance.
 ^ Orange ^
 ^ Yellow ^
 ^ Red ^
 ^ Blue ^
 ^ Gray ^
 ^ Violet ^ If the machine will not start with no accessories plugged in but the power supply powers up fine with the green wire shorted to the black wire (don't try shorting green to black while it's connected to the motherboard), the processor may be dead. This is a somewhat difficult situation. When troubleshooting computers, it's common to simply replace the questionable component with a known good component. Since you won't know whether the motherboard or the CPU is defective, you may want to plug the questionable CPU into a known good test board. If the test board has insufficient protection and the CPU is shorted, the PWM regulator in the test board could be damaged (leaving the board irreparably damaged). If you plug a good CPU into a questionable board that has a defective PWM regulator, then you will kill the test CPU. Many times, if you have a blown CPU, it's best to replace both the CPU and the motherboard. If you decide to swap the CPU to check it, make absolutely sure that you have the correct heatsink properly installed BEFORE applying power to the unit. Some CPUs have no thermal rollback/shutdown protection and if the heatsink isn't properly installed, the CPU will fail within seconds.
One very common problem (after a computer has been moved) is improperly seated memory modules. If the computer won't boot up or gives a memory error on the BIOS screen, shut the computer down, remove and re-seat the memory modules. If it still gives an error, you may have to remove all of the modules and install only one at a time (in the various memory slots). If you find that one memory module or one memory slot is causing the error, you will need to avoid using it. Remember to support the board from the back as much as possible when seating the modules.
When you assemble a new machine or install a major component (motherboard, CPU...), sometimes it won't boot up the first time you turn it on. The problem could be a defective component, a connector that's not properly seated or a BIOS/motherboard setting that isn't right. These are just a few of the possibilities.
Sometimes, a computer will simply fail to boot. If you haven't done anything that could be causing problems (installing/updating software/drivers), some of the system files may have become corrupted or some piece of hardware may have failed. If the computer starts to boot (it shows signs of life), it means that the power supply is probably OK. If it repeatedly fails to boot into Windows, you need to try booting to 'safe mode' (covered earlier in the tutorial). If it boots into safe mode, it indicates that the computer's hardware is likely OK and the problem is probably software/driver related. Unless you want to go through extensive troubleshooting, the best thing to do is to go back to the last restore point. Restore Points were covered earlier in the tutorial.
If you installed a new piece of hardware to upgrade an older (but still functional) piece of hardware, the first thing to do is to remove the new piece and reinstall the old component. If the system again begins to boot and works as it did before, the new piece of hardware could be defective or causing some conflict in the system. Its drivers could be corrupt (if you downloaded them) or they may have some sort of incompatibility with your other hardware/software. If you're not going to try to reinstall the new piece of hardware, you should uninstall the drivers for the component that you tried to install. If the machine will still not boot after reinstalling the old component, you may have pulled a connector out of its socket. Try pushing on all of the connectors on all components (don't forget the memory modules) to be sure that they're all properly seated. If that doesn't work, try booting into safe mode. If it boots there, your hardware is very likely OK and you simply have something loading during boot-up that's causing the system to crash. At this point, you can do a couple of things, you can go back to the last restore point (it should have been created when you installed the drivers for the component that caused the problem). You can boot in safe mode and uninstall the drivers that you recently installed and/or you can go through the startup list (run >> msconfig >> startup) and start removing components until the system boots. If you're removing items from the startup list, begin with the ones that seem to be related to the hardware that you recently installed.
If the computer attempts to boot but crashes repeatedly, boot to safe mode and go to START >> CONTROL PANEL >> ADD AND REMOVE PROGRAMS and uninstall the software. We covered the procedure to uninstall software earlier in the tutorial. If the computer still refuses to boot, you may have to go back to the last restore point.
One of the most important tools for troubleshooting strange software problems is Google. There is no way that any one web site can cover every problem. If you have a problem, take note of the EXACT wording of the problem (take and save a screen-cap if you have a poor memory) and search Google. If you enclose the error statement in parentheses, it may make the search more successful. You may have to follow several links because many of the solutions offered on the forums or in the newsgroups will not be the solution for your problem. If you're having trouble with a specific piece of software, try the software's home page. Look in the 'support' and 'FAQ' sections of the site.
Sometimes, a computer will not boot due to a corrupt file in the OS or a defective hard drive. The problem you face is determining which is the culprit. One tool that you can use is a 'live CD'. A Live CD is a bootable operating system (generally a Linux distribution or a stripped down version of Windows). My favorite is the Hiren Boot CD. It's not always easy to find but if you can find a copy that has mini Windows XP on it, that's the one that I'd suggest that you use, especially if you're working on a computer that was using a Windows operating system. With the live CD, you can go in and confirm that the drive is accessible and the files are generally intact. If, for some reason, the operating system is damaged, you can use the live CD to move the files to a different drive (either a USB flash drive or a second hard drive). If you're going to have to reload the operating system from the Windows installation disc, it's best to make a copy of all important files that are on the same partition as the operating system (generally the partition normally labeled C drive). Sometimes these files will be lost when reloading Windows. If you're going to restore the partition from a recovery file like those produced by True Image or Ghost, EVERY file in the restored partition will be wiped out. If you can't find a good live CD, you can remove the drive and connect it to another computer. I generally keep a working but generally unused computer around for this. Although it's unlikely, it's possible for malware to infect the computer when the drive is connected to the system. When you do this, you should boot the computer and then connect the drive. If it's a SATA drive it may automatically be recognized. If it's an IDE drive, you will have to go to START >> RIGHT-CLICK MY COMPUTER >> select PROPERTIES >> select the HARDWARE tab >> select DEVICE MANAGER >> RIGHT-CLICK DISK DRIVES >> select SCAN FOR HARDWARE CHANGES. You should see the new drive appear in the list of disk drives. When you go back to Windows Explorer (My Computer), the drive should show up in the list of drives. From there, move the files you need to save. If the owner of the computer has a lot of important files and can't remember where they all are, the best option may be to simply buy a new hard drive (~$39+ shipping) and load the OS onto the new drive. Then, the owner can move the files to the new drive as they find them. If you do this, make two partitions on the new drive. Make one for the OS. 40-50GB should be plenty. That will leave at least 25GB for the owner to store her files on. It's best (in my opinion) that you not store important files on the OS partition. If you're read the Backing Up Your Hard Drive page, you know that it's also important to have additional backups of important files.
When working on computers, you'll find that many of them have pulled in a lot of dust/dirt/bugs... If you know that the computer is going to be repairable, it's best to clean it before you begin working on it. If you're uncertain as to whether it will be repairable, you may want to wait and clean it after it's up and running. When cleaning a dusty computer, the best tool is compressed air. The compressed gas that you can buy works but not as well as air from an air compressor. If you're going to use air from an air compressor, you must make sure that the air coming from the compressor is clean and dry. Compressors set up for mechanics often have oilers on them to keep the air tools lubricated. If you live in an area that has high humidity, you'll likely need a water trap on the compressor. Before using the compressor to blow out the computer, you'll want to blow air onto a clean dry surface for about 30 seconds. If the surface is dotted with water or oil, it's not suitable to use on any electronic components. Before you begin to blow out the computer, you'll need to remove the optical drives. If you leave them in, dust can be forced into them and can make them malfunction. When you blow the computer out, you'll definitely want to do this outside with the wind/breeze blowing so that the dust is blown clear of you and anything in the area. Some of these computers can be quite dirty. When you do this, you should disassemble the computer as far as possible (remove both side covers, front bezel...) When blowing the computer out, blow from many angles. For fans, blow from both sides (being careful not to spins the fans too fast). When blowing the power supply out, you'll need to blow repeatedly from both the intake and output sides from every conceivable angle, until no more dust can be blown from it. Expect to do this for 5 minutes or more for really dirty computers. When it's clean, there should be no dust coming from the computer, no matter what angle you blow into the case. If the computer was in the home of a smoker, the dust will probably be very sticky and be difficult to remove. For critical surfaces like the heatsinks, you may need to remove them from the computer and wash them with a stiff brush, soap and hot water (after the fans have been removed). In the case of live infestations of bugs (namely, cockroaches), it's often better to let someone else deal with it. If the cockroaches are alive, they can infest your home or shop and be difficult to get rid of. In cases where there is a heavy infestation in the computer, the smell can be awful and very unpleasant to work around. If you get a computer that's infested with live roaches you should immediately spray the computer with insecticide and put it in a garbage bag that you can seal up (so they can't escape). Many insecticide sprays leave an oily residue and are not well suited for this. If you can find Bengal roach spray, use that. It's VERY effective and is a dry powder. Be aware, however, when you use Bengal, roaches will try to escape it and will exit from every hole in the computer. If you think that you'll have to work on the infested computer again, seal every entry-way that you can find. Tape those that don't need to be open and install fiberglass window screen over the rest of the openings (like those for fans). Tell the owner about the infestation and recommend that they hire an exterminator or apply insecticide themselves (recommend the Bengal, it works). This is important because cockroaches can cause a lot of damage to the other electronic equipment in their homes. Even if it's repairable, it may not be possible to find a service technician that will repair it for them.
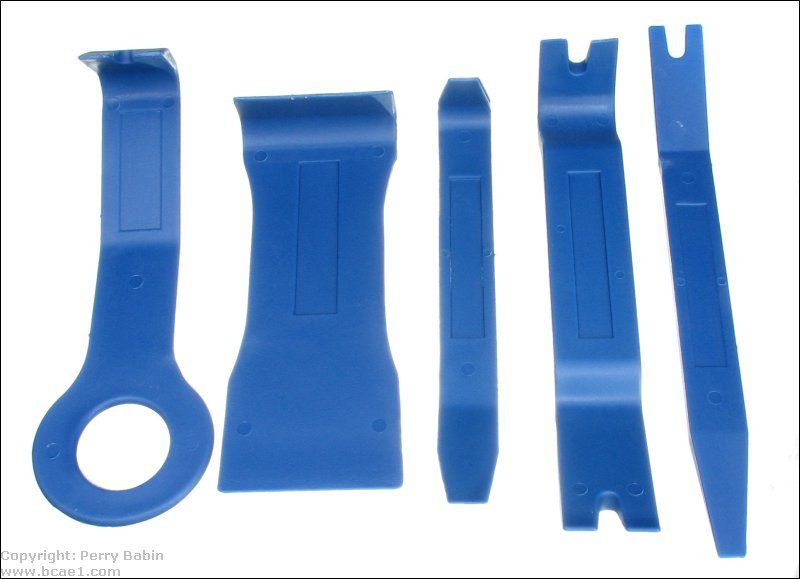
Working on laptop computers isn't something that I'd recommend that you do unless you're very confident in your abilities or you don't absolutely need the computer to work when you finish. It's very easy to make a mistake that can cause significant damage to a laptop computer. If you damage the motherboard, there is little chance that the computer will be repairable. There are, however, a few things that most people can do if they're careful (tighten a loose monitor bracket, replace the power jack, change the processor, clean the heatsink and fan for the processor or graphics adapter...). The most common problems with laptop computers (that require partial or complete disassembly) are broken power connectors, defective keyboards and failed drives. Laptop computers are held together with a combination of screws and locking tabs. The tabs are generally located around the perimeter. To release them, you have to push one half of the case in or out along the point where they meet. Using your fingernails to do this may work for some but the proper tools work better. You can use the same types of tools used to take apart the dashboards of cars (available on eBay or from Harbor Freight). The 'black stick' spudger also works well.
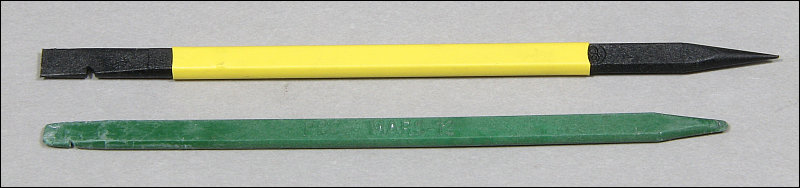
 The black spudger below is a Menda #35622. You can find them for less than $2 each. Buy several. You may break one or two until you learn how much stress they can take.
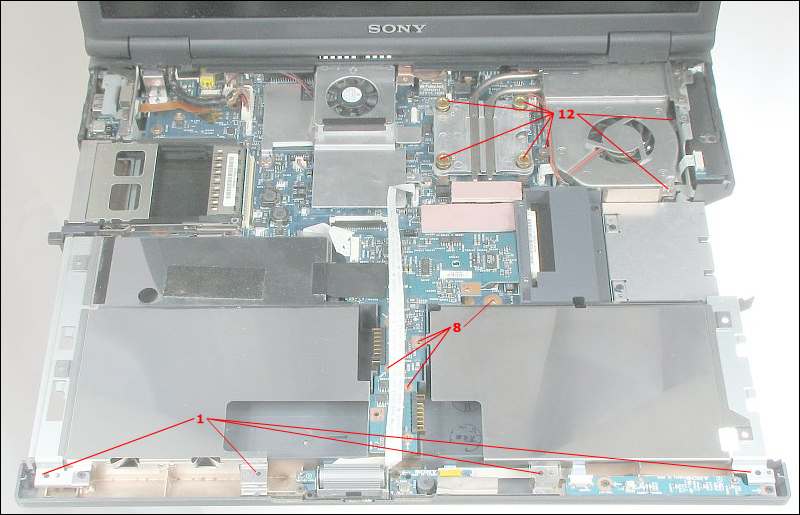
 One of the most difficult thing to remember when repairing laptops is where each of the screws goes. Here, a camera is your best friend. If you have a video camera, set it on a tripod and allow it to record the disassembly of the computer. Record at the highest resolution possible. If you don't have a video camera, photos are just about as good. Take a photo of each side of the computer and take new photos each time that you remove something that reveals another area that was not previously visible. As you disassemble the computer, you will see that there are many different screw sizes (length and diameter). Use the photos that you take to make a diagram of the screw locations. Start with #1 for the first screws that you remove and mark #1 on the photo. Use a divided container to keep the screws organized. The best that I've found are the 14 day containers. Mark the container from 1-14 (15-28 on the second container, 29-42 on the third...) and place the corresponding screws in the various slots. You will need several of these for most laptops. When placing the screws in the individual slots, only include those that were taken off at the same point in the disassembly process and that match exactly. When you reassemble the computer, simply reinstall the screws in the reverse order. Many people will think that this is a waste of time but it's very annoying when you think you have the computer properly reassembled only to find that you have extra screws. Sometimes a screw is critical to the proper operation of the computer because it grounds part of the board or ensures that the heatsink lays properly on the CPU.
 When you use a photo to show where the various screws go, lighten the photo. It makes it easier to see the marks on it. You can either print it and make the marks with a sharpie or save the photo with a new name and mark the photo with MS Paint or your favorite software.
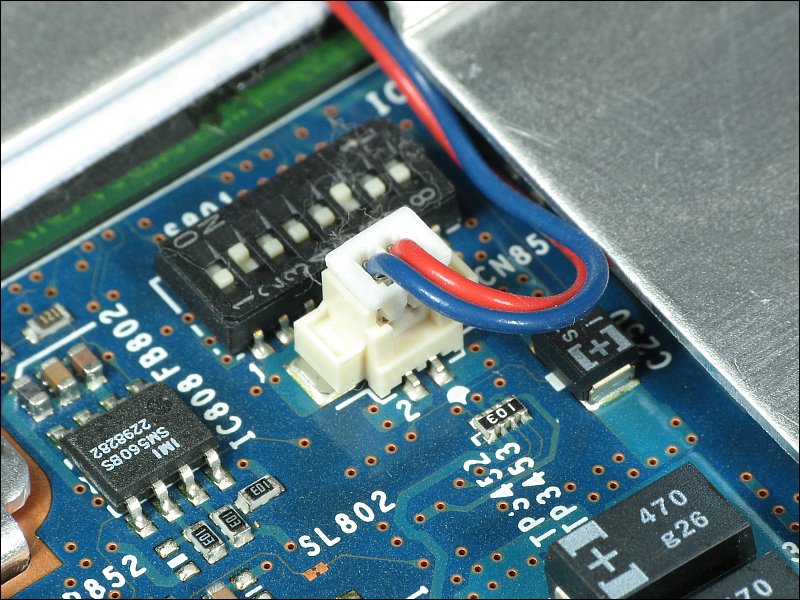
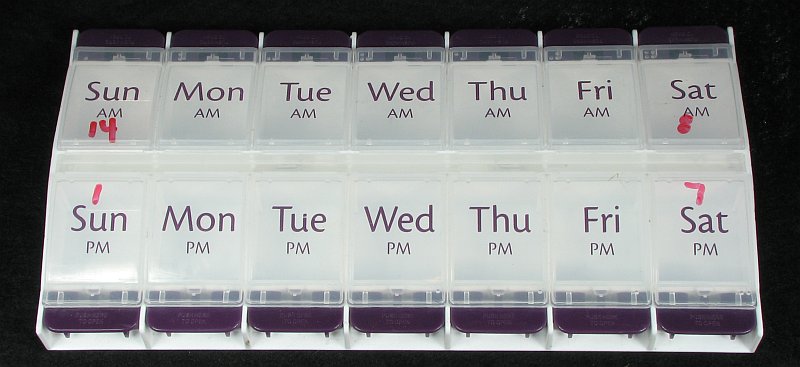 I recommend the type of container above because each of the slots can be latched closed. You may be tempted to use ice trays but I can tell you from experience that it's not a good idea. A slight bump to the tray and screws will be thrown farther than you'd imagine. This will generally result in the loss of many of the screws. During the disassembly, there will be numerous connectors to disconnect. Most are straight-forward. The first is the simplest. You can see that the plug is white and the socket is beige. Pull up on the white part. It's better to only apply force to the plastic but you can generally help by pulling 'gently' on the wires as well. I strongly recommend only using your fingernails to help pull the connectors. If you use pliers and they slip off of the top of the connector, they can VERY easily sheer off the wires. When disassembling a laptop that you've never worked on before, it's important that you take your time and don't force anything. Most pieces come off easily once all of the screws have been removed. If you use too much force and are not careful, when the piece finally comes free, it could result in the tearing of the various cables (ribbon cables are the most vulnerable when force is applied to them along a sharp corner).
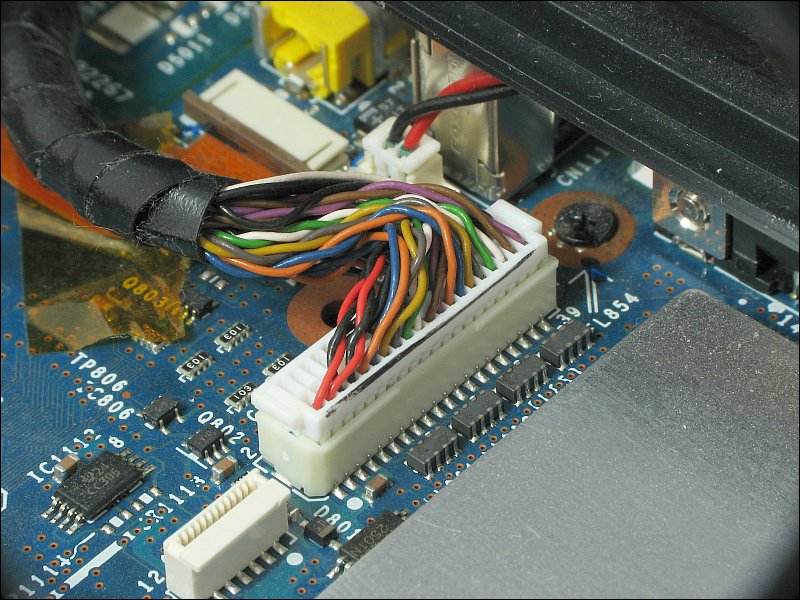
 The following connector is for the video monitor. It's like the connector above but a bit larger. These can take a bit more force to disconnect. If you must pull on the wires, pull straight up. If you pull at an angle, you may apply too much force to the wires on the end of the connector which can cause it to break. The break may not be visible (if part of the insulation was crimped into the terminal) and can cause a lot of un-necessary problems.
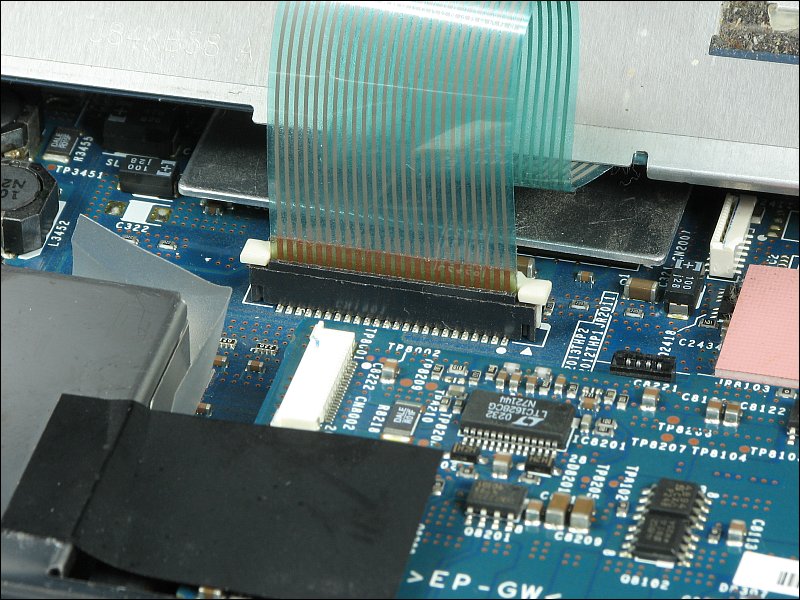
 This next connector is common on keyboards. It's a 2-part connector. The black part is stationary. The white part slides up and down to release and lock the ribbon cable in the connector. To release the cable, lift the lock about 1/16" and pull the ribbon free. When the lock is open, the ribbon should pull free very easily. To reconnect the ribbon, make sure that the lock is in the up-position and insert the ribbon. Then push the lock down until it clicks.
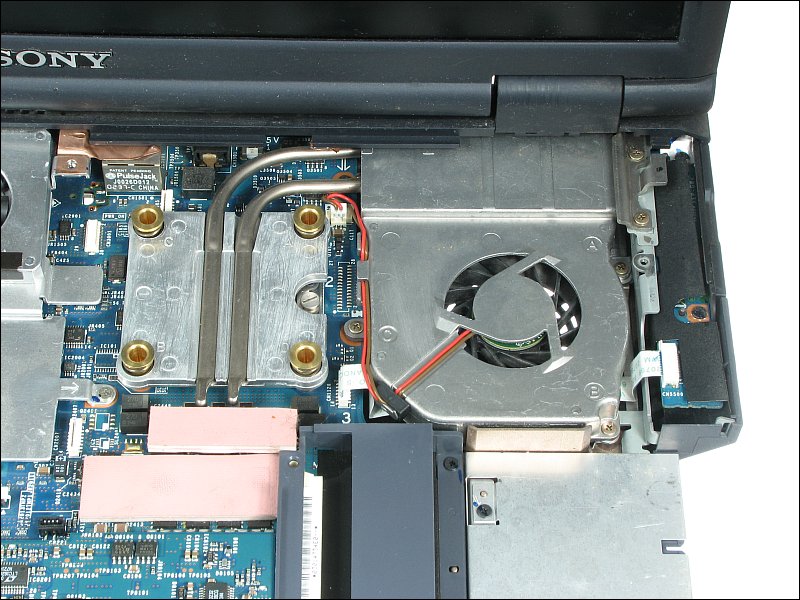
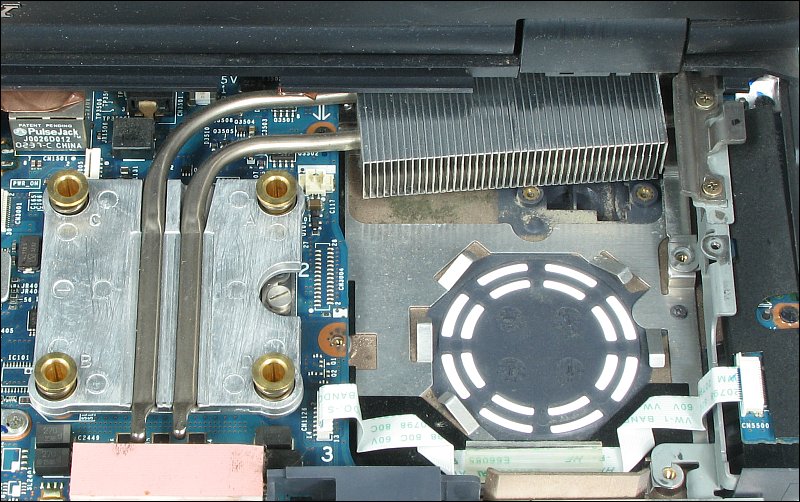
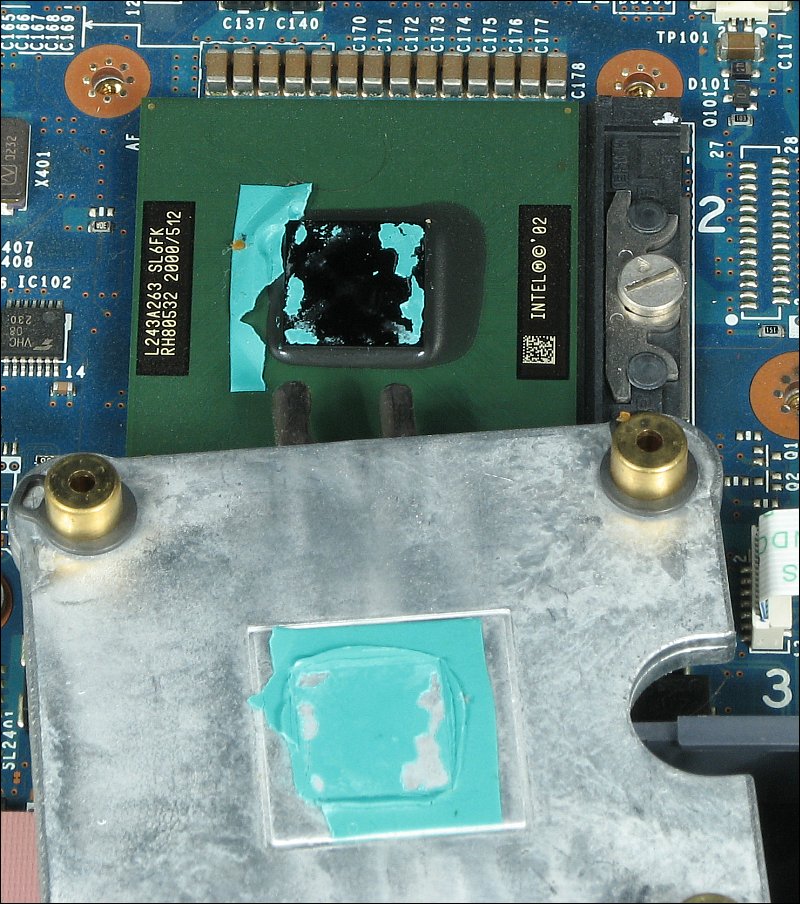
 The next image shows the heatsink and fan for the CPU. I'd advise against touching this unless you absolutely need to do so. The large gray part with the four brass posts is the heatsink. The two pipes that go out and to the left are heatpipes and move the heat to the fins of the heatsink. Sometimes, a laptop will begin to overheat, even when none of the vents (bottom and rear of the computer) are blocked. This is sometimes due to excessive dust in the fins. The best way to clear this is with canned air (compressed gas dusters). This generally works well enough but sometimes, you have to remove the sink. When you remove the sink, you MUST replace the heatsink compound that goes between the sink and the processor. If you try to re-use the original compound, the processor may overheat and fail. the additional photos show the fan shroud and fan removes as well as the heatsink removed from the processor.
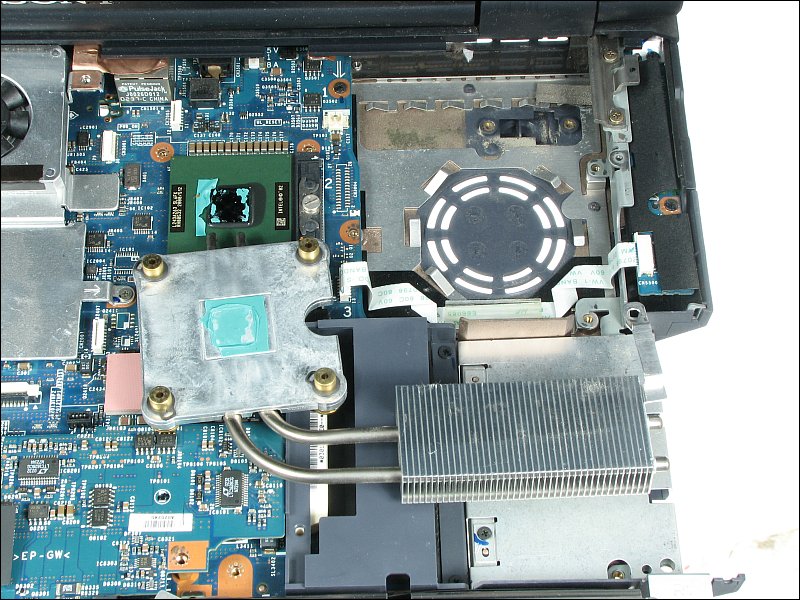 In this last photo, you can clearly see the thermal interface material (turquoise/green). That would have be completely removed and replaced. Virtually any thermal heatsink compound will work. Some like the Arctic Silver 5 but it's not necessary to use it. If you were going to replace the processor, you would release the processor by turning the screw on the socket counter-clockwise. After replacing the processor, you would turn it clockwise to lock it in.
|
|
| Contact Me: babin_perry@yahoo.com | |
|
Perry Babin 2005 - Present All Rights Reserved
|
