Flash support by most modern browsers has been dropped but that's not the end of the line for Flash.
There is no practical alternative to Flash for the interactive demos/applets/graphics on this site.. Especially when there are alternatives, some simple, some good, some...
Ruffle is chosen by most because they can't imagine using anything but their preferred browser. It works. It's OK but not great. The Flash graphics won't look as they're supposed to but it, generally, works.
The #1 preferred (by me) way to view the site and the Flash graphics is with the Chromium Portable browser and the installation of the older (no time-out) Flash Player files. This was incredibly simple when people knew computers but not today when people only know how to work with their phones.
The Flash Browser is a good option but it's so stripped down that it makes it somewhat difficult to use.
The Maxthon browsers are an option. The v4.95 is the easiest (install and use). V5.3.8 and 6.1.0 require (very) slightly more effort (very).
The Chromium and Maxthon browsers on the page above are 'portable' browsers. They are not installed into your system. They are simply made available for use on your computer. They can be carried around on a Flash drive and used on any computer.
----- Critically Important -----
This is ABSOLUTELY THE most important page on this site!
Fuses
From my experience (25+ years in the amp repair business), it seems that most people don't fully understand what a fuse does and why it's necessary. This page will help you to understand fuses and will make you fully realize the consequences of using a fuse that's rated higher than what is recommended by the manufacturer (for electrical devices) or for the current carrying capacity of the wire in the circuit. Virtually every type fuse and fuse holder used in car audio will be shown below and most will have descriptions telling where it's good to use and when a different fuse may be a better choice.
Function:
A fuse is generally inserted into an electrical circuit for 1 of 2 reasons, either to protect the power source which includes the wire that connects the power supply to the electrical device, or to protect the electronic equipment. The electronic equipment manufacturers specify a fuse rated to open the electrical circuit before damage can be done to the device or open the circuit if the electronic device fails in some way (electronic devices may pull excessive current when they fail). If a fuse larger than the specified fuse is used, a small mistake when installing the equipment may cause catastrophic failure of the equipment. WHEN, not if, WHEN you're thinking of replacing a blown fuse with a higher rated fuse ask yourself if you know more than the engineer who designed the equipment.
It basically comes down to this... If you use the correct fuse and there is a problem that's causing excessive current flow, you're sacrificing a $0.50 fuse to protect an expensive piece of electrical equipment and the vehicle it's installed in. If you use a fuse that's rated for too much current, you're sacrificing an expensive piece of equipment or the vehicle it's installed in to protect a $0.50 fuse. Don't get in a hurry when installing electronic equipment. Take the time to go get the right fuse. 50 cents for a fuse is better than $60-$100 labor plus the cost of the replacement parts to have the equipment repaired (if the damage isn't too extensive) or in the worst case scenario, the cost of the stereo equipment AND the vehicle.
Basic Specifications:
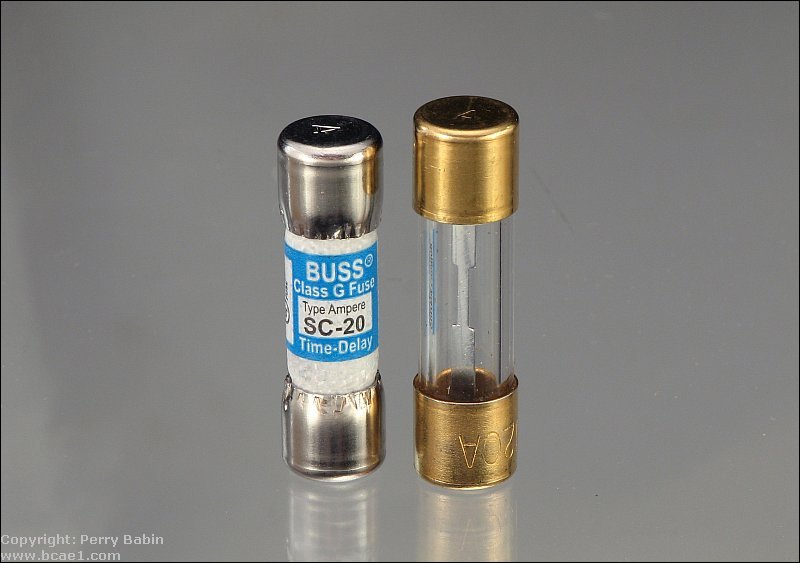
There are two important specifications for fuses. The first is simply the current rating. Fuses are rated for a given number of amps (amperes). Fuses are not rated in watts. If a fuse has 30 printed on it, it's a 30 amp fuse, not a 30 watt fuse. The second specification is the voltage. This isn't really important if you're simply replacing a fuse that has blown with the same type. Fuses typically used in automobiles are generally rated well below 100 volts. If you were to attempt to use a low voltage fuse in a circuit with mains voltage (110v+), it would present a real danger. When a fuse blows, it opens a gap large enough so that an arc (which burns at a very high temperature) can't form between the terminals inside the fuse. A low voltage fuse like an AGU fuse may not be able to open a large enough gap to quench the arc. That would allow current to continue flowing (current would jump the gap in the fusible element in the form of an arc). This could result in an electrical fire. High voltage fuses may also be filled with silica (sand) to fill the gap and quench the arc. Low voltage fuses are not. The following is one example where a low voltage fuse very closely matches a high voltage fuse in size and current rating but is absolutely not a good substitute.
Example:
In this first diagram, you have a simple system. You simply need to safely get the B+ (12v) line from the battery to the amplifier. One of the most important things to understand here is that wire segment A is not protected in any way. If it were to be shorted to ground, either the wire or the battery would be damaged and in either case there would likely be an electrical fire. This is why the wire must be short. 12-18" is the maximum recommended. The fuse protects the remaining length of wire. This generally extends from the front of the vehicle to the back of the vehicle. The fuse must be rated to protect the wire that's being used. The wire 'gauge' is generally the deciding factor when it comes to selecting a fuse. More information on the selection of the proper fuse will be covered on the 'Wire' page of the site. If the amp has no fuse on-board, you will need an external fuse. If you have only one amp, the fuse at the battery can be used to protect the wire and the amplifier. The fuse would need to be whatever was recommended by the manufacturer for the amplifier and would also need to be rated at or less than the suggested maximum current for the wire that you're using.
In the next diagram, things get a little more complicated. As you can see, wire segment 'A' is used to deliver power to the fuse within 18" of the battery. Wire 'A' is of a large enough gauge to power both amplifiers. 4 gauge wire is commonly used as a main power wire so it will be used as an example here. Fuse 'A' must be rated to protect wire 'B'. Any fuse rated at less than ~150 amps is sufficient to protect a 4g wire and the vehicle but I generally recommend a 125 amp fuse with 4g wire. Fuse B protects wire segment C. Fuse C protects wire segment D.
In most cases, the wire size is reduced at the point of distribution. ANY time that the wire size is reduced, you must add a fuse in the line (at the point of distribution) to protect the smaller wire. Look at the following for more detailed info about changing wire sizes.
What you should know about the image below (Please excuse any redundancy. This is important.):
Wire "A" is unprotected which is why you want the main (125 amp) fuse as close to the battery as possible. If this length of wire gets shorted, it WILL burn.
Wire "B" is protected by the 125 amp fuse. It has to be at least 4g. Smaller wire would possibly burn before the fuse would blow in the case of a short circuit to ground. This wire feeds all of the power to the distribution block.
Wire "C" is supplied power from the distribution block. Since it's also a 4g wire, it needs no fuse. The main wafer fuse will protect it and the vehicle in case it's shorted to ground.
Wire "D" is a smaller wire. It's also supplied power by the distribution block. Since this wire is smaller (let's say an 8g wire), the main fuse can not protect against a short circuit. If the 8g wire shorts to ground, it will burn (and possibly take the vehicle with it). This would be a very unsafe condition.
Fuse "A" is protecting wire "E". If the wire is an 8g wire and the fuse is rated at 50 amps or less, the wire is properly protected in case of an accidental short circuit.
Fuse "B" is protecting wire "F". The wire is a 6g wire so it can handle more current than the 8g wire. Any fuse rated at 80 amps or less will protect the wire in case it's shorted to ground. AGU fuses aren't available for anything more than 60 amps so you'd have to have a MAXI-fuse distribution block for anything requiring more than a 60 amp fuse. AGU fuses greater than 80 amps are not available from the two 'real' fuse manufacturers (Bussmann and Littelfuse). There's likely a reason for that. The fuse configuration simply isn't well suited for greater than 60 amps of current. If you use an AGU fuse rated for more than 60 amps in a circuit that draws more than 60 amps for long periods of time, expect to have problems (melted fuse holders, fuses failing but not blowing in the center of the fusible element...).
As you can see, wire "G" is a small wire. Some people might want to power a crossover (or other low current device) in the rear of the vehicle. If the wire was a really small wire like a 16g or 18g wire, there would be no suitable AGU fuse to protect it. In this situation, you'd have to have a secondary fuse holder with a 7.5 amp (or smaller) fuse to protect the wire. A better solution would be to use a 14g (or larger wire) and a 10 amp AGU fuse.
Sometimes, people will insert a small wire (wire "I") in with one of the other larger wires (wire "H") to power the crossover. Since the port that it's tapped off of is likely powering an amplifier, the small AGU fuse is not an option. Since the port already had a relatively large wire in it (because it's powering an amp), the wire tapping off of the shared port probably can't be very big. This smaller wire would absolutely have to have a dedicated fuse holder as close to the distribution block as possible. If wire "I" was shorted to ground and the dedicated fuse holder was absent, wire "I" would burn.
If anything is unclear about this section, please email me and I'll try to clarify. As I said above, this is the most important page of the site. I want everything to be perfectly clear.
Using multiple small wires in place of a larger wire:
Some people may want to use a bunch of smaller, individually insulated, wires (like ten 14g wires) in place of one larger wire (like a 4g wire). This may be OK as far as current carrying capacity is concerned but the problem comes in when you have to fuse it. A 4g wire can handle about 125 amps. A 14g wire can handle about 15 amps. If one of the strands of the 14g wire is shorted to ground (like where it runs through the firewall), the main 125 amp fuse would not blow and the wire would burn. To properly protect the multiple strands of insulated wire, you'd have to use ten 15 amp fuses in individual holders (each wire would have its own fuse). I know that this may be an 'off the wall' situation but I've had several emails about this (generally concerning two or three 8g wires and a large wafer fuse) so there are, at least, a few people who don't fully understand this.
Suggested Fuse Sizes
Wire Gauge
Recommended Maximum Fuse Size
00 awg
400 amps
0 awg
325 amps
1 awg
250 amps
2 awg
200 amps
4 awg
125 amps
6 awg
80 amps
8 awg
50 amps
10 awg
30 amps
12 awg
20 amps
14 awg
15 amps
16 awg
7.5 amps
These are the recommended maximum fuse ratings for the corresponding wire size. Using a smaller fuse than what's recommended here will be perfectly safe.
Fuse Opening Time:
A fuse does not blow when the current reaches its rated current. It is designed to pass its rated current without opening. A fuse will take varying times to blow under different conditions. A fuse will pass significantly more than its rated current for a very short time. It may take 10 minutes or more to blow a fuse at 25% over its rated current. The table below is an example of the specifications for a slow blow fuse. You can see that a 20 amp fuse may pass 40 amps of current for as long as 5 minutes before blowing although it probably wouldn't take a full 5 minutes to blow. The times for other fuses will be slightly different.
%of amp rating
Opening time
110%
4 hours minimum
135%
1 hour maximum
200%
5 minutes maximum
This graph lets you see the estimated time that it might take for an ANL type fuse to open. The data used to create the graph was found on the Bussmann web site. You can see that it would take as much as 10 seconds to blow at double its rated current flow but it would only take approximately 0.1 seconds to blow it if 1000 amps of current passed through the 100 amp fuse. If your amplifiers would intermittently draw 200 amps, the fuse probably would not blow. If they drew 200 amps for more than 10 seconds, the fuse would likely blow. If the wire was shorted to ground, the current flow would be extremely high (probably more than 1000 amps) and the fuse would blow almost instantly.
Graph of opening time vs current flow through a 100 amp ANL type fuse.
Blown Fuses:
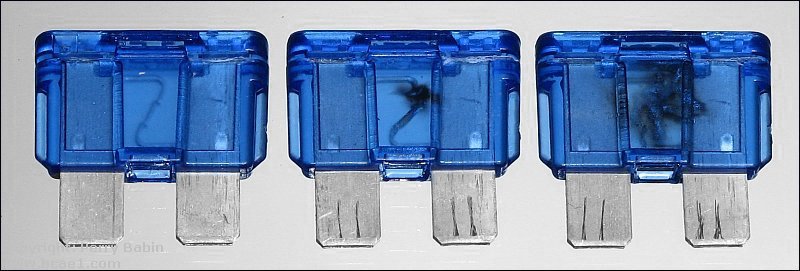
Although it's obvious when a fuse has blown/opened as it is designed to do but a lot of people still want to know what a blown fuse looks like. Below are several examples. The first image has three 15 amp fuses. The one on the left is a normal fuse. The fusible element is intact. The middle fuse blew from a slight overload. The fuse on the right has blown violently. When the element essentially explodes splattering the entire window with the molten remains of the fusible element, you know it was a significant overload.
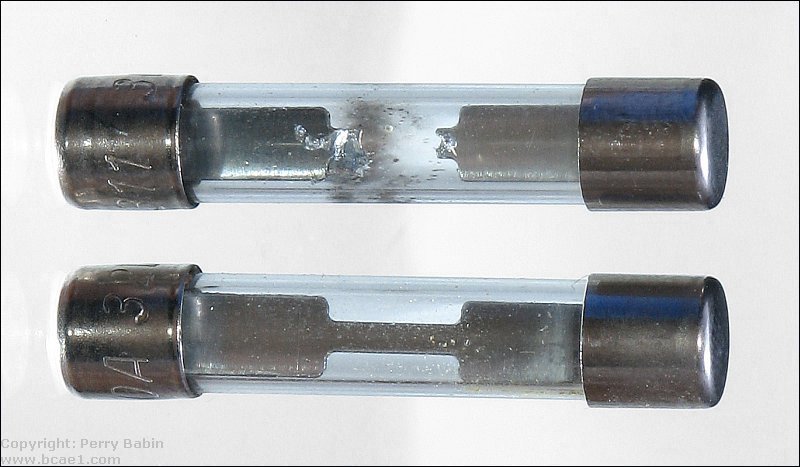
In this image, you see what it looks like when a glass fuse blows as it was designed. Again, this was a significant overload. Many times, the element has just a tiny break in it and you have to hold it up to a light to see it. It was stated that these fuses blew as they were designed to blow. That means that they opened in the middle of the element where it could clearly be seen in the viewing window. In some instances (cheap AGU fuses, in particular), the fusible element will become desoldered from the end cap and the fuse will stop or intermittently pass current.
This is what a blown ANL fuse looks like. Unlike other fuses that allow you to see through to the other side, you can't see an opening in the fusible element. If you didn't look at the fuse before it was blown, it may be difficult to know if it was blown without using a multimeter to check it.
Checking Fuses:
There are several ways that you can check a fuse. When checking fuses in the circuit, you put one meter probe (meter set to DC volts) on each of the terminals and the meter should read approximately 0v DC. When checking the fuses in the circuit and using the meter set to DC volts, the power should be as it would normally be when the fuse being tested had voltage on it. This means that if you're checking a fuse to see if it has voltage across it, and the fuse is used for something that only has power when the key is in the ign/on position, the key must be in that position. If it's not, there will be no voltage applied and there will be no voltage across the fuse, even if it's blown. If the fuse reads something significantly higher than 0v, remove the fuse and check it out of the circuit. For this, you will set your meter to ohms. Touch the probes together to see what the meter reads. It should read well under 1 ohm. Touch the probes to each end of the fuse and it should read essentially the same thing as when you touched the probes together. If you read the same as when the probes are open (not touching anything but air), the fuse is defective. For plastic fuses (in the circuit), you will touch the probes to the metal test points. Out of the circuit, you will touch the probes to the larger tabs on the bottom of the fuse.
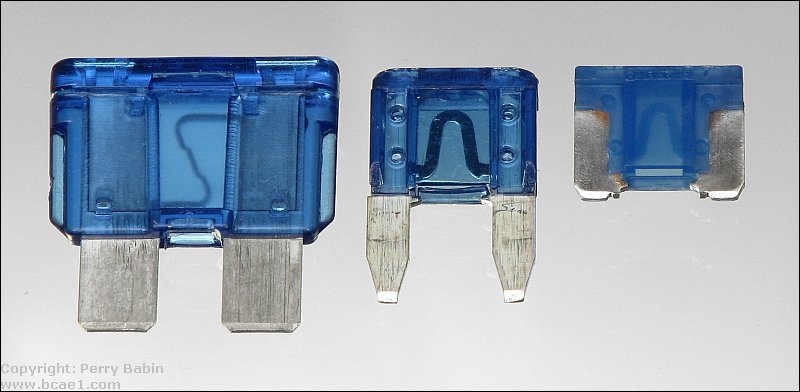
Plastic Fuses
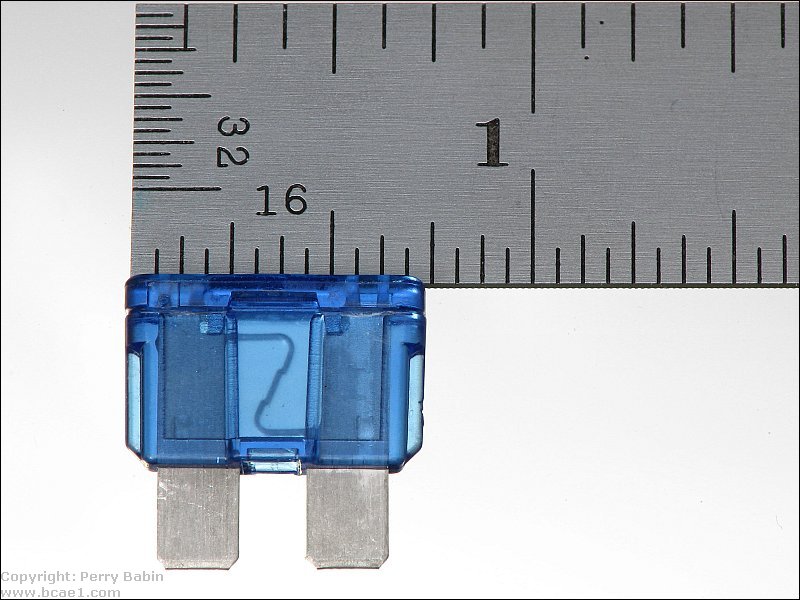
ATC/ATO FUSES:
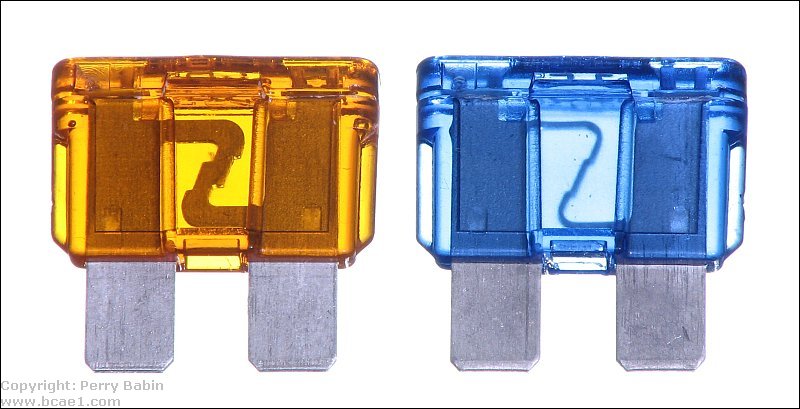
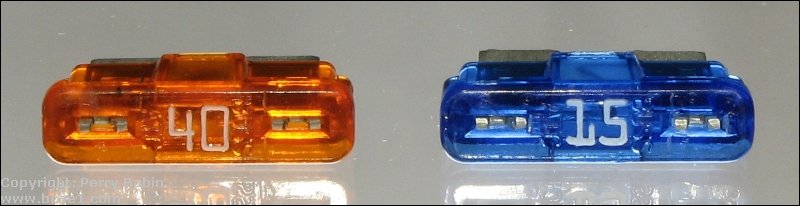
The fuses below are ATC/ATO fuses. The fuse on the left is a 40 amp fuse. The fuse on the right is a 15 amp fuse. These fuses (like most plastic fuses) are also color coded. The exact color may vary from one manufacturer to another but the basic color (blue, orange, red, yellow...) is indicative of the fuse's rating. Click HERE for size. Click HERE for the datasheet.
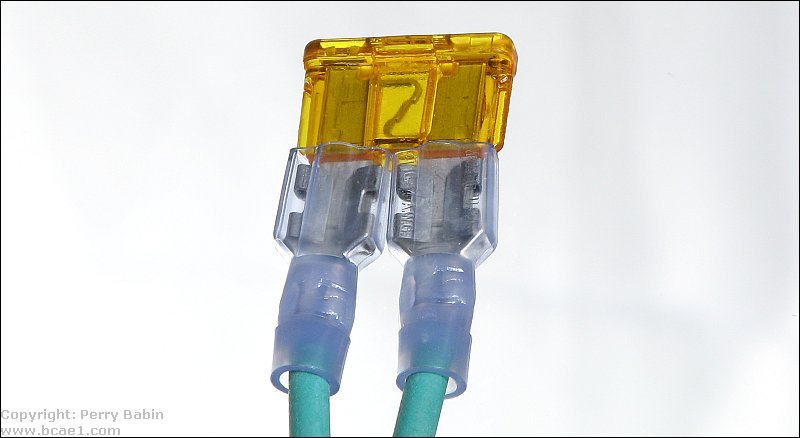
Too many people use the excuse that they didn't have a fuse holder when they were installing their equipment so they installed it without a fuse. Virtually everyone will have the push-on terminals that go on speakers. Those can be used with ATC/ATO fuses as a makeshift fuse holder. If you do this, use either a wire-tie or tape to hold the wires together about 4-6 inches from the fuse. This will reduce the chance that the terminals will pull off of the fuse. If your terminals are not fully insulated like the ones in the photo, use electrical tape to prevent them from making contact with anything else.
ATM Fuses:
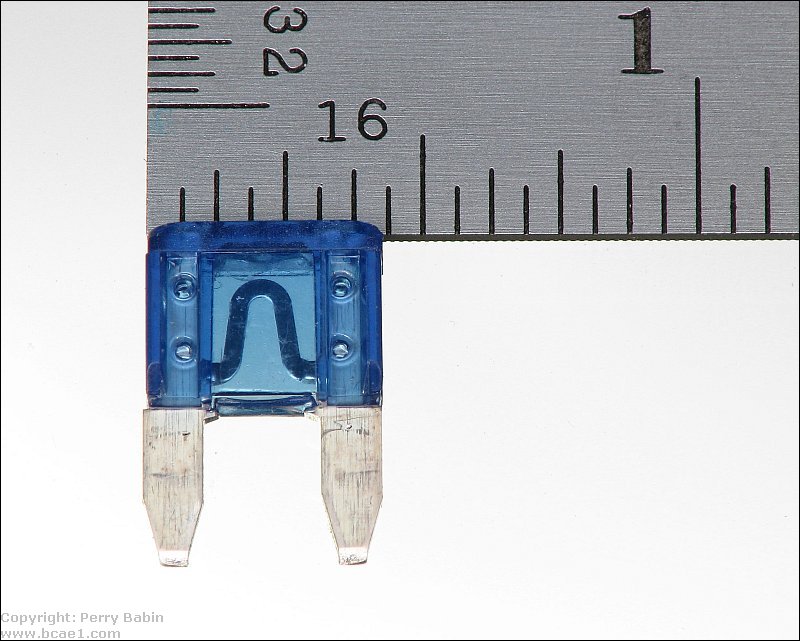
These fuses are widely used in automobiles and head units. They are available in sizes ranging from 2 amps to 30 amps. As with all of the plastic fuses, the color of the plastic casing is an indicator of its rating. The fuse in the following photo is a 7.5 amp fuse. The technical name for this type of fuse is ATM but most people refer to them as mini-ATC or mini-ATO.
The next photo shows a low profile ATM fuse (ATM-LP). These are becoming more popular in new vehicles.
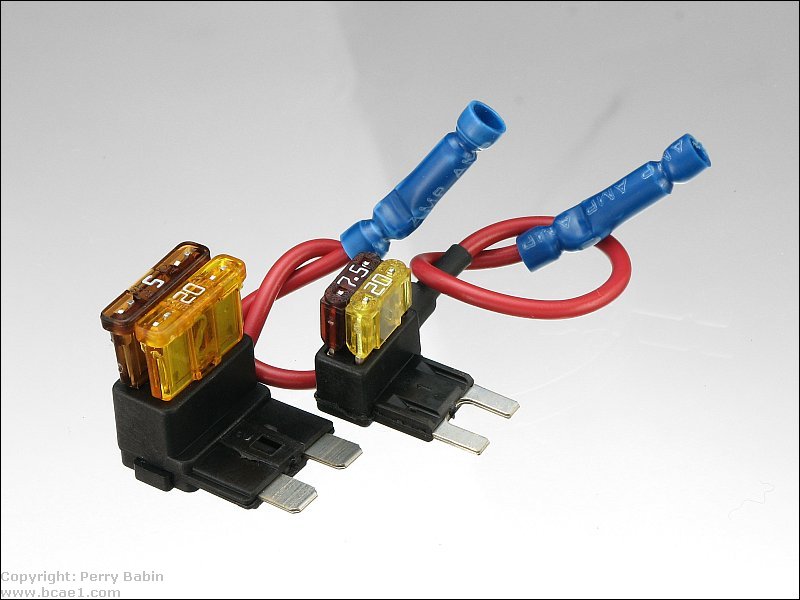
Fuse Taps:
Many times, you'll need to get power to a new accessory but won't want to run a wire to the battery. The following is one solution that works relatively well where there is sufficient space in the fuse panel. You pull a fuse, insert the tap and connect the accessory to the red wire. It sounds simple enough but there are a few things you need to know to ensure that there are no problems. You need to make sure that the fuse that you're using for the tap is rated well above the current required for the device/equipment you're installing. The wire in the vehicle is likely barely big enough for the fuse that's protecting it. You wouldn't want to use this in a slot that's supposed to have a 5 amp fuse for a 15 amp device. There are two ways to install this tap. If you install it with the terminal nearest the bottom-left of the image in the 'hot' side of the fuse slot (the side of the fuse holder that has 12v when no fuse is in the slot), each fuse will be pulling directly from the vehicle wiring. In this configuration, you must not use a fuse larger than the fuse that the slot originally had. If you install it with the terminal nearest the red wire in the hot side of the fuse slot, it's going to be a bit safer because you will pull current through both fuses and if the main fuse (the one nearest the terminals on the tap) is the original fuse size, you will never be able to pull too much current through the wiring in the vehicle. these are mainly for use to supply low current devices like radar detectors, LED light bars, and chargers for MP3 players. For devices that draw more than 5 amps, I'd suggest running a dedicated wire to the battery (with the appropriate fuse at the battery).
As a side note, the fuse slots in these particular taps were especially tight. This made it difficult to get the fuses in. I wouldn't expect cheap fuses to survive removal (they break off in minimally tight holders). Use Bussmann or Littelfuse fuses or have a replacement tap available if the fuse blows.
The following fuse taps are also a good choice. The tab on the slot ensures that the connection to the fuse is reliable. You wouldn't use two taps on the same fuse. They are there to try to show what they look like from all angles.
The following type of tap wraps around the tab on the fuse. Those should not be used. When installed, they will spread the terminals in the fuse box. After the terminals are spread, there's no way to tighten them again. This means that you would never be able to install a fuse without a tap on it.
Cartridge Fuses:
You won't use a fuse like the next one to install your stereo but you may blow one. If you do and have to call around to try to find one, it's a JCAS/FMX fuse (a 50 amp is shown).
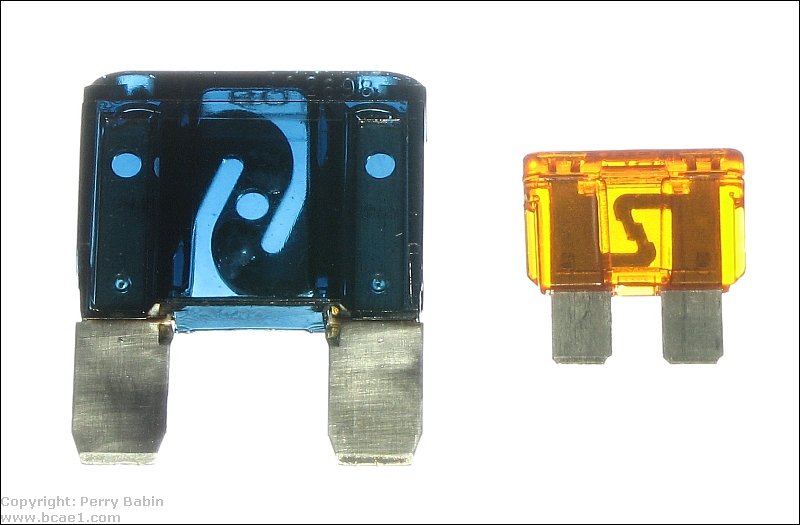
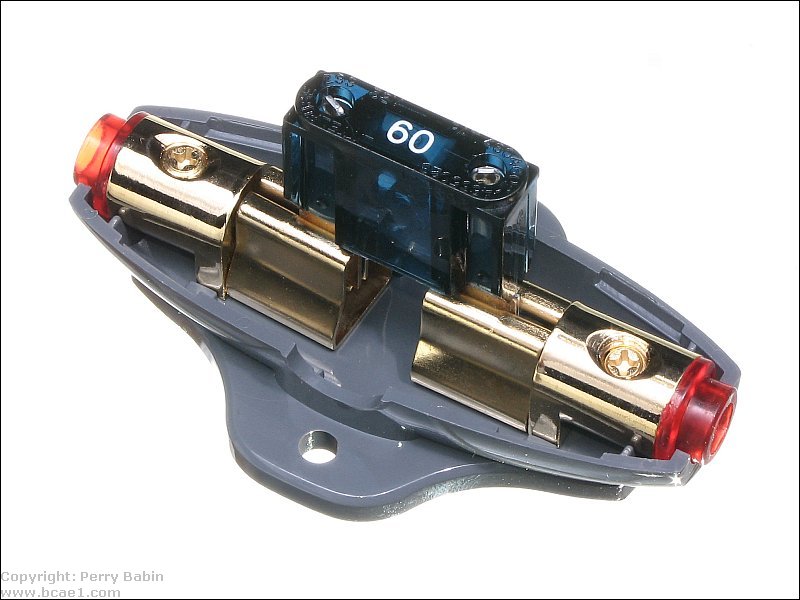
MAXI Fuses:
The image below shows a Maxi fuse and the more common ATO/ATC fuse (for size reference). The Maxi fuse is available in current ratings between 20 and 80 amps. These fuses are, in my opinion, the best choice for systems/amplifiers drawing between 40 and 80 amps of current.
Glass Fuses
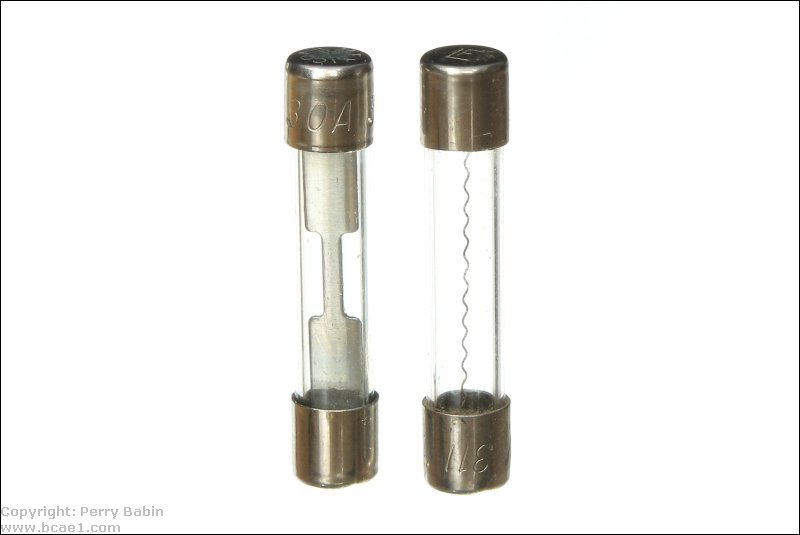
AGC Fuses:
The Image below shows 2 glass AGC type fuses. These fuses measure 11/4" X 1/4". This type of fuse is commonly used in older vehicles and mains powered equipment. You should notice that their physical size is the same but their 'fusible elements' are very different. The fuse with the wider element is a 30 amp fuse. The fuse with the smaller fusible element is a 5 amp fuse. Although both of these fuses are similar physically, they are not interchangeable.
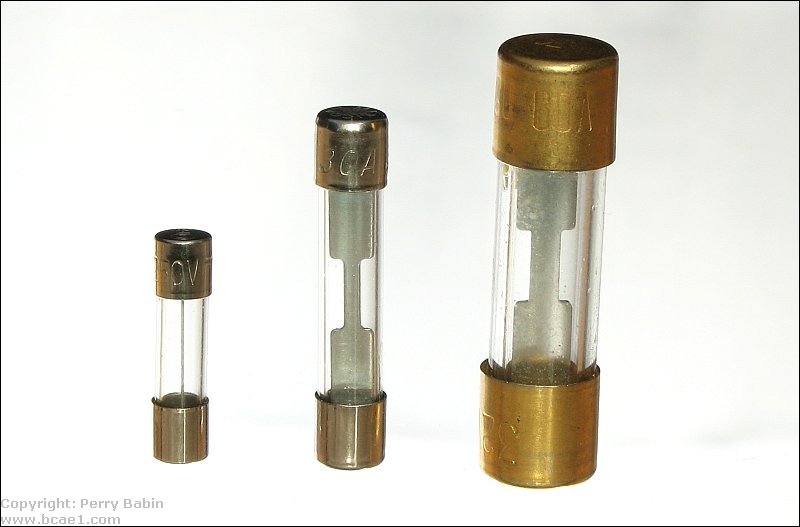
5mmx20mm fuses:
You probably won't find too many 5x20mm fuses in car audio equipment. The smallest fuse in the next image is a 5x20mm fuse. These are much more common in home audio equipment than car audio equipment but I included them so that you will know what they are.
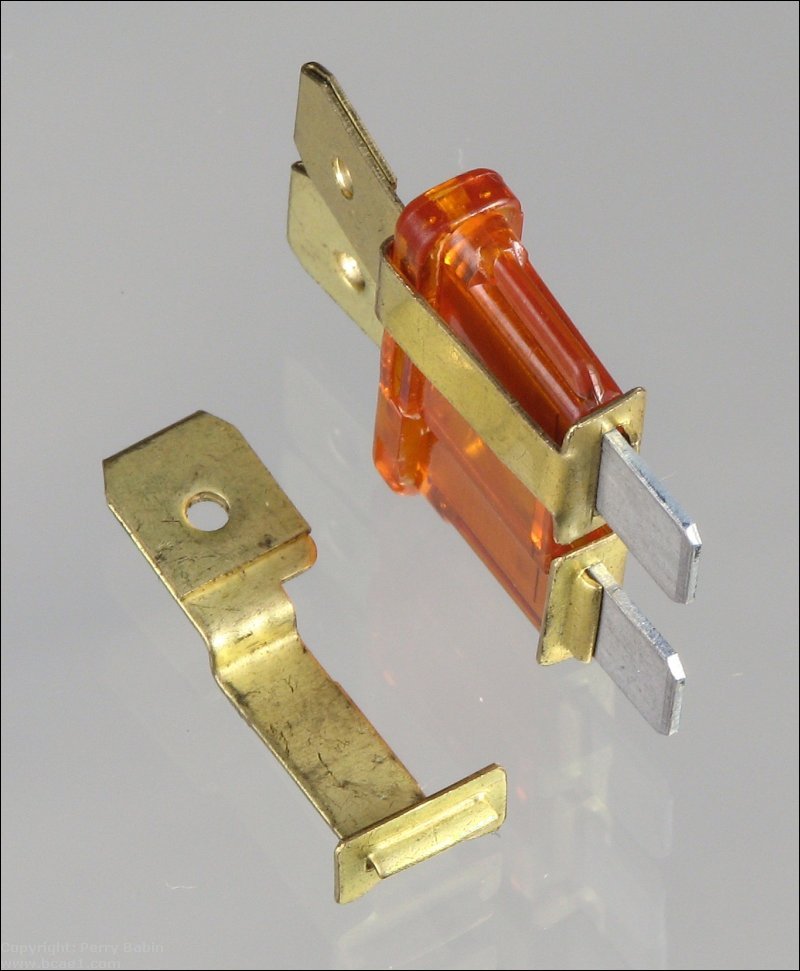
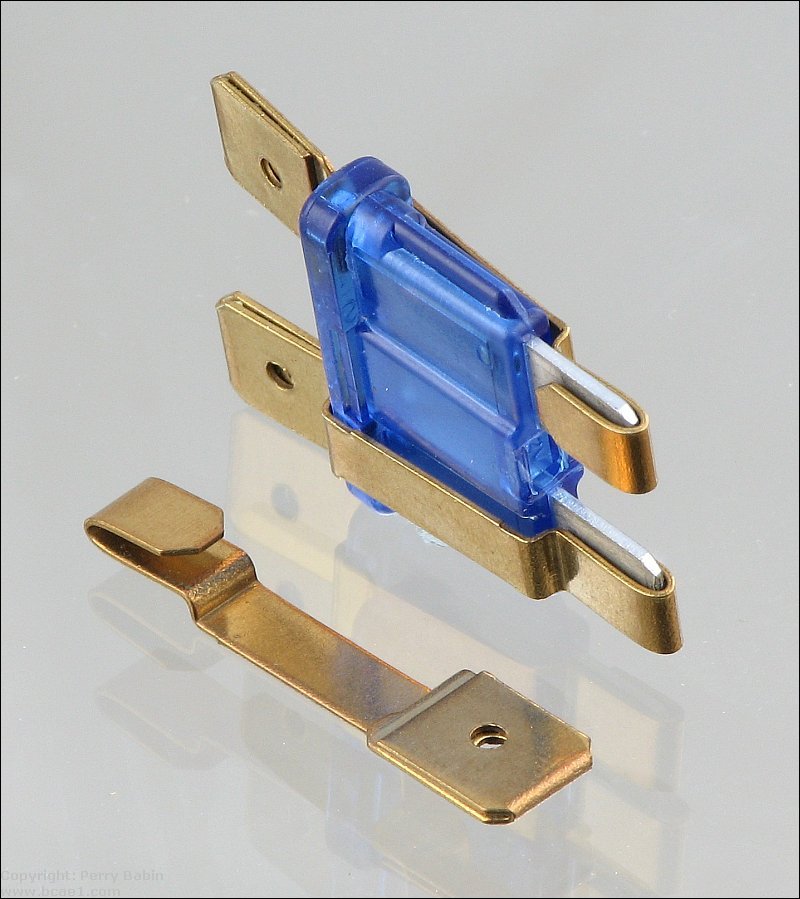
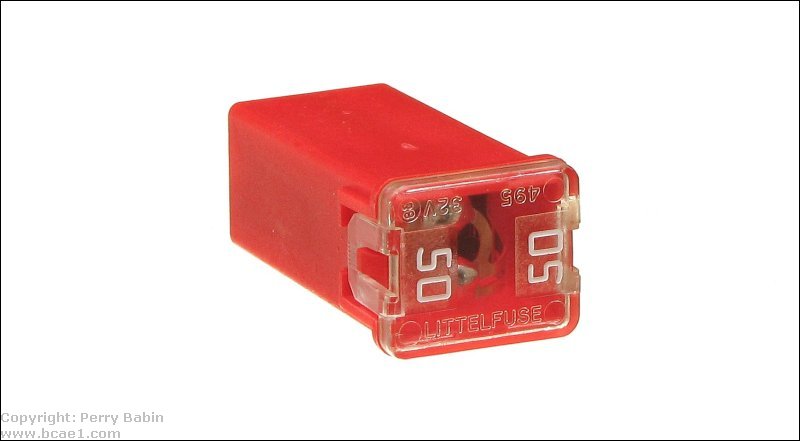
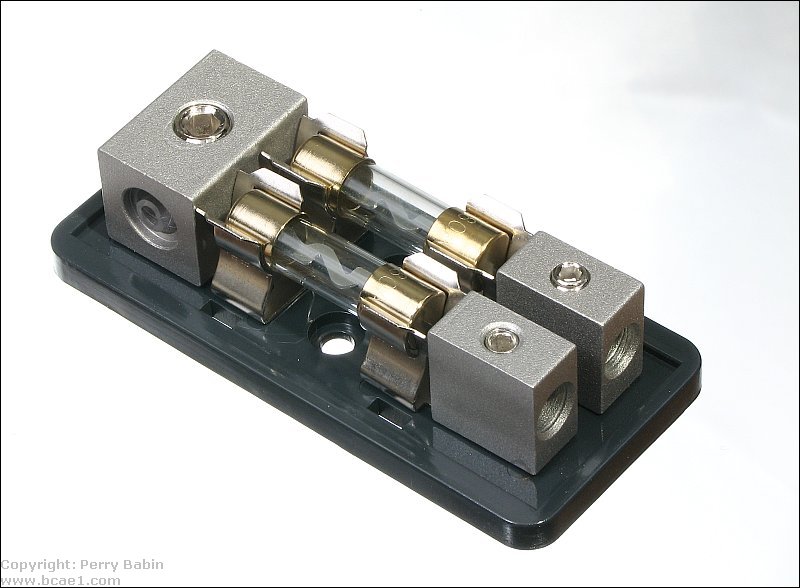
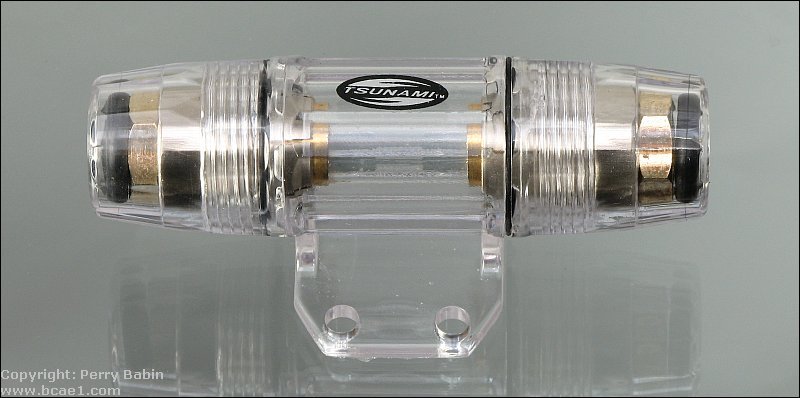
AGU Fuses:
The largest fuse in this image is the glass AGU fuse which measures 11/2" X 13/32". These fuses are available in current ratings between 10 and 80 amps. AGU fuses can be used to protect the main power wire of small to moderately high power systems. They can also be used to protect amplifiers capable of producing up to about 750 watts RMS.
From left to right: 5x20mm, AGC and AGU fuses
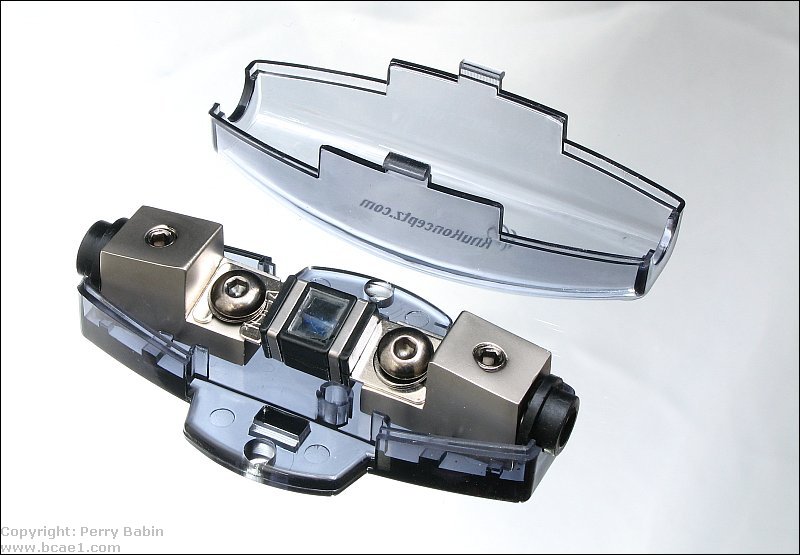
AGU Fuse Holders:
The problems listed above may be compounded if a poor quality fuse holder is used. I would strongly warn against using in line waterproof fuse holders. I said earlier that the AGU fuses may have a problem with heat buildup in their end caps. Using a fully enclosed waterproof type of fuse holder will prevent heat from escaping and will make the problem even worse. Using an open type of snap in fuse holder MAY help a poor quality fuse function properly. Using a good quality fuse in an open type snap in fuse holder will very likely work precisely as it should with little or no chance of overheating. The following is an open fuse holder (not water-tight but has a cover).
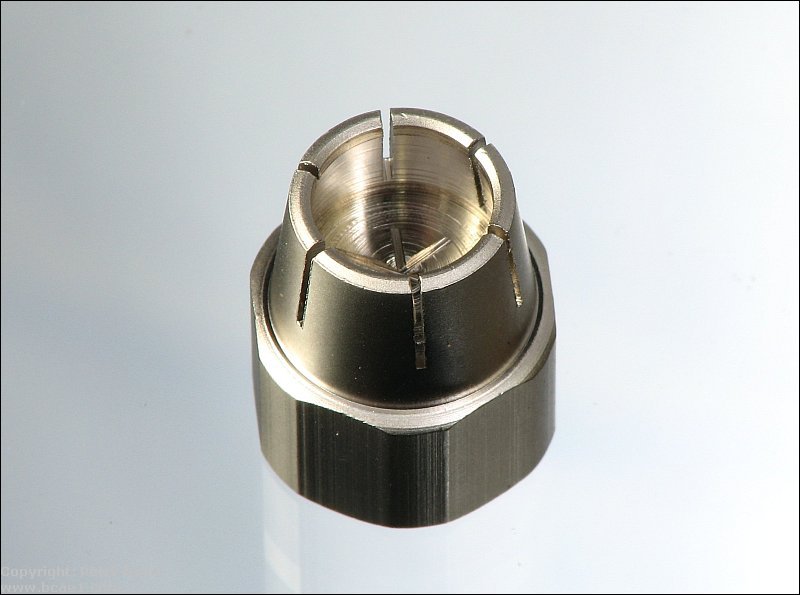
The following fuse holder is one of the better designs for a fuse holder of this type but the salesman told me that they still have more trouble with these than the open fuse holders. I have another sample ordered that isn't designed as well as this one. It's one that the shop won't use because it causes so many problems.
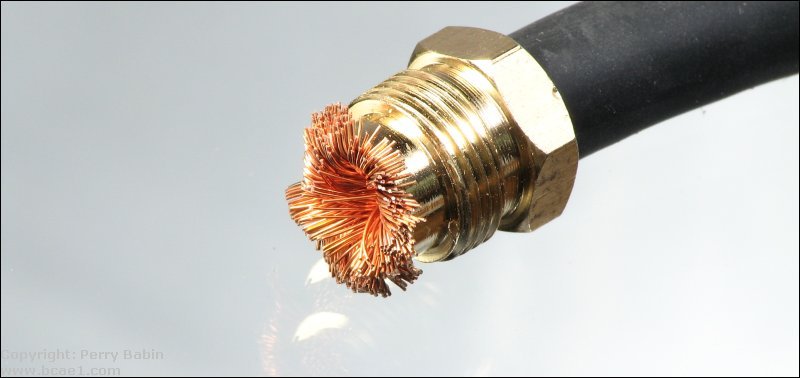
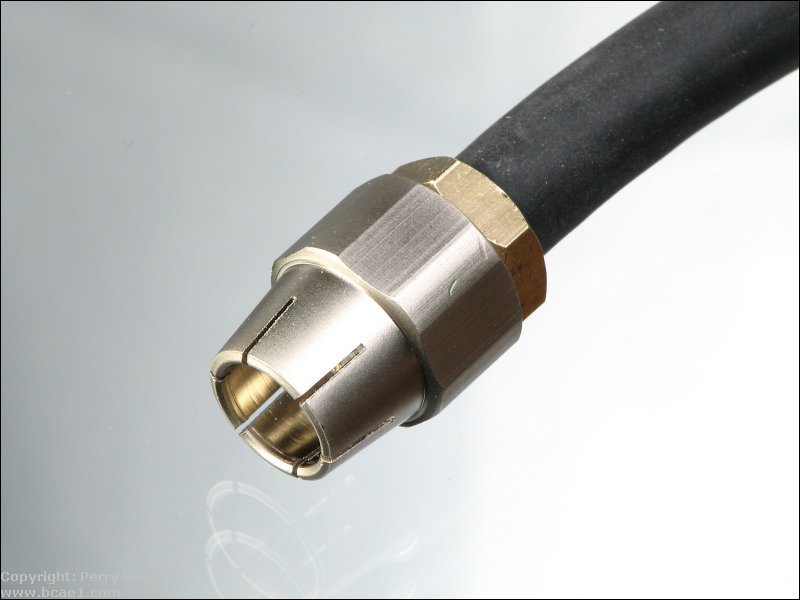
This is the end terminal. This one has heavy metal that grabs the fuse very tightly. This is good because it keeps the resistance low at the point where they make contact. Cheaper ones have thin metal 'fingers' that make contact with the fuse.
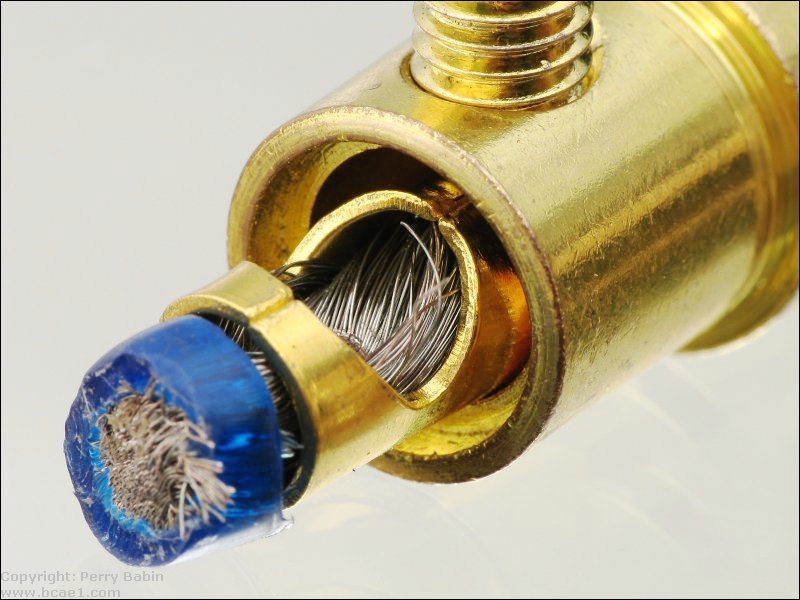
Many fuse holders use a set screw to hold the wire. This one uses a bushing to hold the wire. The wire is folded over the end of the bushing and then the terminal is threaded onto the bushing and wire. When tightened, it provides a good connection (typically better than a set screw).
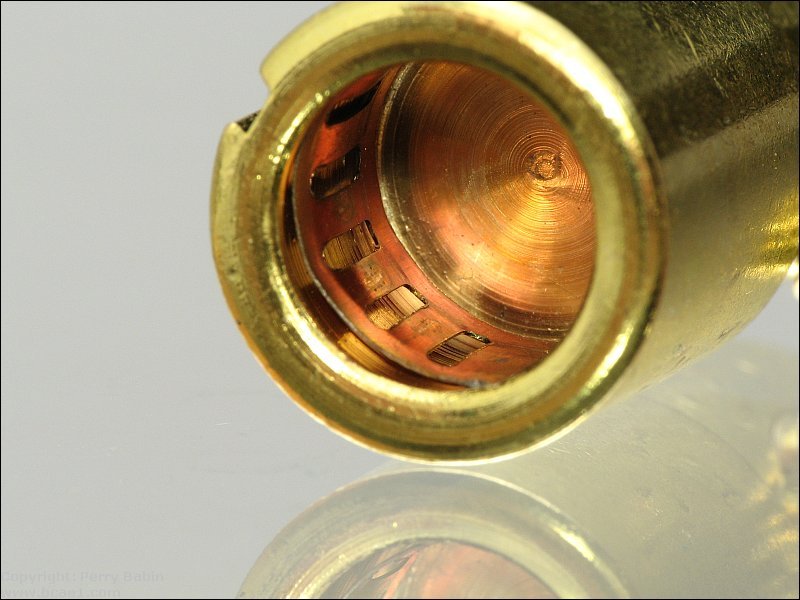
The following images show the worst of the worst in terms of reliability. It uses the 'fingers' to bridge the connection from the fuse to the brass terminal. This will introduce resistance that will cause heating. The second and third images show the bushing that allows smaller wire to be used. The bushing just adds one more connection that introduces more resistance. The third image shows how the wire is damaged from overheating. The set screw was tight but it still overheated due to high resistance. The terminals on the previous fuse holder were much better than these and not that much more expensive (~$9 for the good one and ~$6 for the cheap one).
Common Symptoms of a Defective AGU Fuse:
I have received a lot of emails and have seen a lot of examples of defective fuses. When you have an amp that won't power up, you need to check the voltage on the terminals of the amp. This is the procedure:
Set your multimeter to DC volts. Place the black meter probe on the ground terminal of the amp (not on the point where the ground wire connected to the vehicle). Place the red probe on the B+ (battery) terminal of the amplifier (not on the wire, not on the distribution block or the fuse in the distribution block). You should read approximately 12 volts. If you do not, the fuse at the battery or in the distribution block is likely blown.
Switch the head unit on (so the amp will have remote voltage applied), touch the red probe alternately to the B+ and remote terminals of the amp. If the voltage is below ~11 volts on either the B+ or remote line, you need to check the wiring feeding whichever line is too low. This includes all connections at the battery, at the fuse holders and at any butt connectors that are in the line.
When performing this test, if you find that the voltage on the B+ line drops when the head unit is on but not when it's off, you likely have a defective AGU fuse.
MAXI Fuse Holders:
There are several types of MAXI fuse holders. The best typically have screws to ensure that there is sufficient pressure on the tabs to keep the resistance as low as possible. The fuse holder in the photo below is an over-grown cousin to the standard inline ATC/ATO fuse holders. This is a very good holder but not fancy enough for most people installing a stereo in their vehicles.
The next image is the type most commonly used. The spring clips are not as tight as either the one above or the type with a screw but will work for most situations where the average current draw isn't near the fuse rating.
ANL/ANE Fuses:
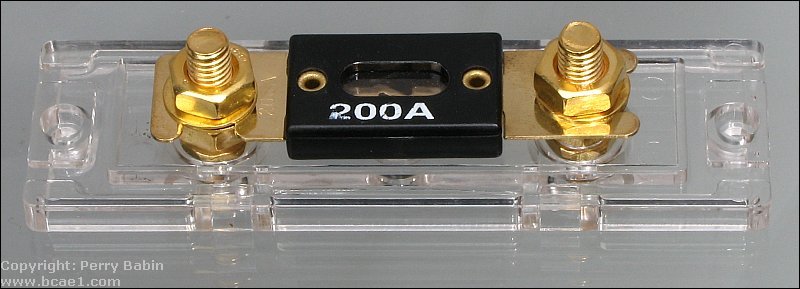
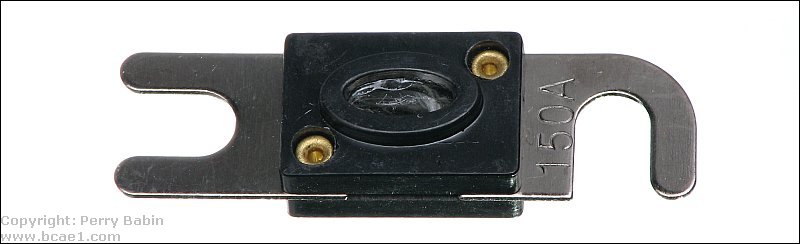
ANL type fuses are the most common types of fuses used to protect the main power wire in car audio systems. ANL fuses are available from Bussmann in sizes from 35 amps to 750 amps. The following photo shows a 200 amp ANL type fuse. In this fuse holder, there is no wire-terminal block. The wires would have ring terminals on them and then screwed down tightly onto the fuse.
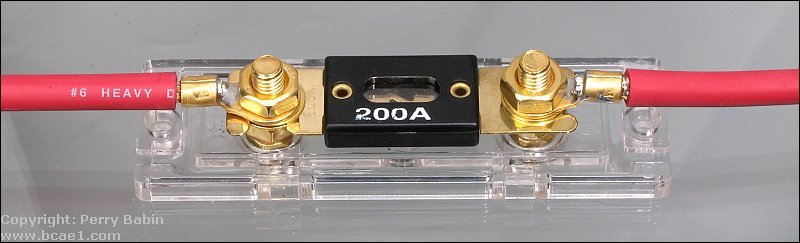
If you read all of the previous information on this page, you will see a very serious problem with the next image. The wire is 6g but it has a 200 amp fuse. Of course, there's no danger here because it's just a photo but in a vehicle, this combination may not offer any protection against an electrical fire.
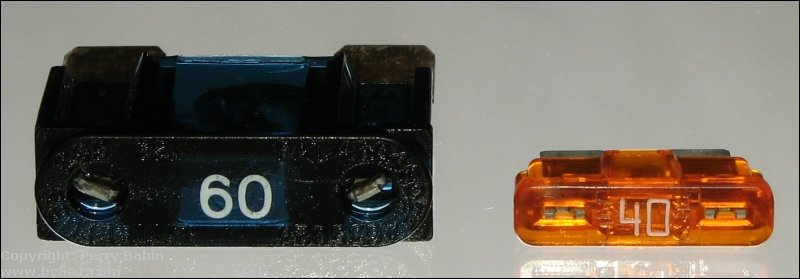
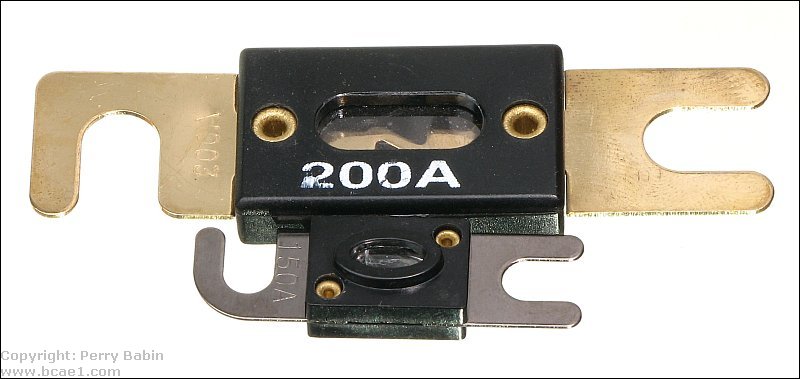
Fuses of this size and configuration are referred to as either a MIDI, AMI or mini-ANL fuses. The one in the holder has a blue LED that illuminates when the fuse blows.
The following photo shows the difference in size between the ANL and mini-ANL fuses.
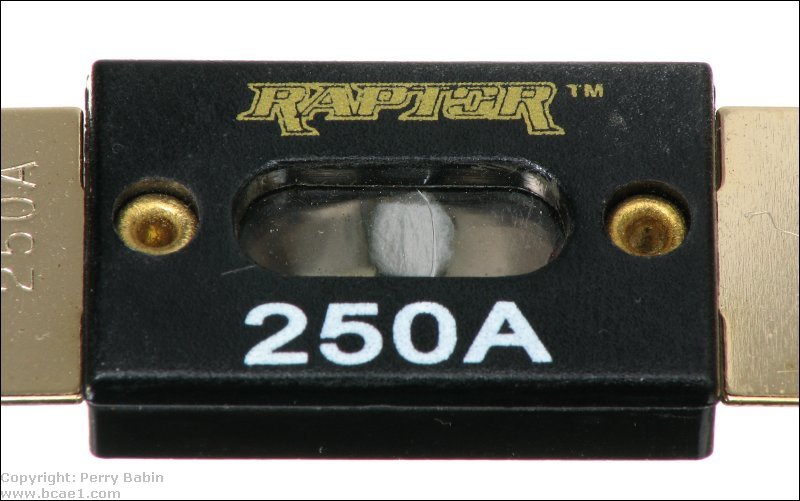
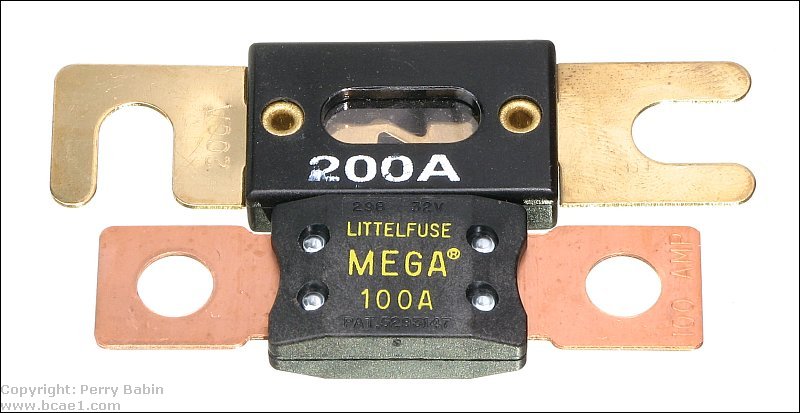
MEGA®/AMG Bolt-on Fuses:
These fuses are not really popular in car audio but are widely available and may be an option for high current protection in the main power line (from the battery). They are available in sizes ranging from 100-250 amps. As you can see, there is no big fancy block of metal with set screws here. This type of fuse requires ring terminals. In commercial/industrial applications, this is a better option because there are fewer points of connection. You'll never see the bling type fuse holders where safety and reliability are of the utmost importance.
The following image shows the difference in size between the MEGA fuses and the ANL fuses.
Note on Blown Fuses
When a fuse blows (even one that has been perfectly capable of handling the current requirements of a given piece of equipment), many people will replace it with a fuse of equal size without thinking (which isn't necessarily a bad thing). Then, if it instantly blows again, they go to the next larger fuse size (now, that IS a bad thing). They don't think for a minute that the fuse that just blew was the same as the one that worked fine for a long time. They don't think that something just might have changed which is now causing the amplifier to pull significantly more current.
If you have a piece of equipment (especially an amplifier) that has played fine for a while with a given size fuse and the fuse blows, do not replace it with a larger fuse. I'd actually suggest temporarily replacing it with a fuse ~1/2 the rating of the one that blew. If you have a 200 watt amplifier that's been running fine with a 30 amp fuse and the fuse suddenly blows, replacing it with another 30 amp fuse is fine but I'd suggest trying a 15 amp fuse first. With the volume set to its minimum position, the amp should power up and idle with the smaller (lower rated) fuse. It should also play cleanly at a low to moderate volume. If the fuse blows with no volume, there is very likely a problem with the amplifier. If it does not play cleanly, there may be a problem with the speaker(s) or wiring. If it blows the fuse at very low volume, there is most likely a shorted speaker or a short in the wiring.
For amplifiers... What happens many times is that a component fails (often an output transistor) and the fuse blows. Since the fuse has likely been passing a fair amount of current (remember, the amplifier was playing loud enough to fail) the fuse's element was at a higher than ambient temperature and allowed the fuse to blow relatively quickly. When you insert a new (cool) fuse, it will take more to blow it even if it was identical to the one that originally blew. If the power supply components in the amp are operating at the upper end of their safe operating area (common with budget amplifiers), the new fuse might not blow before the power supply components (remember that the amplifier probably has a shorted output transistor). If the power supply components are destroyed (along with the output transistors), the repair bill may be significantly higher (maybe $100 instead of $60). Checking to make sure that everything is OK with the smaller fuse will assure you that no more damage is done.
You should remember:
1.NEVER replace a fuse with a fuse rated for higher current than the recommended fuse.
2.The physical size of a fuse is NOT an indicator of its current carrying capacity.
3.Just because a 30 amp fuse fits in the place of a blown 5 amp fuse, that does NOT mean that it's a suitable replacement for the 5 amp fuse.
This site was started for pages/information that didn't fit well on my other sites. It includes topics from backing up computer files to small engine repair to 3D graphics software to basic information on diabetes.
This site introduces you to macro photography. Macro photography is nothing more than the photography of small objects. It can take quite a while to understand the limitations associated with this type of photography. Without help, people will struggle to get good images. Understanding what's possible and what's not possible makes the task much easier. If you need to photograph relatively small objects (6" in height/width down to a few thousandths of an inch), this site will help.
If you're interested in air rifles, this site will introduce you to the types of rifles available and many of the things you'll need to know to shoot accurately. It also touches on field target competition. There are links to some of the better sites and forums as well as a collection of interactive demos.
This site helps anyone new to computers and anyone with a basic understanding of computers with a desire to learn more about the internal components of a computer. If you have a computer that you'd like to upgrade but don't know where to start, this is a good site for you.
This site is for those who want to begin racing karts but don't fully understand how the various parts work. It's mostly interactive demos that show how the various parts of the kart work.
Click HERE to visit a friend's new car audio tech site.


 From my experience (25+ years in the amp repair business), it seems that most people don't fully understand what a fuse does and why it's necessary. This page will help you to understand fuses and will make you fully realize the consequences of using a fuse that's rated higher than what is recommended by the manufacturer (for electrical devices) or for the current carrying capacity of the wire in the circuit. Virtually every type fuse and fuse holder used in car audio will be shown below and most will have descriptions telling where it's good to use and when a different fuse may be a better choice.


