|
Bridged Head Unit Speaker Outputs
If not most, many of the head units which are damaged, are damaged due to incorrect connection of the speaker output wires. This is especially true with units labeled as "high power". The output of a high power head unit is set up in a bridged configuration. You remember how the bridgeable amplifier drove signal into both the positive AND the negative terminals of the speaker. You should also remember that the speaker received much more power in the bridged configuration (theoretically 4 times the non-bridged power). The same thing applies in a high power head unit. The biggest difference is that the radio has only the battery supply voltage (~12v DC) with which to work.
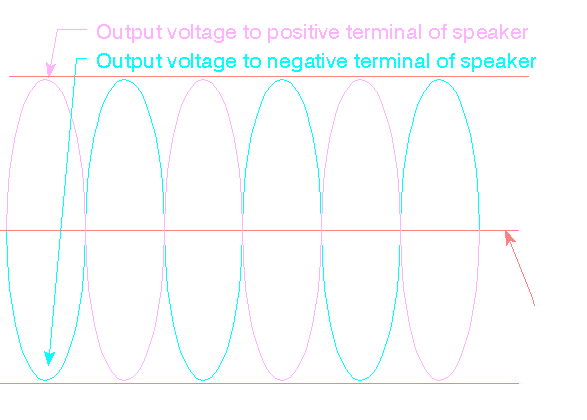
Reference Point:
In the bridgeable amplifier, one speaker terminal was driven above the reference point (ground) while the other was driven below the reference (for each half of the cycle). You cannot drive the speaker terminal below ground in the radio because there is no "negative" voltage in the radio (the negative voltage is developed in the amplifier's switching power supply). The reference point has to be somewhere between ground (0 volts) and the supply voltage (12v DC). Ideally this would be (and is) 6v DC. This allows the audio's signal to swing equally above and below the reference (6v DC). The diagram below shows what a sine wave, driven to its maximum 'clean' level, looks like. The purple line would be the output driven into the positive speaker terminal. The cyan line is the signal driving the negative speaker wire. As you can see, the entire battery voltage can be applied to the speaker.
Motivating the Speaker:
In this section, the cone of the hypothetical speaker will be forced outward when the voltage on the positive speaker terminal is more positive than the voltage applied to the negative terminal. In the diagram below, the yellow line indicates the instantaneous voltages which would be present on the speaker's terminals. Remember that the purple line indicates the voltage applied to the positive speaker terminal and the cyan line indicates the voltage applied to the negative speaker terminal.
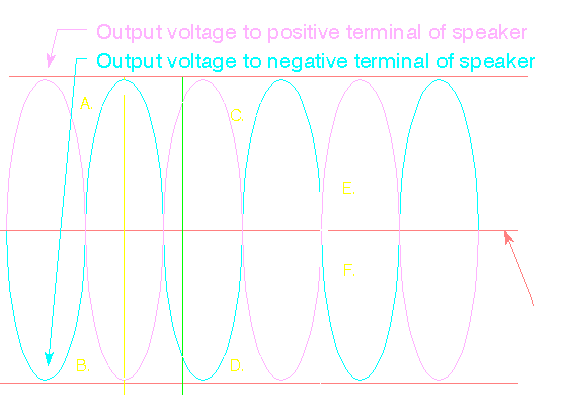
Point 'A' indicates a voltage of approximately 12 volts on the negative speaker wire. Point 'B' indicates that the voltage on the positive speaker terminal is 0 volts. This means that there is 12 volts across the speaker terminals. Since the voltage on the positive terminal is less than the voltage on the negative terminal, the speaker would be pulled in from its point of rest. It would also be at its maximum inward excursion. Well... as far as it could be driven by this amplifier (before clipping).
At point 'C' on the green line the voltage on the positive speaker terminal is approximately 11 volts. The voltage on the negative speaker terminal is approximately 1 volt. The total voltage applied to the speaker terminals is approximately 10 volts. Since the voltage on the positive speaker terminal is higher than the voltage on the negative speaker terminal, the speaker would be pushed outward from its point of rest.
At the white line, the voltage applied to both speaker terminals is approximately 6 volts dc. Since there is no voltage difference across the speaker terminals, the speaker is in the center point of its travel (effectively at its point of rest).
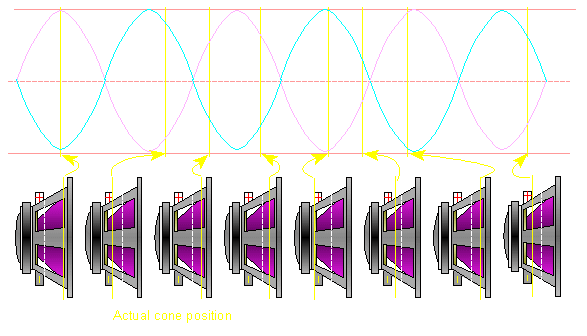
And if you want a graphical representation of the cone movement...
6 Volts DC on Speaker Wires:
With the volume control at its minimum level (no audio), the D.C. voltage on each of the head unit's speaker output terminals (positive and negative for one speaker output) would be at 6v DC. This is why it is critical that no speaker output wire/terminal be allowed to touch to ground. The head unit's internal amplifier will try to pass as much current as it takes to keep the speaker reference at 6v DC. If the resistance to ground (0v DC) is essentially 0 ohms (due to a speaker wire coming in contact with the vehicle's chassis), the output chip/transistors will pass enough current to ground to cause catastrophic failure of the unit.
Power Output:
As you can see, the entire supply voltage (~12 volts) can be applied to the speaker. This results in an effective peak voltage of 12 volts.
First you must convert peak voltage to RMS voltage:
RMS = Peak * 0.707
RMS voltage from speaker outputs = 8.5 volts
If you use Ohm's Law to calculate the power output:
P = E2/R
P = 8.52/4
P = ~18 watts RMS
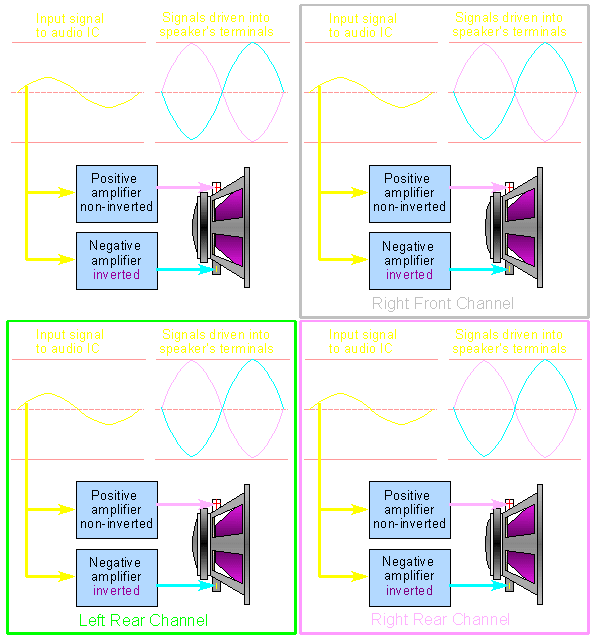
Eight Channels of Amplification:
The following diagram shows how the bridged output for 4 channels uses 8 channels of amplification.
|


